There is great news coming for all IFR pilots who utilize the multitude of uncontrolled airports across the US.
From the beginning of aviation time, the process of getting an IFR clearance at an uncontrolled airport has been arduous. For airports under Center controlled airspace, you had to dial the Clearance Delivery line, which ported you to Flight Service. Then you sat on hold till someone picked up, gave them your information, then sat on hold again while they called the Center. Finally, after what seemed like an eternity, the briefer came back with your clearance and departure instructions.
On a busy day, this could take ten to fifteen minutes, which can be really annoying when a pilot is trying to take off and get somewhere.
In my opinion, this also led to a lot of unsafe (and probably illegal) VFR departures when conditions were either clearly IFR or unsafe if buzzing around at low altitudes and high speeds in Class G airspace.
RCO’s (Remote Communications Outlet, 2nd column, halfway down) and Clearance Delivery Frequencies are in place at some airports, but by and large, the above process was how you got your clearance.
Departing from a TRACON controlled airport usually was easier and quicker. The TRACON has a direct line that is available for pilots to call to speak directly with a controller, but not all these phone numbers are published.
As of June 20th, the FAA is implementing this at all uncontrolled airports. On the chart supplement for all IFR charts across the US (not including Alaska), the FAA will publish the Center phone numbers and remaining TRACON phone numbers for pilots to call directly to receive their IFR clearances and departure instructions, and to cancel their IFR flight plans (A lot of TRACONs already have their phone number published).
Flight Service will no longer be taking IFR flight plan cancellations. Pilots will still be able to cancel with Center or TRACON in the air, but will now need to call the number on the chart supplement on the ground for cancellation.
Now that the FAA is modernizing this process, hopefully more pilots will decide to call on the ground for their clearance on a MVFR or IFR day instead of taking off and trying to pick it up in the air.
Finding the Chart Supplement on Foreflight
Where is the Chart Supplement? I’m so glad you asked.
Before iPads, everyone carried around the green book, officially known as the Airport/Facilities Directory, or A/FD. With the advent of Foreflight & Garmin Pilot & others, all the information in the A/FD is now easily accessible in each of the Apps.
Foreflight may integrate the clearance delivery phone number for each airport into their airport information page, but in the meantime, here is how to find the Chart Supplement.
On Foreflight, go to Documents along the bottom of the App. In the Catalog on the left, tap FAA. Chart Supplement will be about 1/3 of the way down the page. Tap that, then tap the region you need and it will download into your Documents Library.
Once it is downloaded, check the Table of Contents for FAA Telephone Numbers and NWS. Go to that page and scroll through to find the Center or TRACON you are needing, then dial the number.
The Malibu & M-Class Owner’s and Pilot’s Association recently released their MMOPA Vision Video. It is a great video detailing the history of the Piper PA46 & the history of MMOPA. The PA46 would have ceased to exist without the founding of the original Malibu Coalition.
Checkout the video above (and Texas Top Aviation’s Hank Gibson even gets a cameo!).
The Malibu & M-Class Owner’s and Pilot’s Association recently released their MMOPA Vision Video. It is a great video detailing the history of the Piper PA46 & the history of MMOPA. The PA46 would have ceased to exist without the founding of the original Malibu Coalition. Checkout the video above (and Texas Top Aviation’s Hank…
Takeoff briefings are one of those things that most pilots are taught when they first learn how to fly, but once they get into flying themselves around, quickly fall by the wayside. There is a reason student pilots are instructed to perform a takeoff briefing before departure. It gets them thinking about what the plan is after they get off the ground and what to do if something goes wrong.
Takeoff briefings are a good habit to get into. Airline crews do a takeoff briefing before every departure, even though they have performed a takeoff in that particular airplane thousands of times. It enhances safety and provides repetition, keeping that knowledge at the forefront of the crew’s minds.
In general aviation, a takeoff briefing should cover what the takeoff procedure is, what the abort plan is, and what the plan after takeoff is.
Takeoff Procedure
Most pilots fly the same airplane all the time, so the familiarity with what goes into a takeoff is there. But, habits should be formed to brief the takeoff procedure as part of the takeoff briefing. It doesn’t need to be extensive, just covering the basics of how the airplane is getting off the ground. Something like this:
Throttle setting (if turbo charged, will full throttle cause an overboost?)
Rotate speed
Expected takeoff roll
That’s it. Nothing fancy for the takeoff procedure.
Abort Plan
What is the plan if something goes wrong? It doesn’t have to be an engine failure, maybe the engine coughs when full power is added or maybe the engine doesn’t produce peak RPM. Maybe the takeoff roll is longer than anticipated and something doesn’t seem right. Maybe on climb out a door pops open. Maybe the engine fails at 1,000 feet. It’s good to keep the plan in the foreground for what to do if an abnormal or emergency situation takes place.
Brief the aborted takeoff procedure
Pick an abort point on the runway based on the expected ground roll
What is the procedure if the airplane isn’t off the ground by then?
What is the procedure if the engine quits on the runway?
Brief the engine failure procedure at low altitude
If the engine fails over the runway, will you try to land on the runway?
What altitude would you elect to turn back as opposed to landing straight ahead?
If the plane is too low to turn back, would you land straight ahead or aim left or right?
What airspeed will you aim to hold if the engine fails?
In a Cirrus, what is your minimum parachute deployment altitude?
After Takeoff Plan
After the airplane is off the ground, what’s the plan then? Are you staying in the pattern or departing the area? Do you need to adjust your power at a certain altitude? What altitude are you climbing to? What heading are you going to fly? Is your flight plan in your GPS? This is an excellent time to set up altitude and heading bugs if your airplane is so equipped.
Get in the habit of doing a takeoff briefing before you call the tower or announce your departure. It get’s your mind focused on the task at hand and then what is going to be happening next.
Takeoff briefings are one of those things that most pilots are taught when they first learn how to fly, but once they get into flying themselves around, quickly fall by the wayside. There is a reason student pilots are instructed to perform a takeoff briefing before departure. It gets them thinking about what the plan…
Just south of the equator in the mountains of Papua, Indonesia on the island of New Guinea, pilots spend their days carrying food, building supplies, doctors, pigs, and passengers into some of the most remote and extreme airstrips on the planet. That’s where I fly.
Each morning I load my Cessna Grand Caravan with 2,600 lbs of (insert strange cargo here) and depart my home base of Wamena just after the sun sends its first rays of light across the waking skies above. I spend my day winding through narrow valleys and crossing high altitude mountain passes with building clouds and poor communication, only to land on short, narrow airstrips with steep slopes and little room for error. Most of these one-way in, one-way out runways require me to commit to landing well before touchdown due to terrain that is too close to allow for a safe go-around. Everything better be right when I cross that decision point or I could be in for some excitement.
The need to keep wide margins of safety might seem obvious in environments like mine, but that doesn’t make them any less important where you fly. You may be a new pilot or an old timer, but keeping your margin should always be on the top of your priority list.
Let’s unpack this further. Margin is not just maintaining the regulatory requirements for cloud clearances or minimum altitudes. It’s more than planning for an alternate airport or carrying the required fuel reserve. Margin is breathing room. It is that extra maneuvering room, the Plan C, the well thought out options that provide you multiple “outs” in any given situation. Margin is what gets you home when things take a turn for the worse.
Margin comes in all shapes and sizes. For myself it includes maintaining double my required turn radius in narrow valleys or choosing not to land when my groundspeed is just 1 knot too high at a short and slippery airstrip. For you, it could be determining a ceiling or visibility minimum requirement that is more conservative than the legal ones or setting a wind limitation that you know is reasonable. When it comes down to it, keeping your margin means you don’t push to the ragged edge of your skill or the aircraft’s capability.
Margin can also refer to your mental or emotional capacity. Are you mentally prepared to divert and miss that important event because the weather is getting bad? Are you ready to handle the disappointment of passengers when you arrive over your airstrip and choose not to land due to approaching rain or a factor that is difficult for a non-pilot to understand? Are you willing to cancel a flight on an important client because you are coming down with a cold or didn’t get adequate sleep? As the PIC of your flying machine, you alone are responsible for the safety of the aircraft and the people on board and those are the tough calls that only you can make.
Fatigue, overconfidence, and complacency are the biggest obstacles to keeping your margin. They are all very subtle dangers and you may be experiencing them without even recognizing it. Fatigue can slow down your thought process leaving you behind the plane and backed into a corner before you know it. Overconfidence might cause you to push weather or commit to a course of action that has no favorable alternatives. Complacency will lead you to believe that, because you have 2000 hours in a particular make and model, you don’t need to do a thorough preflight or complete the pre-landing checklist.
Regardless of experience level, operating environment, fancy avionics, and level of proficiency, margin is something that we all need plenty of. So as you go about your upcoming flights, be asking yourself what you can do to build in more margin. It just might be what gets you home.
Pete Greenwald is a transplant to Atlanta, Georgia who has fallen in love with all things Southern, including his wife, Ashley. As a pilot and A&P with Mission Aviation Fellowship, he flies the Cessna Grand Caravan in Papua, Indonesia serving people who live in isolation. In his spare time he is on the hunt for the best burger around.
Just south of the equator in the mountains of Papua, Indonesia on the island of New Guinea, pilots spend their days carrying food, building supplies, doctors, pigs, and passengers into some of the most remote and extreme airstrips on the planet. That’s where I fly. Each morning I load my Cessna Grand Caravan with 2,600…
Randy Vanstory, a long-time customer of Texas Top Aviation, decided in early 2017 to build his own airplane. Randy currently owns a Mooney M20J and has been active in aviation for a number of years. He took on the Vans RV 10, starting in February 2017. He’s about halfway through right now, with an estimated completion of mid-2020.
A completed Vans RV 10
I asked Randy what gave him the desire to build his own plane. “I love building things, learning new things, and working on things” he said. “This satisfies those desires all in one project.” Randy had a desire to work with his hands, to create something of his own, and building an airplane put several of his passions together in one project.
Lots of pilots out there dream of building their own airplane in their garage. There is a certain cool factor to putting together an RV or a Lancair in a garage, then trucking it out to an airport, attaching the wings, then flying a personal creation for the first time. An airplane unique to you, since there isn’t one quite like it any where else.
Randy Vanstory, a long-time customer of Texas Top Aviation, decided in early 2017 to build his own airplane. Randy currently owns a Mooney M20J and has been active in aviation for a number of years. He took on the Vans RV 10, starting in February 2017. He’s about halfway through right now, with an estimated…
It was a rainy Thursday afternoon and I was eating lunch with my family when my phone rang. My wife and I had just been discussing how miserable the weather was, so it was only natural that about 30 minutes later I was soaking wet and sitting in one of our Aerostars getting ready to take off for Ohio. I didn’t have much information about who I would be flying, or why, but I knew that I was going to pick someone up to fly them home; something about a missing airplane. So off I went into the muck. My biggest concern at that point being whether or not my clothes would ever dry out.
I arrived uneventfully and walked happily into the FBO, but found myself quickly in a very different atmosphere. It turned out I had two passengers to pick up, a husband and wife, and they had arrived at the FBO before me. As I walked in the door, the wife received a phone call. The person on the phone told her that search teams had found her father’s airplane crashed in the woods and that he was dead. I learned the rest of the details quickly and it was hard to stomach.
She was travelling home that day to be with family until they were able to locate her father. She was pregnant with her first baby and was in her third trimester. The baby was to be her dad’s first grandchild. He’d owned a Lake Amphibian for years and had stayed at home to work while his wife was out of town. He was last seen leaving work on Tuesday of that week and was reported missing on Thursday by his co-workers. Airport security footage showed him pulling the airplane out and taking off at 20:48 (after sunset) on Tuesday night.
After a few minutes we loaded the Aerostar and took off. It was the saddest flight I’ve ever done. Understandably, my passanger sobbed on and off from the time she got off the phone until we landed a couple of hours later. The weather seemed appropriate as we flew along through the rain and were greeted at our destination by a grief stricken family and a few reporters.
I said a sad goodbye and left, but I couldn’t help but think about their situation. It really hit close to home with me as it was easy to draw parallels between my family and theirs: she was very close in age to me and pregnant with her first child. My wife and I were new parents. Her dad had owned his airplane for about the same length of time that my dad has owned his Bonanza. Additionally, it isn’t uncommon for my parents to go a couple days without being able to reach each other because they both travel.
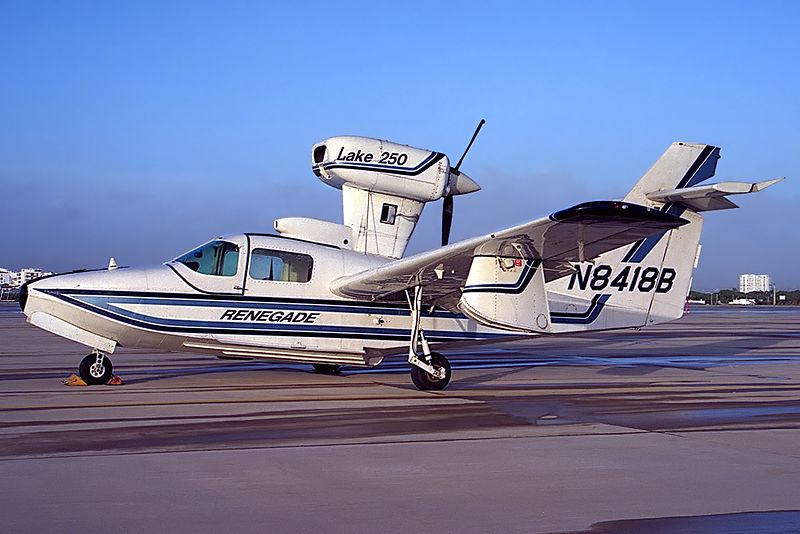
A Lake 250, the same type of aircraft involved in the accident.
But what happened..?
In the time since the accident, the NTSB has published their findings and unfortunately, it makes the situation sadder. It was completely avoidable.
Airport security cameras showed that after removing the airplane from the hangar, the pilot did not complete a preflight inspection or even a walkaround of any kind. He simply climbed in and left. The investigators were unable to find any traces or odor of fuel in the wreckage, nor any mechanical abnormalities with the airplane. In fact, according to the report, the engine was put on a test stand and ran perfectly. It would seem that the pilot simply never checked the fuel quantity and took off. The airport cameras captured the take off and a bright flash about 30 seconds after the aircraft departed.
Here is an excerpt from the report:
The National Transportation Safety Board determines the probable cause(s) of this accident as follows: The pilot’s attempted 180-degree return to the runway immediately after takeoff in dark night conditions, which resulted in collision with trees and terrain. Also causal was the pilot’s inadequate preflight inspection, which resulted in a takeoff with little-to-no fuel on board the airplane.
Interestingly, the report also details their ability to use logbook information and fuel receipts to show the airplane was taken on a long cross country on its last flight and likely not fueled again.
Another thing which stuck out in my mind upon learning the details of the crash was how important it is to let someone know when you’re going flying. Having another person know roughly when a flight is leaving, where it’s going and and when to expect it back could potentially save the lives of the people on board. In the case of this accident, the pilot didn’t alert anyone that he was going flying and therefore, no one realized he was missing for 2 days.
From reading the NTSB report I don’t get the impression that he survived the crash, but I can’t help thinking about the possibility that he, or others in similar circumstances, could survive a crash and then die from their injuries because no one knew to look for them. When I flew charter, we weren’t legally allowed to take off VFR without letting someone at the company know the details of the flight. I’ve adopted this as my personal policy as well. One text message could be the difference between being rescued or not.
Finally, every pilot should ensure that a proper walk around is completed! It’s easy to assume everything is okay with an airplane, especially one that no one else has access too. In addition to a thorough preflight, I like to walk all the way around the airplane and visual check fuel caps, doors, chocks, ropes, etc., immediately before getting in to ensure that everything is ready. I know a couple of pilots who have taken off with various panels and compartments open simply because they got distracted during their walk around and never closed them. (A good policy is to never walk away and leave something open). Perhaps even more mind boggling is that he apparently didn’t look at the fuel gauges after start up and before take off. I also have to wonder how much fuel he had remaining upon completion of the previous flight.
“Aviation in itself is not inherently dangerous. But to an even greater degree than the sea, it is terribly unforgiving of any carelessness, incapacity or neglect” is likely a familiar quote to just about every pilot. It is often written on a poster with a picture of an old timey bi-plane hanging out of a tree, but I think that it is absolutely on point. Carelessness in the preflight and neglecting basic pilot responsibilities (in this case fuel planning) cost this father his life and his opportunity to meet his first grandchild.
I know this article is a real downer, but it’s supposed to be. Its tragic that accidents take place which are completely avoidable. Obviously this case was beyond the normal realm of carelessness and neglect, but, we as pilots need to be extremely careful not to get so comfortable with an airplane that we stop doing the things which are so basic and important to safety. One of my professors in school used to say “aviation is fun, but it plays for keeps,” which is an effective way to remind myself how important it is to do it right.
*Out of respect to the family, I have not included any specific names, tail numbers or airports in this article.
It was a rainy Thursday afternoon and I was eating lunch with my family when my phone rang. My wife and I had just been discussing how miserable the weather was, so it was only natural that about 30 minutes later I was soaking wet and sitting in one of our Aerostars getting ready to…
What’s the most cost effective glass panel retrofit? There are several options out there (and it seems like more coming each Sun ‘N’ Fun or Osh Kosh event), but the consensus is the Aspen EFD 1000 or 1500, right? At $12,000 installed, it’s about $8,000-$10,000 cheaper than the Garmin G500 (though you can make the argument that when you add a second screen and SVT to the Aspen, the price is about the same).
I am here to blow your mind. What if you could get a glass panel retrofit that is a complete AHRS system with airspeed and altitude, plus a slaved HSI that auto slews to your GPS and a 4 hour backup battery so you can throw your steam attitude indicator away, for only $4,600, plus installation?
I am not crazy.
The Garmin G5 debuted last year when the FAA relaxed it’s regulations to allow more experimental avionics into certified airplanes. The single G5 was a big hit. The 3.5 inch screen fit nicely into the hole that the traditional attitude indicator left, giving pilots a glass attitude, airspeed and altimeter options for less than $2,500.
In March, Garmin brought out the HSI version of the G5. Equipped with a low cost magnetometer, the DG/HSI version is a complete replacement for the traditional DG/HSI. The unit also displays ground speed and distance (received from the GPS information), while auto-slewing to the GPS flight plan, so the CDI needle will move on it’s own, eliminating the annoying need for the pilot to set the course on the HSI (and ridding the GPS of the message that pops up reminding the pilot to set the course).
The dual units provide a complete backup Attitude in the case of a display failure. The reversionary mode you get with the Garmin G1000 and the Garmin G500 is also present in the dual G5s. This eliminates the need for a backup steam gauge attitude indicator, freeing up panel space for an engine monitor or some other toy. The G5 units can also be equipped with 4 hour backup batteries in case of electrical failure.
The price for the dual G5 setup is very reasonable at just under $4,600 plus installation (which, according to Garmin, should be pretty simple as the units act as plug and play instruments). The AHRS unit is available stand alone for under $2,200 while the DG/HSI unit standalone runs just under $2,600.
What’s the most cost effective glass panel retrofit? There are several options out there (and it seems like more coming each Sun ‘N’ Fun or Osh Kosh event), but the consensus is the Aspen EFD 1000 or 1500, right? At $12,000 installed, it’s about $8,000-$10,000 cheaper than the Garmin G500 (though you can make the…









One Comment