The Aunt Betty Directive: PFD Failures

Glass panel displays, ballistic parachute aircraft recovery systems, portable tablet computers enabling paperless cockpits, and widely available three axis autopilot systems have changed the way we fly, the way we train, and the way we are expected to perform on check rides. Our training and testing paradigms have tried to stay in synch, yet always seem to be catching up to the latest levels of technology.

This is very apparent when we instructors are preparing a student for an FAA practical test. When training aircraft had no autopilots, no GPS, and certainly no parachutes, the general philosophy was that during training, the student should have the lowest level of technology available. This was also the expectation on the check ride. This theory has changed over the years and now the Practical Test Standards require that an applicant integrate all available technology while demonstrating mastery of his or her aircraft. This raises numerous questions from instructors and students about what technology will be available for each task.

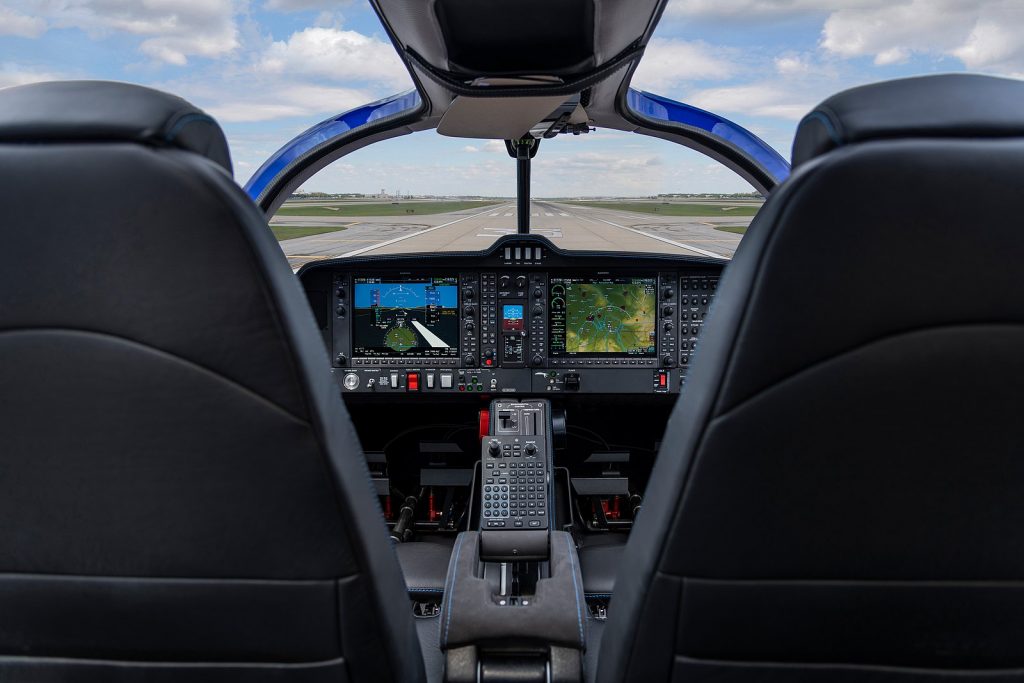
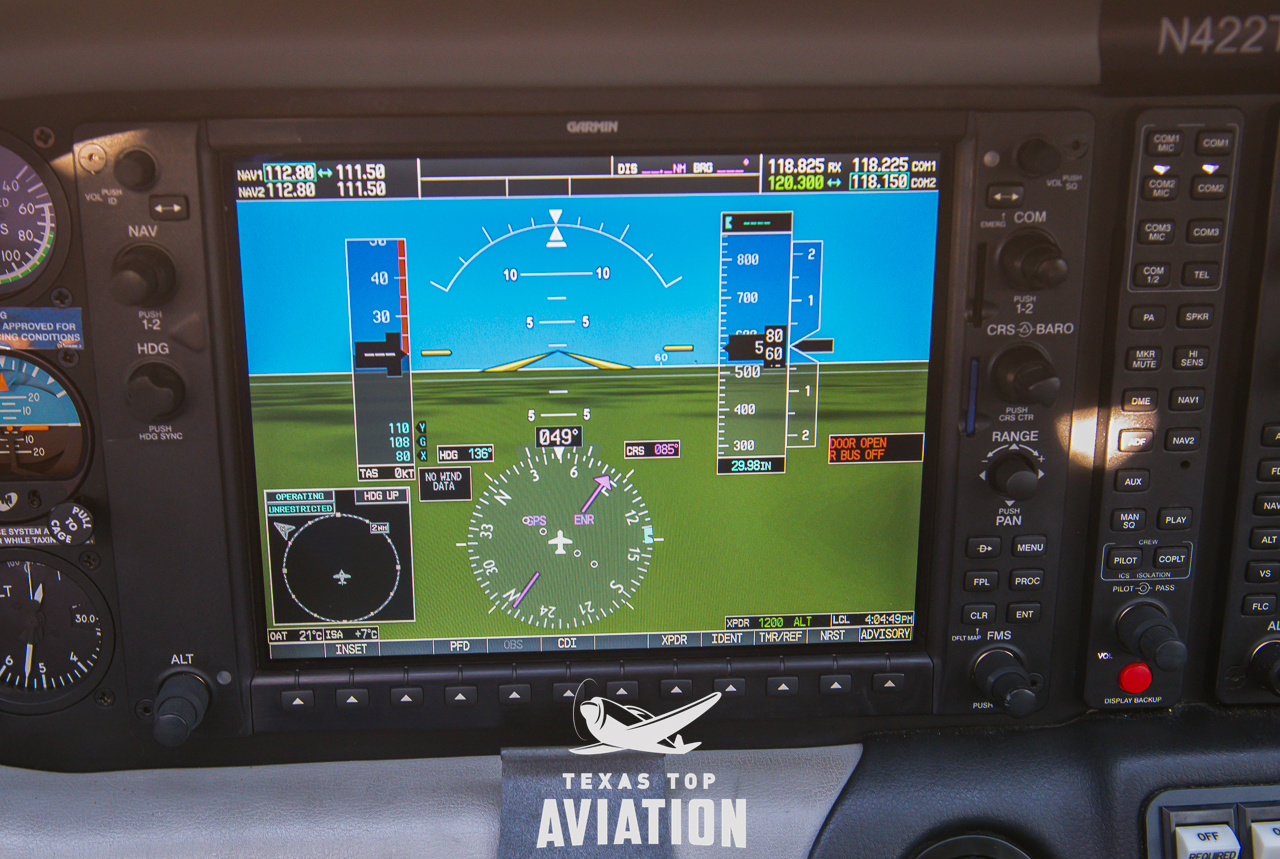
One example of this dilemma is found when contemplating an instrument airplane practical test in a Cirrus SR20/SR22. The test requires the task “Instrument Approach without Primary Flight Display”, which has taken the place of what was the partial panel approach, accomplished without use of gyroscopic heading and attitude indicators. In the Cirrus, the standby attitude indicator, standby airspeed, and standby altimeter are available, as is the Multi-Function Display. Guidance from the FAA has us shooting a GPS approach using the moving map display on the MFD after disabling the PFD. Those of us who trained and tested in steam gauge aircraft think that this task should be fairly easy. With a fully functional Attitude Indicator and a nice big moving map display showing our course, a reasonably competent instrument pilot should have little trouble adapting to this setup and flying a good approach.

But, in the Cirrus specifically, and perhaps in other aircraft as well, another question comes up. Can the applicant use the autopilot (which still works just fine after a display failure) during the approach without the PFD? A rather famous DPE who writes for a national magazine says “yes”, opining that not to allow its use would be introducing simultaneous multiple systems failures, which is strictly forbidden in the minds of some. If we follow this logic, we would not test simulated engine failure emergencies in these aircraft either, because to do so would imply failure of not only the engine, but the CAPS parachute system as well. In my former role as a pilot examiner, I always said no, that the approach should be hand flown. Here is my logic.

I was amazed that flight instructors and examiners would accept the substitution of autopilot technology for the skill required to fly an approach without the PFD. I would argue that the intent and the well described emphasis of the PTS is that the applicant must demonstrate the ability to control the airplane after a loss of the primary flight display, not observe and monitor the autopilot controlling the airplane! This argument was generally unpersuasive, so I approached from a different point of view, that of a concerned family member.

“Aunt Betty” represents a future passenger flying with the soon to be rated instrument pilot. Here is the question posed to Aunt Betty: “When we train and test pilots for instrument proficiency, we require them to demonstrate the ability to safely and skillfully fly the airplane without their primary instruments. Now, Betty, in this airplane, we can test this task in one of two ways. We would like your input on which way you would prefer, seeing as you will be a frequent passenger with your nephew. We can either have the pilot (might be your son, brother, husband, or nephew) demonstrate that he can fly the airplane by hand without the PFD, which does require a little more skill and a slightly different technique, or, we can require the pilot to perform this task using the autopilot so that the pilot basically monitors the airplane flying itself on the approach.

“Now, Aunt Betty, a pilot allowed to use the autopilot system on this approach may not have the skill or technique to fly the approach by hand in the clouds should the autopilot shut down due to turbulence or mechanical failure. Should this happen to a pilot without the skill and practice normally required, the odds of a fatal accident occurring would be quite high.

“So what do you think, Aunt Betty? Would you feel more comfortable flying with this fellow if he has demonstrated mastery of the aircraft (sans PFD) without the autopilot or only with its assistance?”

This leads us to a larger discussion about the use of other technology, iPad, GPS moving map, and more. If technology is used as a replacement for pilot proficiency during training and testing, we end up with less skillful, less competent and ultimately less safe pilots. But, if we require that our students demonstrate mastery with the lowest available level of automation and technology (which, by the way, implies excellent fundamental aircraft control skills) then, when technology is added into the equation, we have a safer pilot.

Technology can be a value added safety multiplier, or it can be a crutch needed to make up for lack of fundamental and advanced skills. Crutch or Safety Multiplier, which one will you choose? I know which one Aunt Betty prefers.

Charles McDougal is a flight instructor, corporate pilot, and former DPE ‎who offers basic and advanced flight instruction in the San Antonio area.  To find out more information about Charles or to contact him, visit his website, www.flighttrainingcoalition.com.

Similar Posts

  • Merry Christmas 2018

    So the Word became human and made his home among us. He was full of unfailing love and faithfulness. And we have seen his glory, the glory of the Father’s one and only Son (John 1:14).

    From the Texas Top Aviation family (Hank, Kelsey, Everett, Cooper, and Cord) to your family, we wish you a Merry Christmas!  We are thankful for how the Lord has blessed us this year.  We pray for blessings on your family this coming year.

    Keep the wheel side down and the sunny side up!

    Merry Christmas!

  • Maintaining TKS Panels

    Columbia TKS Panels

    When cleaning airplanes, the majority of people don’t know how to properly maintain their TKS panels.  TKS panels provide wing leading edge, horizontal stabilizer leading edge, and, in the case of FIKI airplanes, vertical stabilizer leading edge de-icing protection.  For those not familiar with them, they are metal strips that have thousands of holes drilled into them where the TKS fluid seeps out. They have become quite prevalent on Cirrus aircraft, the Cessna TTx, and Mooney aircraft manufactured in the last decade or so.  The system is also known as a weeping wing system.

    Being on the leading edges, these panels pick up bugs very easily.  For the uninitiated, it would make sense to just use normal airplane cleaner to spray the panels and scrub the bugs.  Don’t!

    Using anything that contains Methyl Ethyl Ketone (MEK) as that can harm the TKS bladders behind the panels.  Any aircraft cleaner containing wax could cause the pores to clog, preventing the TKS fluid from properly seeping onto the wing.

    What’s the best thing to do?  Soap and water with a soft cloth is a good start (again, make sure it doesn’t have wax in it.  Dish soap would be suitable).  No hose available?  Just simply turn the TKS system on, let it run till you start to see fluid drip off the wings onto the ground, and use the fluid to clean the panels.

    A soft cloth would work fine, but, if the panels are really buggy, take a green scouring pad to do some scrubbing.  Just make sure the scrubbing motion is up and down with the grain, not side to side.  You can find the green scouring sponges on the dishwashing aisle in the grocery store.  Just leave one in the hangar for when you need it.

  • The PIC Isn’t Always the Pilot Who Took Off

    You are at cruising altitude and your flight is going just as planned. All of that can change, sometimes without much warning, and you, the non-pilot, are now in charge. Would you know what to do?

    This was a scary thought for me until I attended a seminar developed for the non-flyer at a Cirrus Owners Pilot Association (COPA) fly-in. Cirrus is the only small plane with a parachute as standard, so I thought all I had to do in an emergency was pull the chute. It’s a little more complicated than that!
    I learned the vast majority of pilot incapacitation happens when the plane is at cruising altitude, so there is time to find a solution.

    anne-pargeter-picture

    I was taught ten basic steps to follow to bring the plane safely to the ground.

    • First attempt to revive the pilot. If he is choking, it is possible to do a Heimlich maneuver from the side. This may dislodge whatever is blocking his airway and solve the problem. If he is experiencing hypoxia, turn off the heat, open all vents, and, if you have on board oxygen, use it. Also, if you can, get instructions on how to descend to a lower altitude. If the pilot is unconscious due to a heart attack or other medical emergency, there are still things you can do from the right seat.
    • Engage the autopilot if it isn’t already on and move the pilot off the controls. *
    • Ensure you are connected to the radio. If you hear ATC or other pilots, you are.
    • Send an electronic trouble message. Set the transponder to 7-7-0-0 to identify your plane to ATC. This will cause your plane to be highlighted on ATC radar screens.
    • ATC will most likely contact you asking what is your emergency. If this does not happen, you will need to transmit a Mayday call. All non-pilot passengers should know how to use the radio to get help, if they know nothing else.
    • With help from ATC, decide where you want to go.
    • Use the autopilot to fly in the direction suggested by ATC. I was taught that ultimately the choice of where to deploy the parachute is up to me because I am now the PIC, pilot in command.
    • Ensure that seat belts are secure and the emergency hammer is between your legs (so you have it to break a window to escape if needed).
    • Pull the parachute handle.
    • On the way down, shut down the engine and brace for impact.
    • After landing, move away from the plane, into the wind. Stay nearby and wait for help.

    The seminar covered specific procedures to accomplish these basic steps, what to do if you don’t get a response from ATC, what to say in a Mayday transmission, how to fly a heading, how to check fuel levels, shut down the engine, etc. After the seminar, I felt much more comfortable about what to do if my pilot suddenly lost consciousness.

    I was also told to practice what I had learned to avoid panicking in an emergency situation. There are so many things the person in the right seat can do under normal circumstances to practice. Learn how to set heading bugs, learn where the plane’s Electronic Locator Transmitter (ELT) is located and how to activate it. This will help rescuers locate the airplane. Learn how to assess your fuel levels. Practice making routine radio transmissions. Observe what your pilot does and ask questions if you don’t understand something.

    Knowing what to do in an emergency situation will give you a sense of control over what will happen to you, your pilot, and any passengers on board your plane. If you have never considered taking a lesson or two for the non-pilot, find yourself an instructor, and learn what you need to know for your plane. Hopefully you will never have to use it, but if you do, you will be ready to be the PIC who lands the plane.

    Anne and her husband Stephen are the proud owners of a Cirrus SR20. They plan to put the airplane to better use once Stephen retires. Anne has a background in desktop publishing and writing.

  • Airspace Alert: Houston Executive Tower Opens

    For those of you who frequent the Houston area, make sure to check your NOTAMs.  The Houston Executive Airport (KTME) in Katy recently opened a control tower.  The Houston Executive tower information won’t show up on the sectional chart till the new chart comes out in the spring.  The only way to get the information about the tower and the airspace will be via NOTAMs or when the new Airport/Facilities Directory comes out on November 3rd.  The tower opened October 1st.

    According to AOPA, the airspace will remain Class G around the airport, even though there is a control tower in place.  Since the Houston Executive tower is there, it will be mandatory to contact the tower when passing through the airspace.  KTME’s airspace stretches up to 2,000 feet MSL and goes out to a 4 sm radius around the airport.  It is a VFR Only tower, so the controllers do not have radar.

    The tower is open from 6am-10pm, local time, 7 days a week.

    Frequency Information

    Houston Executive Tower:  126.975

    Houston Executive Ground Control/Clearance Delivery:  132.075

    Houston Executive ATIS:  119.525


  • Beware of the Lunch Monster

    He prowls around, preying on innocent pilots.

    He’s very sneaky, creeping unexpectedly and attacking after the propeller begins to turn.

    He’s very cunning, veiling his intentions until, BOOM, he attacks.

    Beware of the Lunch Monster!

    Whenever I am doing a full day of training (which is usually how transition training courses are planned out, in full day sessions), I always plan a lunch stop.  My metabolism has the speed of a rocket ship, so I get hungry and need some sustenance in the middle of the day.  I have a running list of airports to stop at that have good lunch spots at them or nearby, so my customers and I usually end up at one of those airports.

    Almost without fail, if a customer is having an excellent flying morning, nailing all the procedures, picking up all the techniques, and overall, flying pretty well, then eats lunch, the afternoon doesn’t go quite as well.  Doing some of the same things we did that morning, but the customer’s performance isn’t quite as good.  Most of the time, it’s just a brain lockup or landings aren’t quite as squeaky as they were in the morning.

    Part of it is fatigue after flying for 2-3 hours in the morning.  The other part is what I call the Lunch Monster.  Eating a big lunch can sap away brain power and cause a person to lose energy around 2-3pm, leading to an afternoon lull (or the Lunch Monster attacking!).

    According to Forbes.com:

    Diet contributes to energy levels too. “Eating a lunch that is too big is the most common reason for feeling sleepy in the afternoon,” says Rebecca Solomon a nutritionist at Mount Sinai Hospital in Manhattan. “All your energy goes into digesting the enormous meal.”

    The goal is to keep the body’s Cortical and Cortisone levels even since they’re the hormones released by the body in reaction to stress–they produce the fight or flight response. Their levels are elevated when you have sugar, caffeine and processed food, so you feel awake and energetic. But a few hours later, when those levels drop, you’re sluggish.

    Solomon recommends eating a meal that’s balanced with healthy fats (from olive oil or avocados, for instance) with protein and healthy carbohydrates (whole wheat bread or pasta). The portion will vary for people of different sizes, but a general rule is you should be hungry about four hours after the meal.

    Another healthy eating habit: Consume small portions of foods throughout the day, including almonds, carrots and hummus and fruit. Enjoy lunch around 1:30 or 2 p.m., just before the time you normally feel fatigued.

    Now, most of the stops on my list of restaurants don’t fit the bill of healthy fats and healthy carbohydrates (plenty of protein, though, especially the BBQ joints).  For those days, bringing along a snack like almonds or dried fruit is a great idea to munch on mid-afternoon.  Trimming down the amount eaten at lunch helps a lot too.

    So, the next time you have a long day of flying or training, beware the lunch monster and prep some good snacks when your flight instructor says you’re stopping for BBQ!

  • Rudder Use

    I have the blessing (same say it’s a curse) of being a tailwheel pilot. I did my tailwheel training in a Citabria and have gathered about 400 hours over the years in Citabrias, Super Cubs, and Maules (don’t judge all tailwheel airplanes by a Maule, by the way. The Maule is it’s own unique animal). The blessing of being a tailwheel pilot is that it greatly enhances my stick and rudder skills for all airplanes.

    No matter what airplane you fly, basic stick and rudder skills are always important. At some point during a flight, the rudder will need to be used, even if you have an airplane that has a yaw damper. Rudder use is vitally important in the takeoff and landing phase, especially if you fly an airplane that generates a lot of torque on the takeoff roll. Rudder in that phase of flight is pretty evident, because if the rudder isn’t used, you’ll go off the left side of the runway.

    Where I want to focus is rudder use in the landing phase. As an airplane comes down final, there are several forces that are be acting on the airplane. When it’s bumpy, updrafts and downdrafts are moving the plane up and down and all around. To correct for a bump that sends the airplane into a roll, aileron is added in the opposite direction of the roll. That aileron input also induces adverse yaw, pulling the nose of the airplane in the opposite direction that the pilot is moving the ailerons.

    If a pilot isn’t using his feet correctly, then the nose of the airplane will wallow around through the air as aileron inputs are used. The tail is also moving around quite a bit, so the pilot might not “feel” the yawing moment, but the passengers in the back seat certainly will.

    The other advantage that comes with proper rudder usage on short final is the airplane is more responsive to control inputs. When utilizing both the ailerons and the rudder, a pilot is able to fly the airplane much more precisely and control it much better.

    This doesn’t mean you have to be staring at the turn coordinator the whole time down final. In fact, that’s exactly what you don’t want to do. Your eyes need to be outside the airplane. Just get in the habit of stepping on the rudder whenever you move the ailerons on final and eventually, you will feel what your airplane is doing. Don’t step on the rudder as hard as you can, but slight pedal pressure in the direction of aileron input will make a big difference.

    Rudder is also vitally important for landing in a crosswind no matter that airplane. Crosswind landings are a learned skill that take a lot of practice to perfect. There is also a lot of confusion as to what control input does what during the landing.

    Here is the simplest way to picture a crosswind landing and what the controls do:

    • Aileron-When performing a crosswind landing, the ailerons keep the airplane over the centerline. If the airplane is drifting to the right of the centerline, add left aileron to bring it back to centerline, then keep enough aileron control pressure in to keep the airplane over centerline. In a perfect crosswind landing, the main tire on the windward side will touch down first. Left crosswind means left tire touching first.
    • Rudder-When performing a crosswind landing, the job of the rudder is to straighten the nose to point down the runway. You will not be coordinated in a crosswind landing, you will be slipping, which is the goal. So, with a left crosswind, you will be inputting left aileron to remain over the centerline and you will also need right rudder to straighten the nose. This also prevents the airplane from actually rolling in the direction of the aileron input.

    If you remember for a crosswind landing: “Aileron into the wind to stay over centerline, opposite rudder to straighten the nose.” Too much aileron and the plane will drift into the wind. Too much rudder and the nose will yaw in the opposite direction.

    Rudder is very important, even in our day and age where a lot of general aviation airplanes have yaw dampers. Our feet only have a job for a short period of time, but that is the most critical time. An excellent way to get more proficient in rudder use is to go get a tailwheel endorsement. If you are in the central Texas area, check out TacAreo in Fredericksburg, T82.

    Don’t let your feet fall asleep!

One Comment

  1. One day last winter while happily joining an approach into KHYI, the cloud deck was seventy five hundred feet thick with 400′, 1.5 miles in mist. At the approach fix prior to FAF the lights went out. Having flown and trained with AATDs a lot, and always with the iPad foreflight this experience was something as natural as walking forward after a small stumble.

    Know your fundamentals and train train train. When the stumble happens there won’t be a death defying fall afterwards.

Leave a Reply

Your email address will not be published. Required fields are marked *