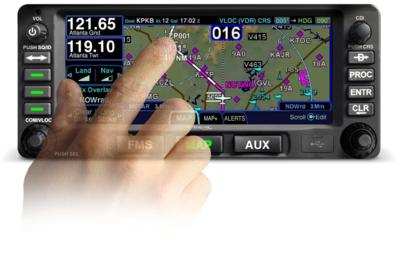
Avidyne’s plug and play replacement for the Garmin 430, the Avidyne IFD 440, finally received certification from the FAA last week. The touch screen GPS unit is being marketed as a simple swap out for the Garmin 430. This release follows up Avidyne’s release last year of the IFD 540, also a plug and play replacement, but for the Garmin 530.
The features and touch screen of the GPS units sound quite nifty, but it will be hard for Avidyne to compete with the GTN 750 and 650 from Garmin. The unit prices for the IFD 540 and 440 will be less (and installation is simpler), but we will see how the company does.
The STC allows for installation in 1,000 makes and models of aircraft, according to the company, so there are a lot of possibilities for installs.
In conjunction, Avidyne also released a new version of it’s software for both GPS units. According to Avidyne, this will unlock multiple features that enhances the capabilities of both units.
To read more on the IFD 440 and it’s bigger brother, the IFD 540, check out Avidyne’s website.
We’ve all been there. You’re flying into an unfamiliar airport at night, you’re having difficulty seeing the field, and trouble identifying the runway. Airports can be hard to identify for a variety of reasons, but approaching in darkness only makes it more difficult. Perhaps the airport is located in a densely populated area and the airport lights bleed into the city lights. Maybe the airport that you’re approaching is located amid terrain that obstructs your view.
Situations like these are not uncommon for charter pilots. Just a few evenings ago I was descending IFR into Asheville, NC (KAVL) on a dark night with high overcast and scattered showers. Although the airport was VFR, the surrounding hills made me doubtful that I would be able to see the field in time to safely and comfortably descend for the visual approach that I was expecting.
Fortunately, there are some things we can do to help find our destination and set us up for the approach. Here are a few tricks that I use regularly when I find myself in this position:
When flying into an untowered/closed tower airport: Make sure that you have the right lighting frequency. Some airports have pilot-controlled lighting that is operated on a different frequency than the CTAF. If the lights don’t seem to be working, consult your AFD. If the AFD advises that your frequency is correct, double check the NOTAMs to make sure that the lights haven’t been taken out of service.
For towered airports: Ask the tower controller to turn up the intensity of the runway lights. This has helped me find the runway countless times. This request can be especially useful at airports that are located in a highly lit area. Controllers are happy to honor this request and will often leave the lights at the bright setting until you advise them that you are ready for them to be turned back to normal intensity.
Load an approach: If you are an instrument rated pilot, loading an instrument approach is a great way to get oriented with a runway when you need a little help. You may need to coordinate with the tower or controlling agency if you want to fly the approach, but this has the added bonus of giving the pilot altitudes for terrain/obstacle clearance should there be any hazards present.
Use OBS mode: If you are flying an airplane that has equipment capable of doing so, you can use the Omni Bearing Selector (OBS) button to help align you with the runway. If using this strategy, just remember: THIS IS NOT AN INSTRUMENT APPROACH. It will not provide you with obstacle clearance, nor will it line you up directly with the runway.
The pictures below should help clarify how to use the OBS to assist in airport orientation.
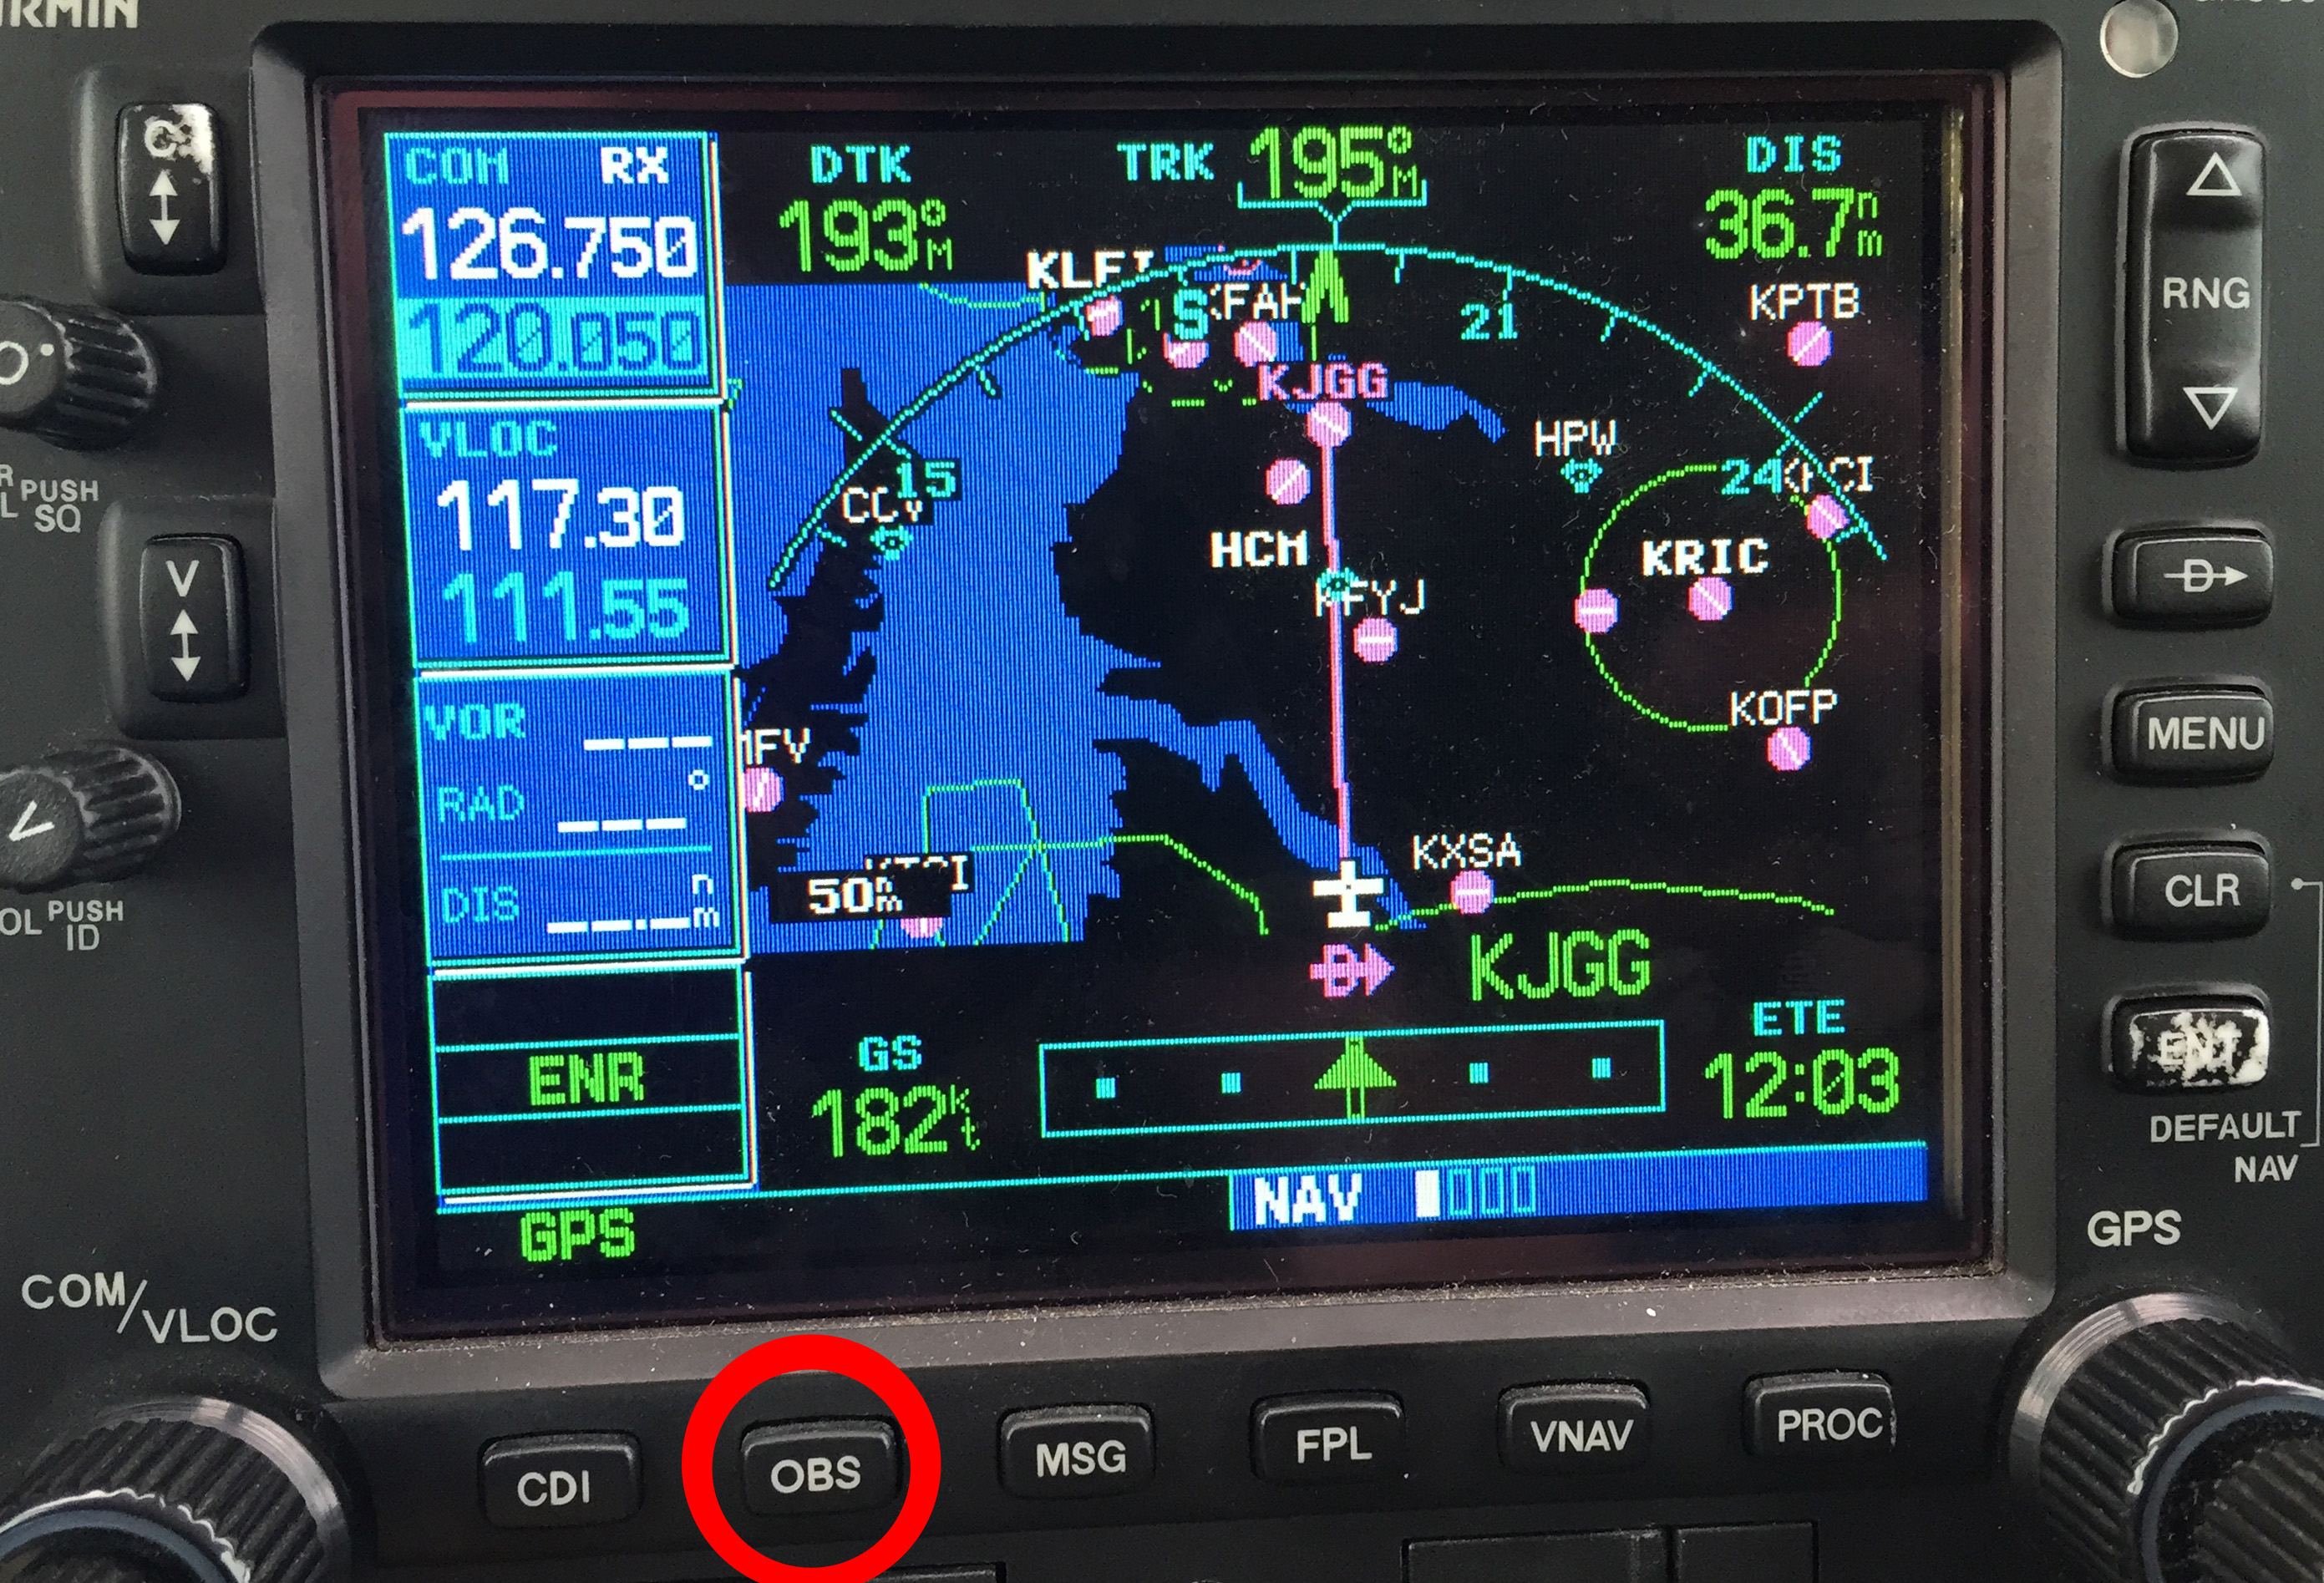
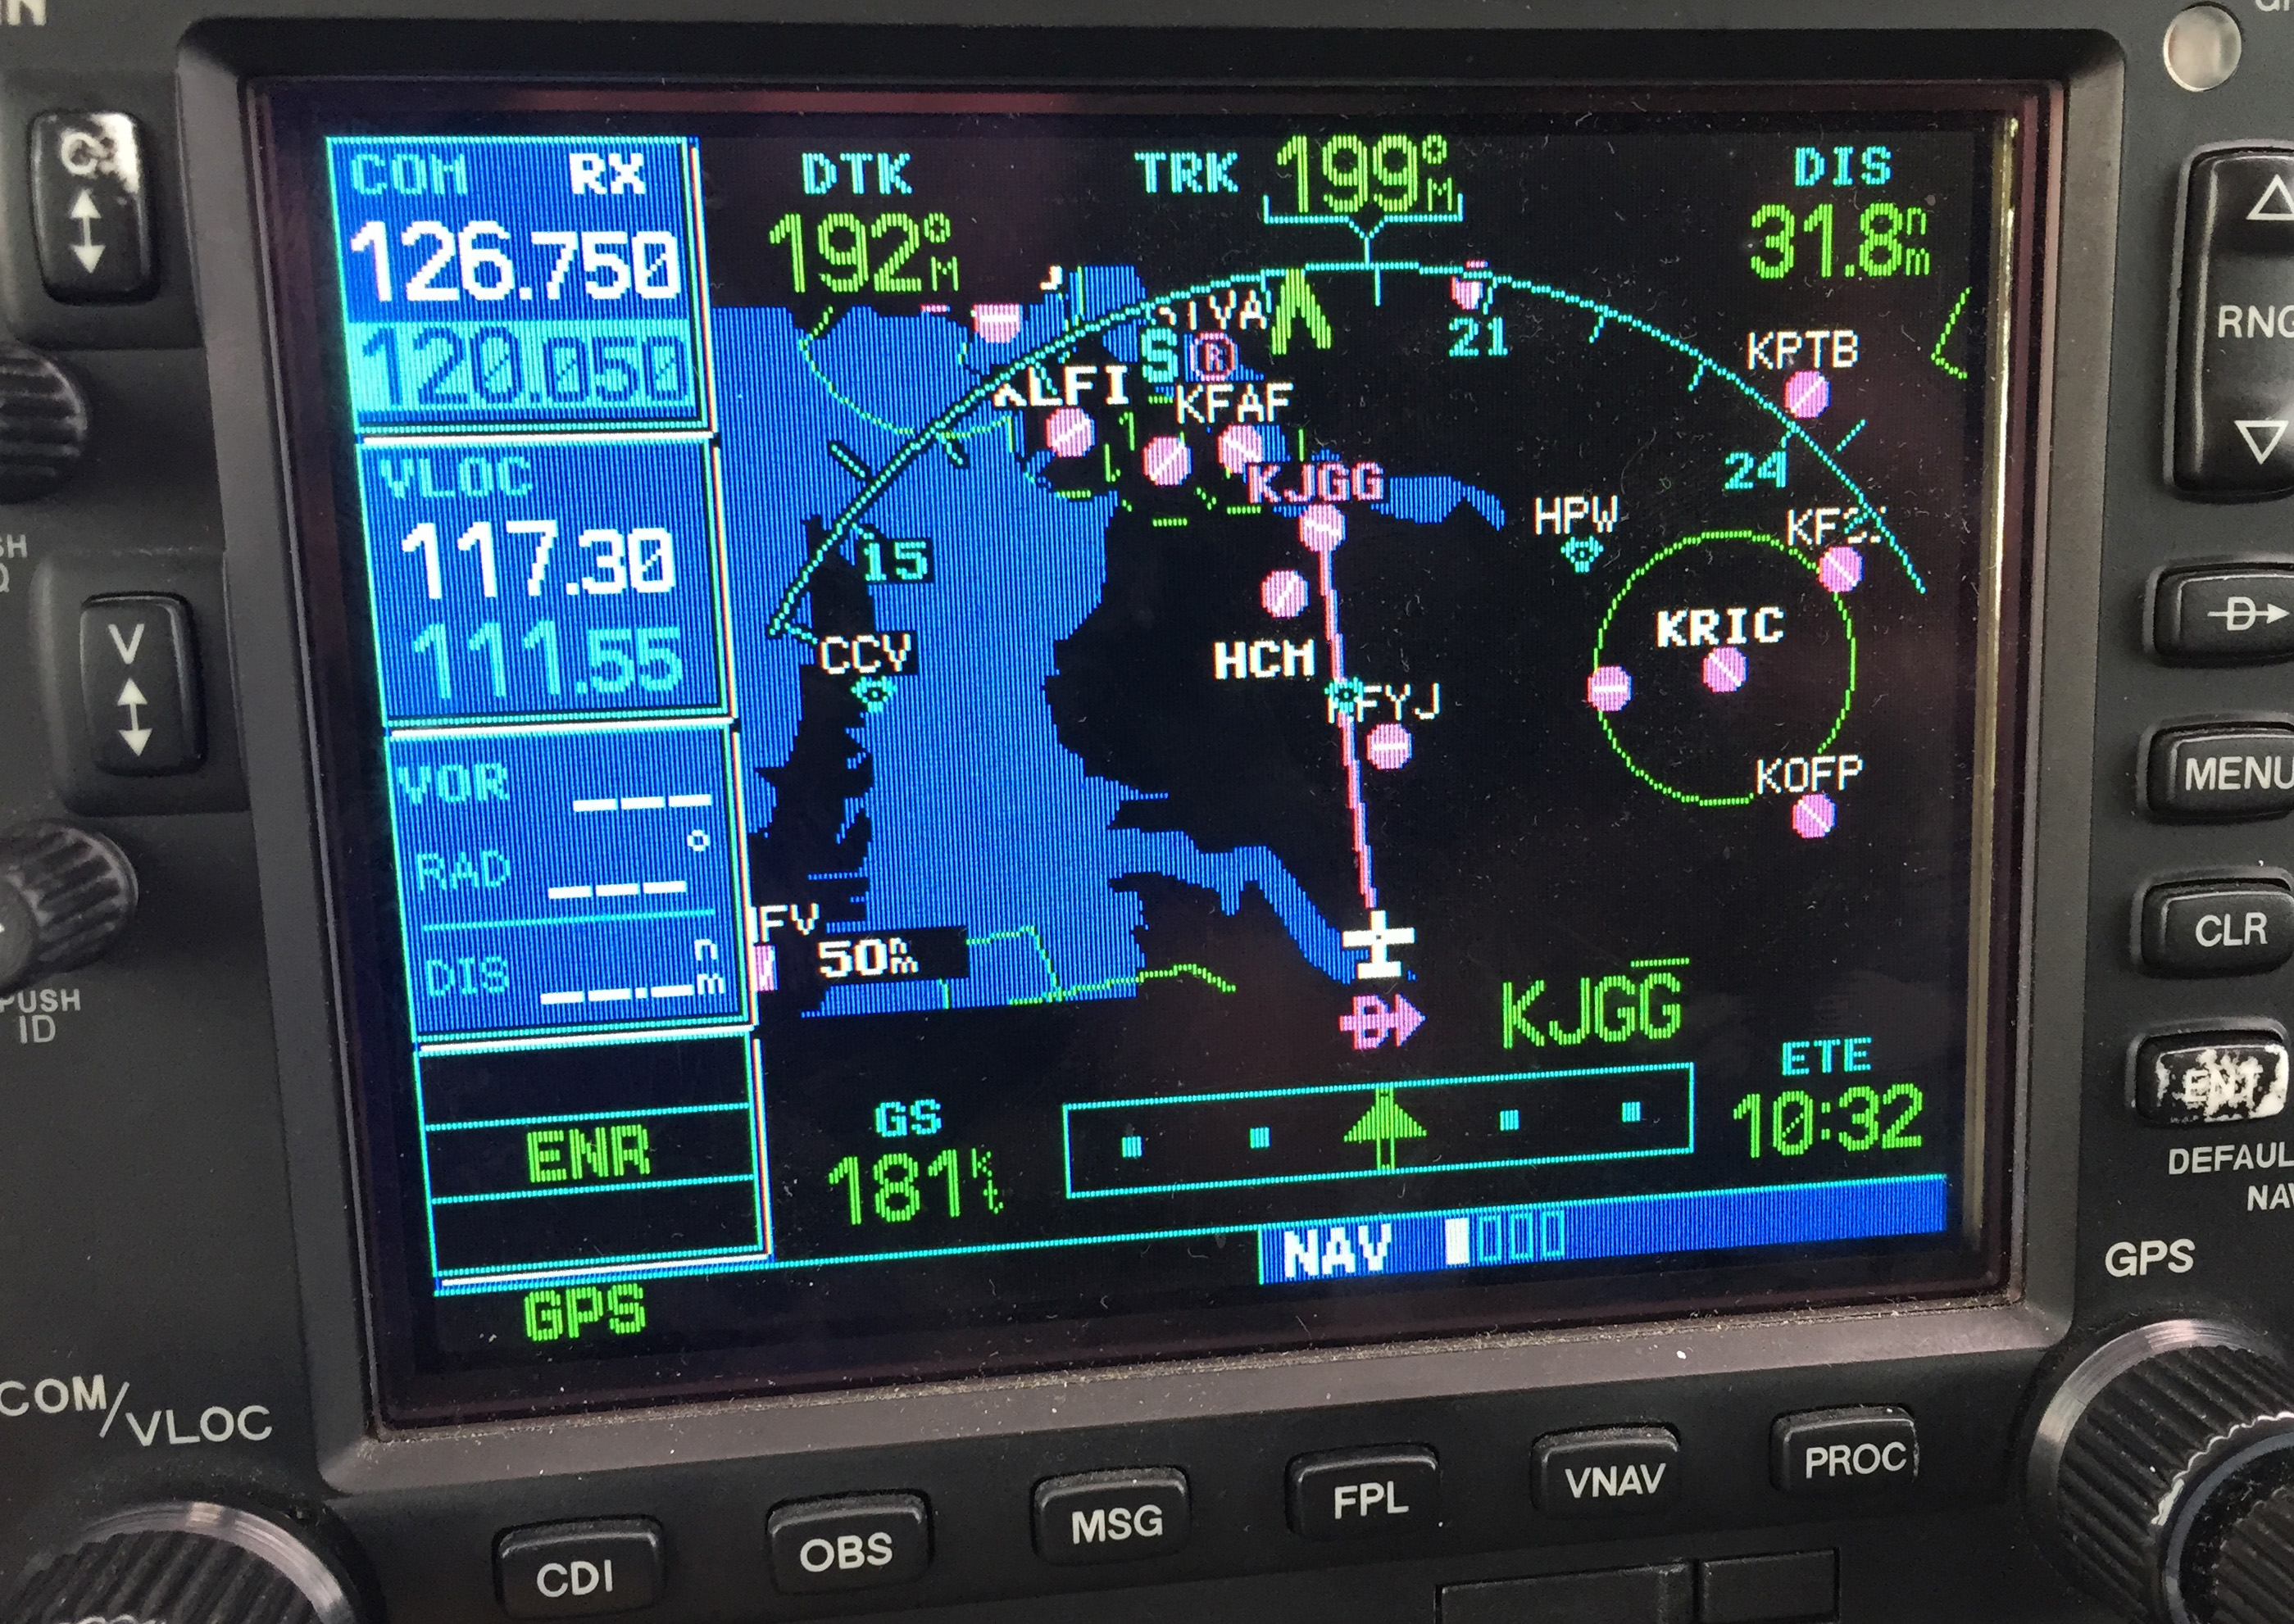
Step 1- Have the destination set as the next way point in your flight plan. In the picture below, The GPS is set to navigate direct to KJGG. Press the OBS button (circled in red) to engage the OBS mode.
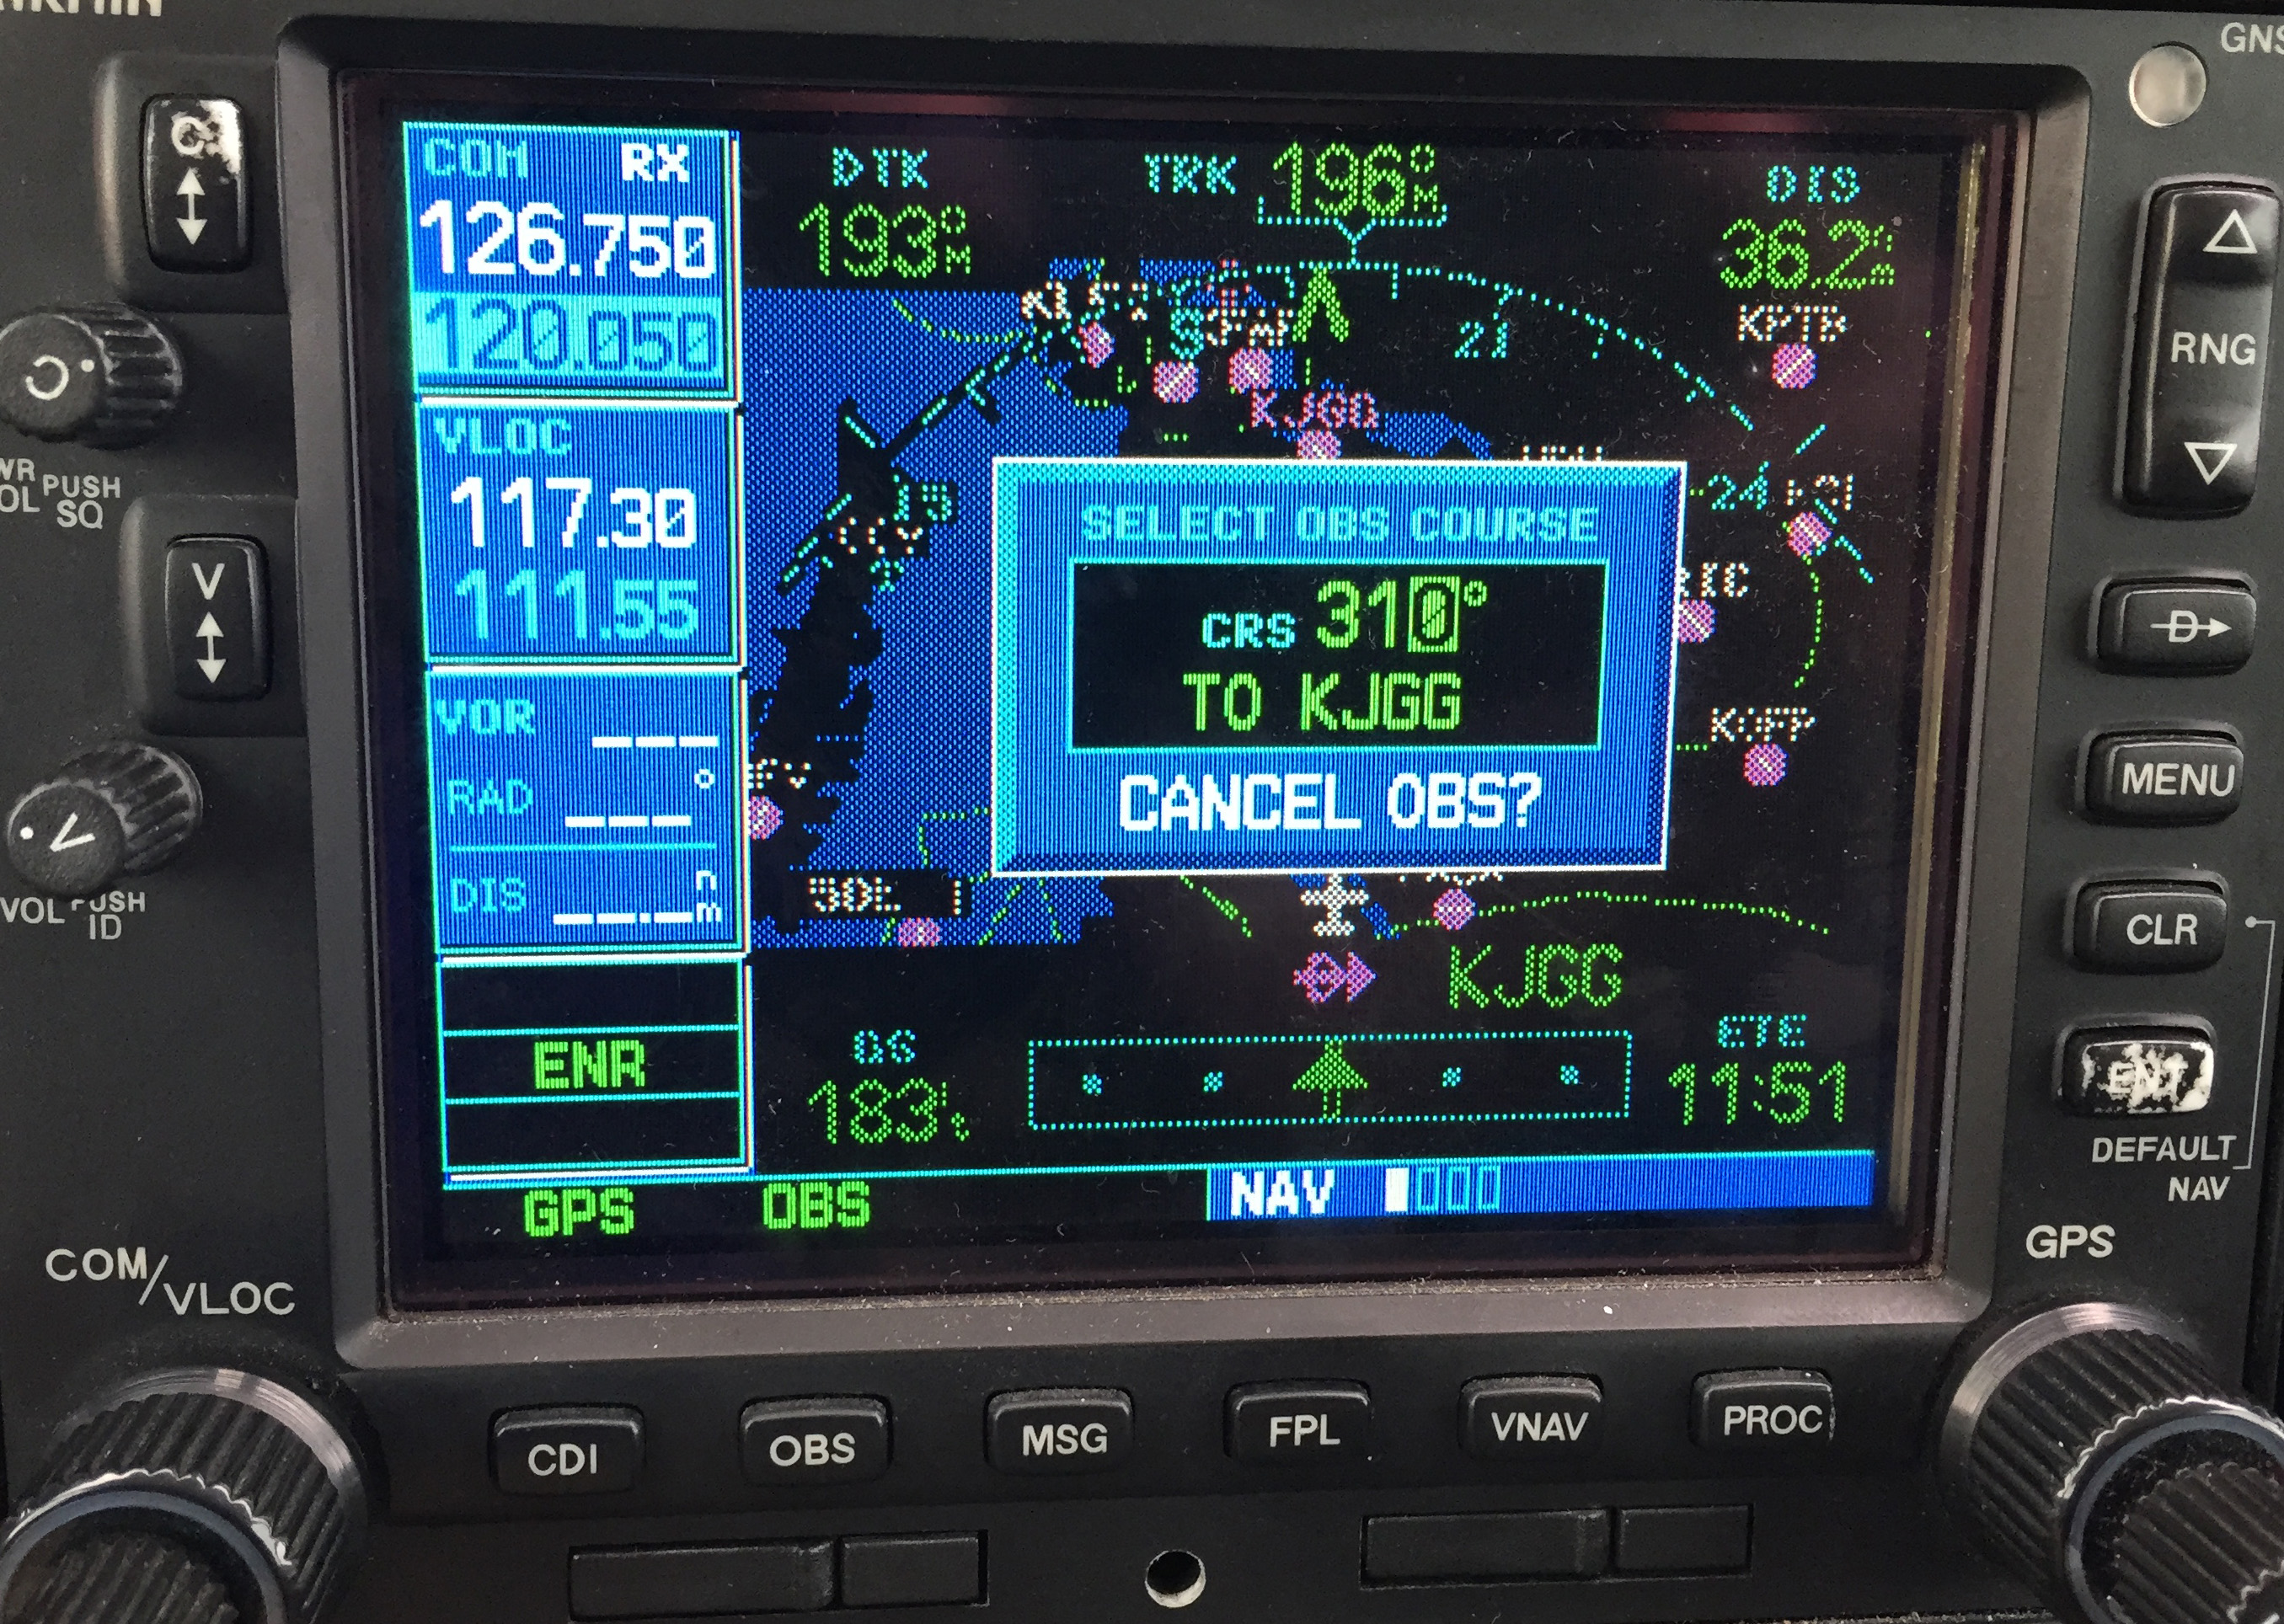
Step 2- Once OBS is selected, use either the window on the screen (which should come up automatically when you press the button in step 1) or the OBS selec tor on your navigation head to select the inbound radial. In this example, I have selected 310 degrees, the landing runway at KJGG.
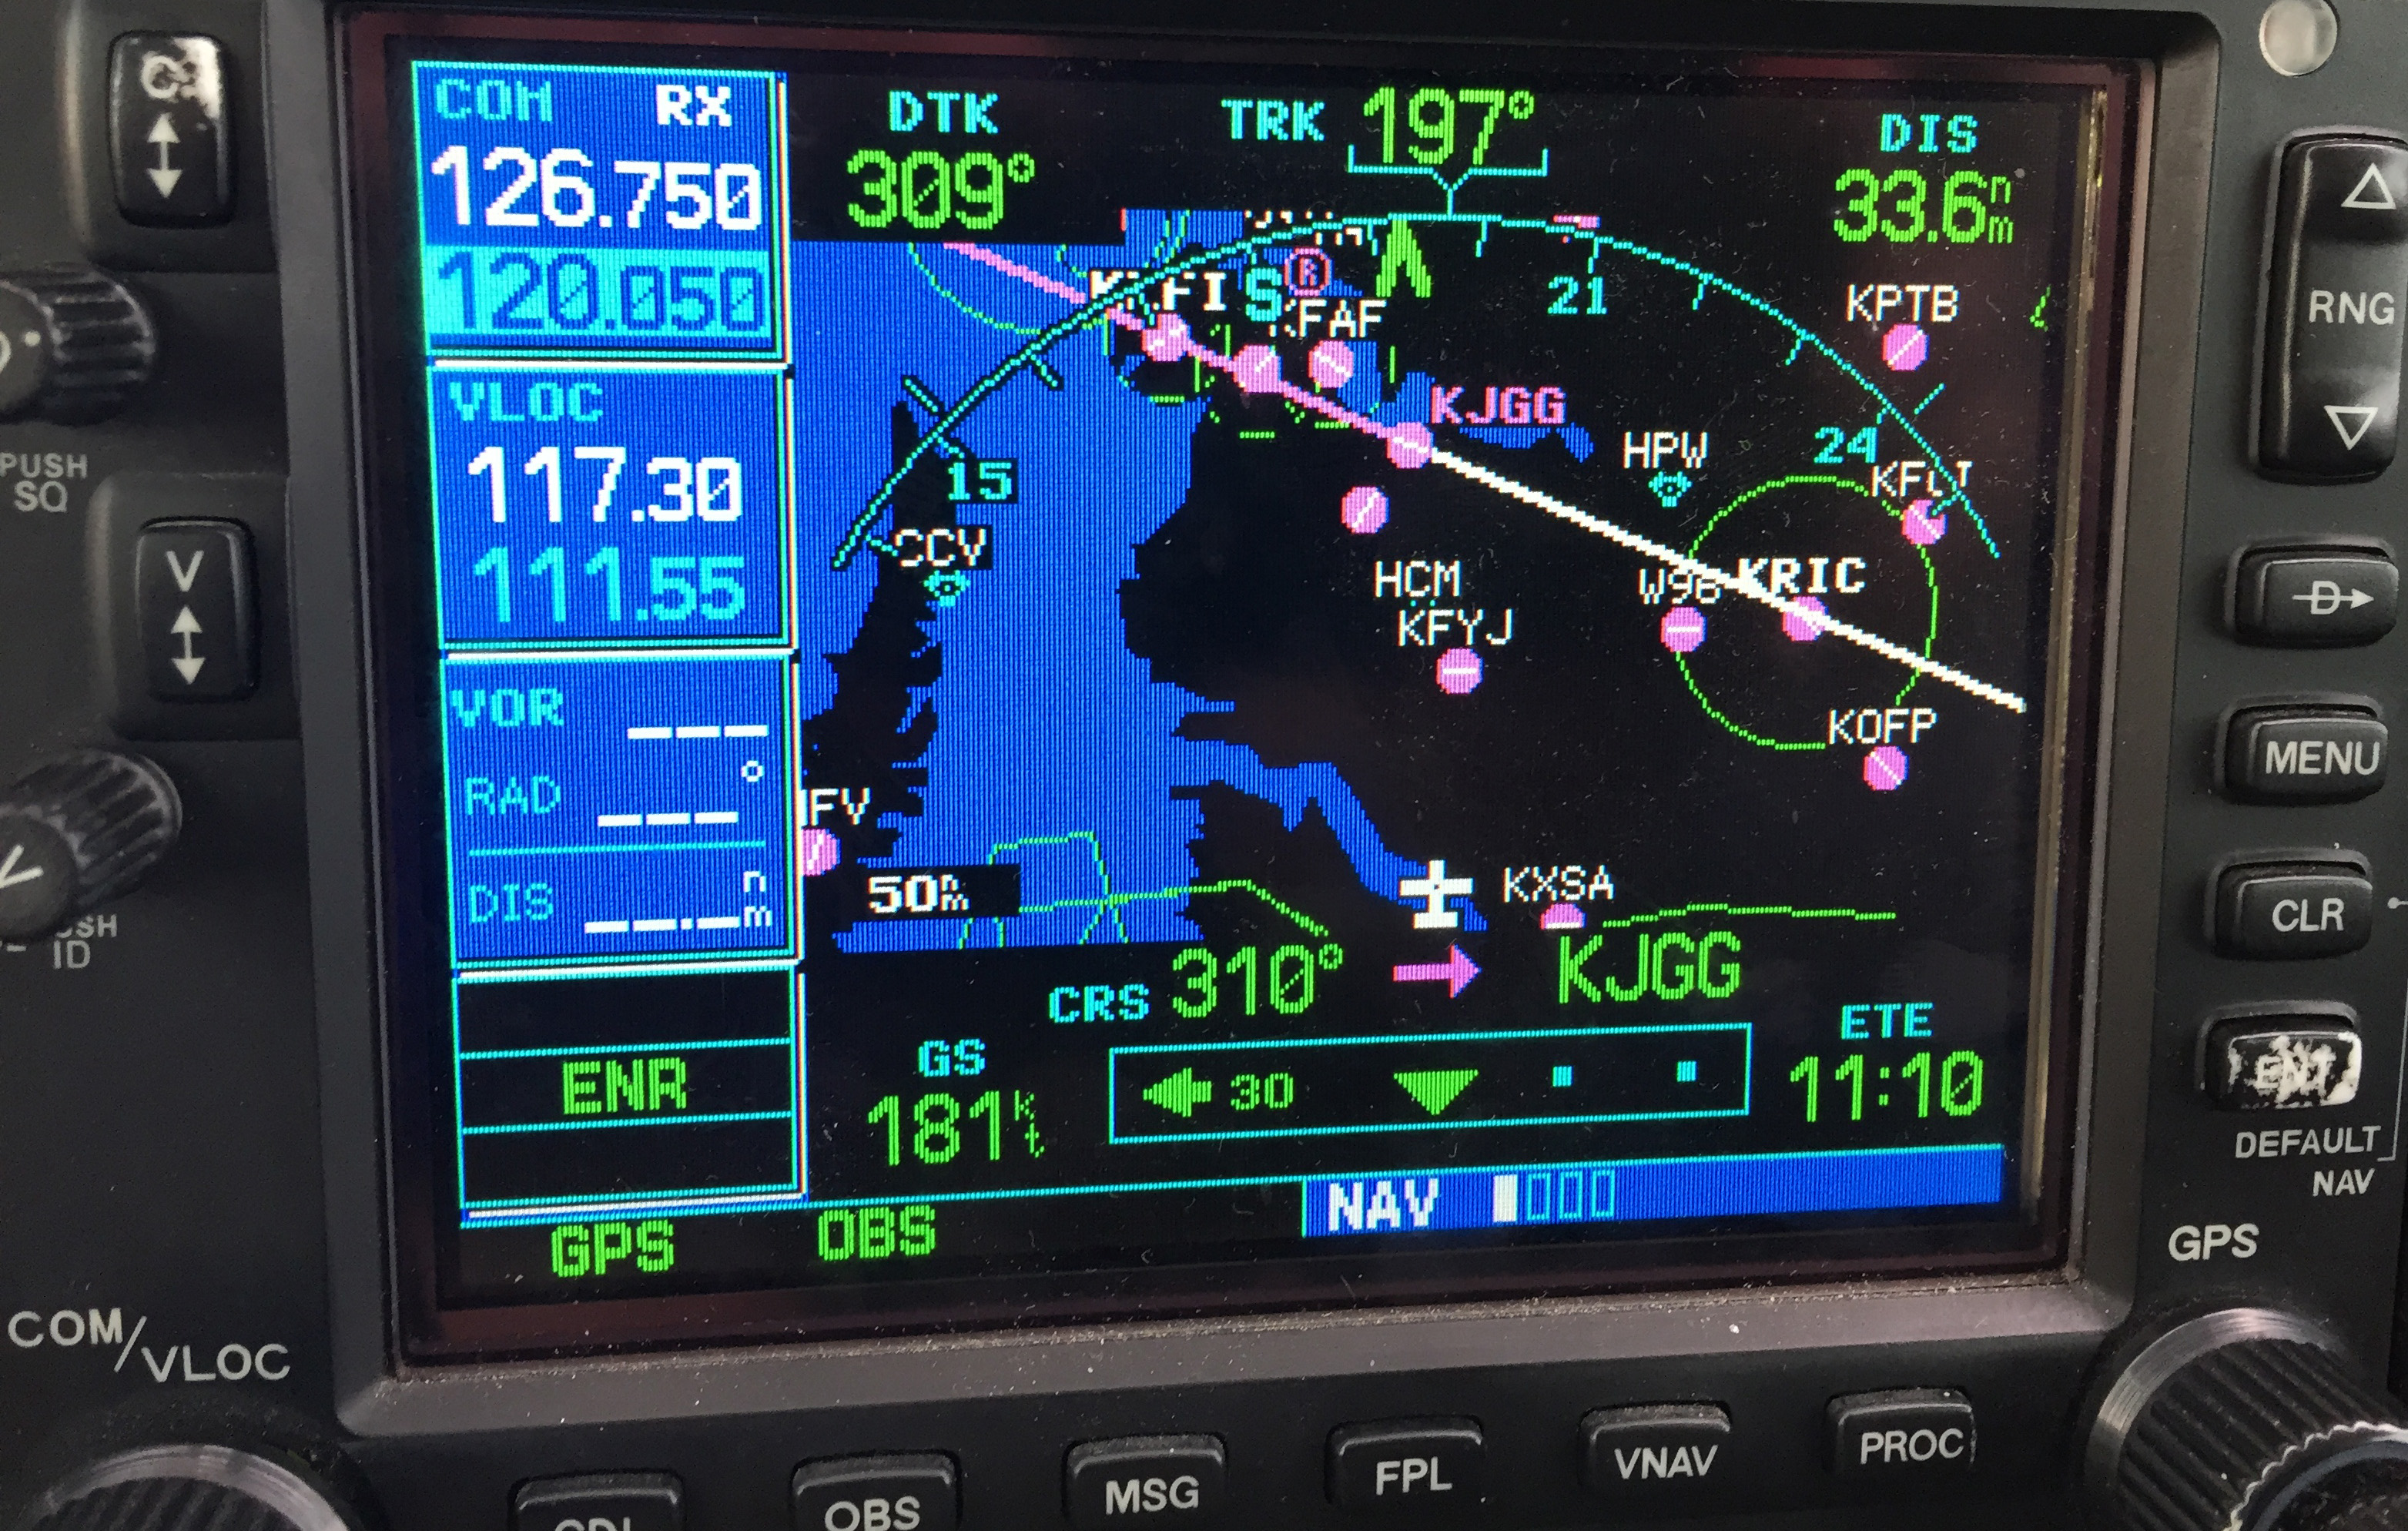
Step 3- The GPS now shows an inbound course to the airport of 310 degrees. It appears as a magenta line. The line serves as an excellent aid in airport/ runway orientation. Remember that this will not line you up perfectly with the runway, but it can still be extremely useful in planning a pattern entry or for getting your bearings.
Note: As shown below, If you press the OBS button again, the GPS will return to the navigation as previously set.
1. Ask for vectors to the airport/ runway: If you have VFR flight following or are talking to a tower equipped to provide vectors, asking for them can be a good choice. Although the controllers may not always be able to accommodate your request due to workload or equipment limitations, most will be happy to comply if they are able. Some pilots may feel silly asking for help, but my policy has always been that I’d rather feel silly for asking than look silly for being lost.
In the case of the Asheville flight mentioned in the opening of this article, my solution was to ask the controller fo r direct to the final approach fix of the assigned runway. Upon arriving there, I had no trouble seeing the VASI and was in good position to fly the visual approach. If I had wanted to be positioned a little further out, I could have asked to fly to a different fix or simply asked to be cleared for the approach in lieu of the visual. Just remember to keep your intentions clear when communicating them to the controller.
The best way to approach an airport day or night, familiar or unfamiliar, is with careful preparation. Having lighted landmarks picked out as well as being acquainted with the airport layout will pay off when it comes time to plan your pattern entry or find the airport on a dark night. Use the resources available to you to get you safely to your destination.
Andrew Robinson is a 135 Charter Pilot and flight instructor in Pennsylvania. He flies Pilatus PC-12s and instructs in Beechcraft Bonanzas.
For a long time, I was happy if an FBO had a radio where I could tune the ATIS or automated weather before getting into the plane. This would allow me to skip listening to the weather in the airplane with the engine running, giving me a quicker exit from the ramp while burning a little less fuel. I would also be able to brief my taxi route from the ramp since I would know which runway was in use before getting in the plane.
As we progress forward in technology, I’m constantly amazed at how much more planning I can do from the palm of my hand. Now, I can call a phone number and get the ATIS, AWOS, or ASOS, depending on the size of the airport; if you prefer reading a text version…well, there’s an app for that.
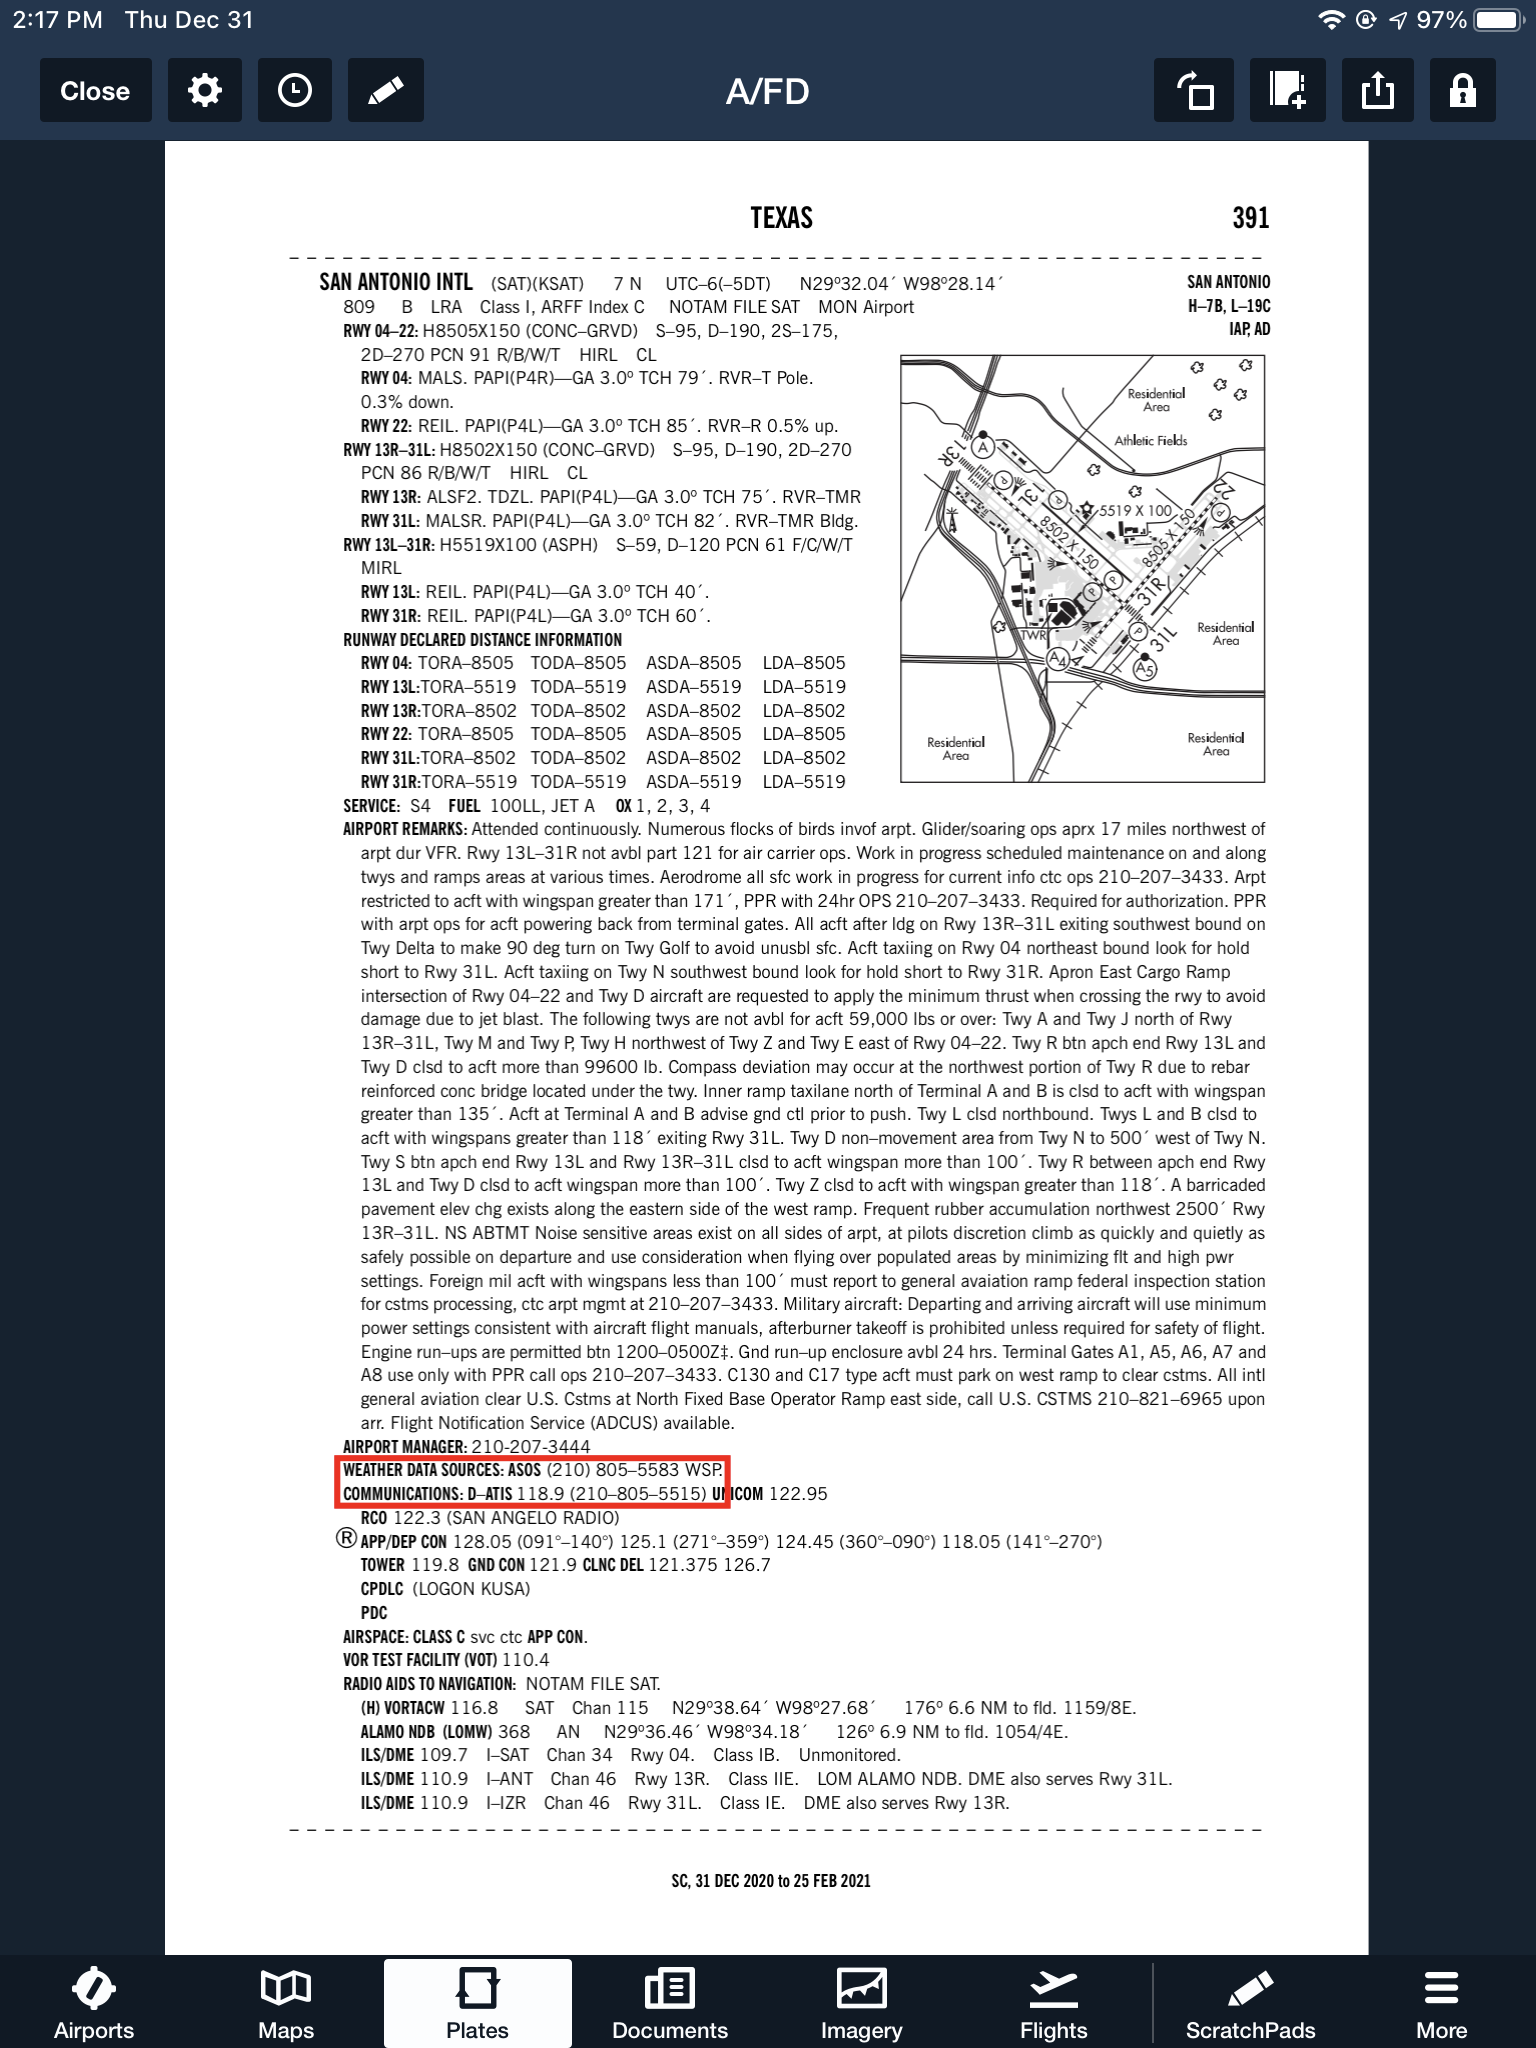
With this technology, it’s very important for pilots to be aware of what service they are utilizing when calling these numbers. Usually only a Class B or larger Class C airport will have a phone number specifically for ATIS as well as one for AWOS/ASOS. These are listed in the Airport/Facility Directory (AFD), as well as all flight planning apps (Foreflight, Garmin Pilot, Stratus Insight). More then one pilot has called the AWOS/ASOS number for an airport thinking they would receive the ATIS (because towered airports that have ATIS phone numbers often also have AWOS/ASOS phone numbers that are different). Since the pilot didn’t hear a code on the phone, that led to the false thinking that either the tower was closed or the pilot did not have the code (ie. Information Bravo) to give to ground control when calling for taxi instructions. The minute weather can be very useful for flight planning, but the ATIS must be received before contacting ATC at a towered airport.
Notice the red box just past halfway down the page. There is a phone number for the ASOS at KSAT and a separate phone number for the ATIS next to the frequency.
Sometimes, you may get a busy tone if someone else is on the line. Usually, waiting a few minutes and trying again will lead to success. Just like old school phone lines, only one call can go through at at time! If it’s a particularly stormy day, you may be fighting a number of pilots to get on the line. In this case, an app where you can read the ATIS may be particularly helpful (Yes, there actually is a dedicated ATIS App!).
The ATIS app allows us lowly pilots without an Aircraft Communicating and Reporting System (ACARS) to access the Digital ATIS (D-ATIS ) at airports where ATIS is available. Only 76 airports in the US have D-ATIS, most of which are either Class B or busier Class C airports. Foreflight also provides D-ATIS textually at the same 76 airports, though it is only accessible depending on which subscription level you have with Foreflight (since I’m not a Garmin Pilot or Stratus Insight user, I’m not sure if either of them give D-ATIS reports).
ATIS App Symbol
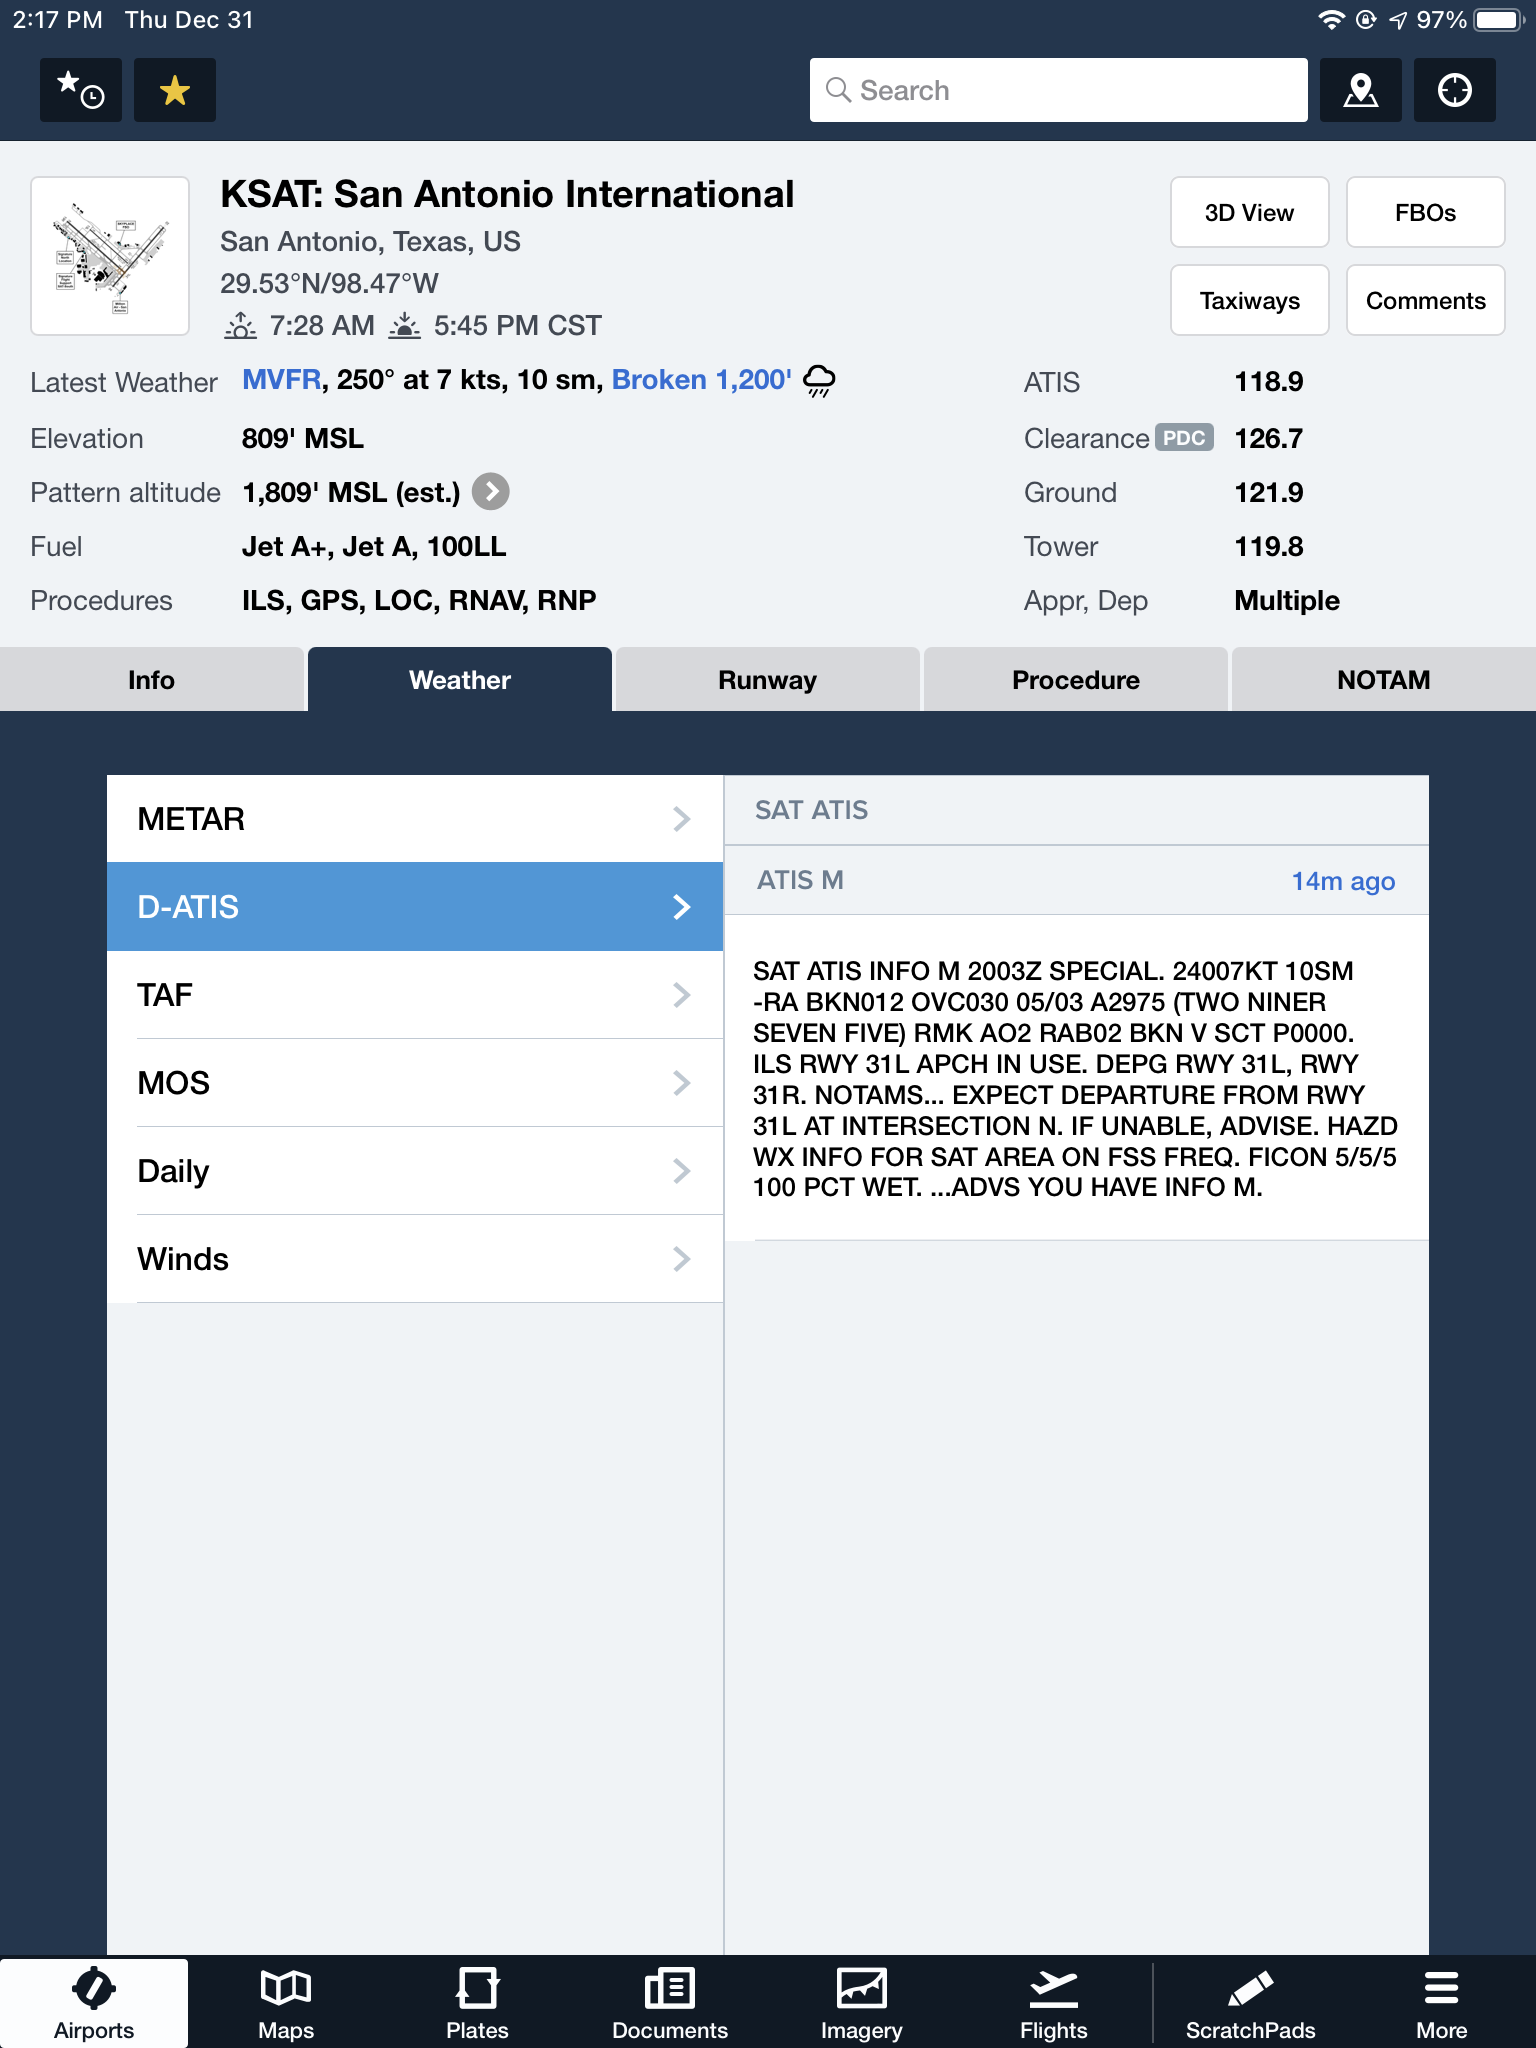
With Foreflight’s D-ATIS, it does not get updated over ADS-B, only when your iPad or phone have an internet signal. When inbound to an airport with D-ATIS, the pilot has to listen to the radio frequency to get the current ATIS. Foreflight will display the last D-ATIS it received, but typically, it’s old. Check the time in the upper right hand corner.
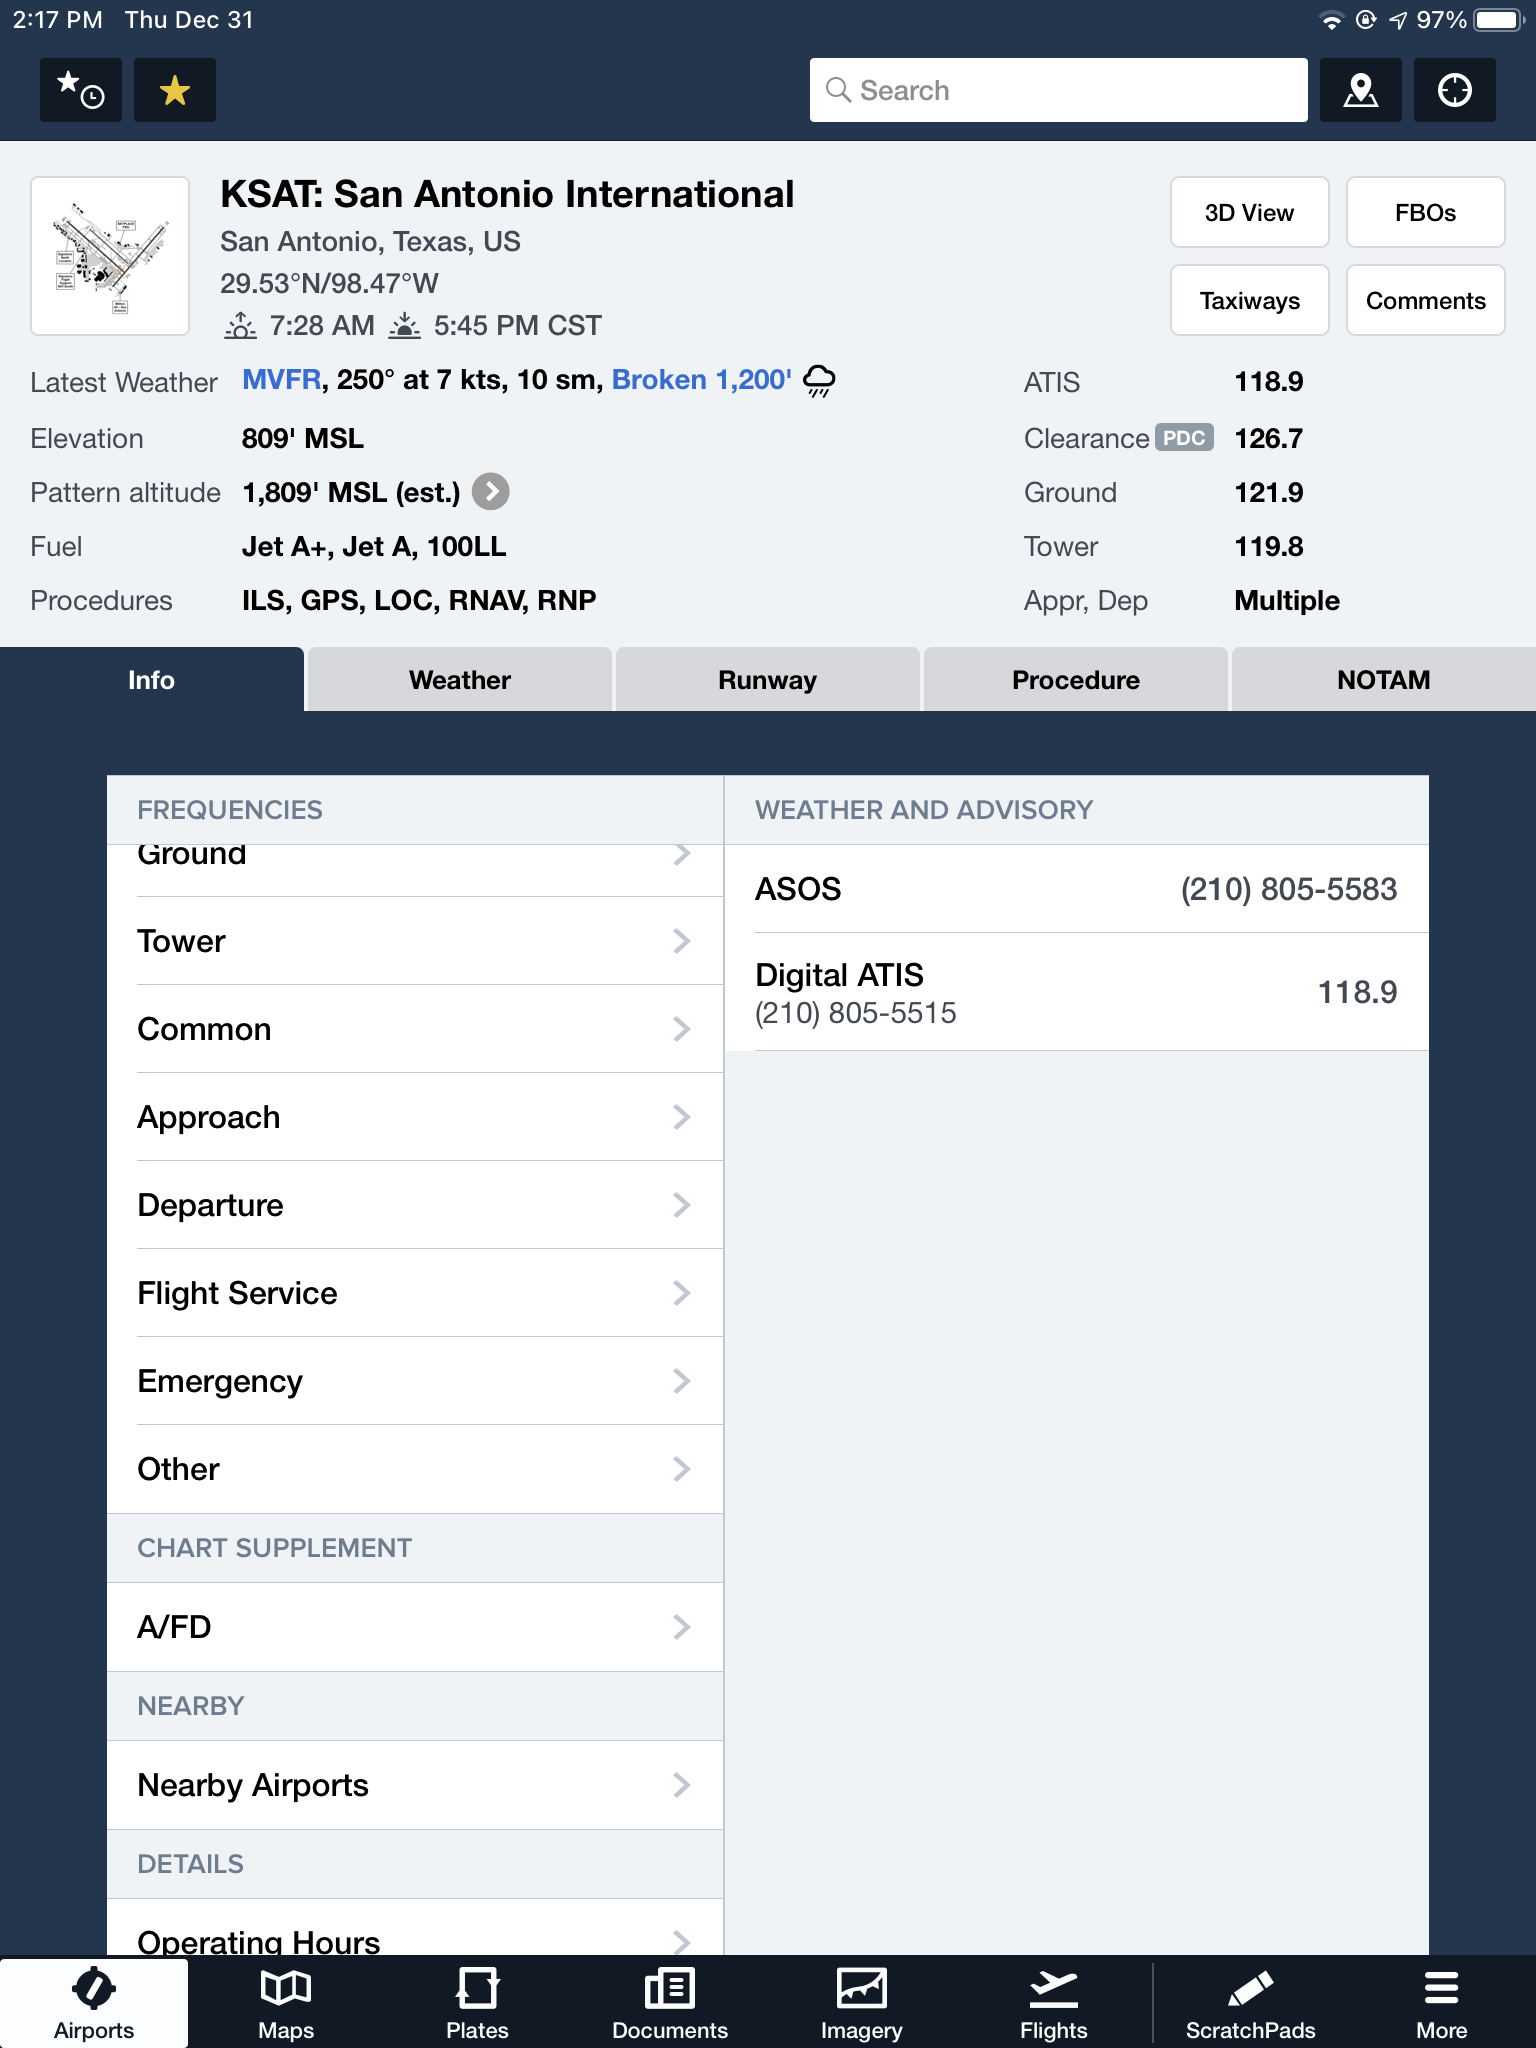
On the Airports page on Foreflight, tap Info, then tap Weather & Advisory and the phone numbers will display along with the ATIS frequency
On the Airports page, tab Weather, then tap D-ATIS, and the last received D-ATIS will display. Note the age of the D-ATIS in the upper right hand corner
Foreflight now offers Pre-Departure Clearance (PDC) at those same 76 airports. With either a pre-registered tail number or a Foreflight call sign (starting in FFL), once a pilot files an IFR flight plan, the D-ATIS and the IFR clearance in it’s entirety are texted to the phone number the pilot filed with. All that is left to do is call ground, state “I have information Romeo and my clearance, ready to taxi,” then away you go. Skipping listening to the ATIS and talking to Clearance Delivery saves a good 5-10 minutes at times, depending on how busy the airport is.
These days, there are many different avenues to get the current weather (and IFR clearances!). When calling on the phone, the key is to be aware, know which number you are calling and, if you are expecting to hear an ATIS message but instead hear the AWOS/ASOS, verify the Chart Supplement Guide and Notices to Airmen (NOTAMS) to check tower hours of operation before flying into the airspace.
An 8 seat, cabin class, single engine turboprop is set to come to market in 2018 from the new aviation conglomerate Textron Aviation (Textron owns Cessna, Hawker, and Beechcraft). Details were announced last week at the European Business Aviation Conference and Exhibition. The as yet unnamed aircraft will be equipped with Garmin’s G3000 avionics and will be outfitted with a GE 1,240 Shaft Horsepower engine.
The GE engine will be equipped with a FADEC (Fully Automated Digital Engine Control) computer that will allow the pilot to make all necessary power adjustments using just one lever.
Range will be about 1,600 miles at 285 knots, giving the airplane the same legs as a PC12 at slightly faster speeds, but a smaller cabin. The cabin will be equipped with a belted lav if desired.
When it comes to turboprop engines, a hot start is a really bad thing. For you piston drivers out there thinking, “What’s the big deal, you are just starting a hot engine,” then here’s a little education for you.
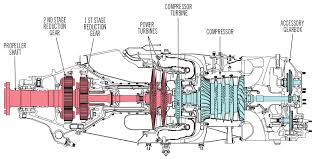
In a PT6 turboprop engine, there is a very important temperature gauge that a pilot monitors very closely during each and every start. It is called the Inter-Turbine Temperature gauge, or ITT. This temperature is a measurement of the exhaust gases between the compressor turbine and the power turbine (s). In the picture below, the probe is located where the blue and red colors meet.
In a turboprop engine, specifically the Pratt & Whitney PT-6 in all it’s different sizes and variations, there will always be a specific temperature that the pilot will want to keep the ITT below. This article will deal specifically with a Piper Meridian.
A Piper Meridian starts hotter than almost any other PT6 engine because of the way it’s air intake is designed. Unlike other turboprops, the Meridian has a permanently open inertial separator. This means that not all the intake air makes it to the engine during start because some of it goes out the inertial separator opening. So, coming to a Meridian from operating other turboprop engines can lead to a little bit of a surprise on the ITT temperature being higher than what a pilot is used to when starting.
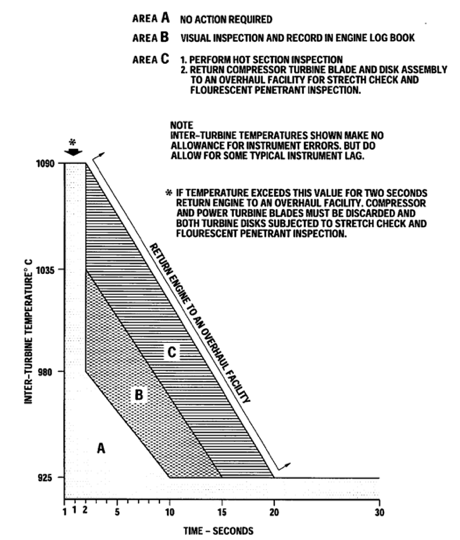
As a rule of thumb, when starting a Meridian, never let a start continue when the ITT hits 875 degrees. Based on the chart below, you are still in the safe zone at 875 and have about a 50 degree buffer before you have to start getting worried.
On cold starts with a good battery or a GPU, 875 is typically not an issue. Most starts when cold are going to be in the high 700s or low 800s. On a cold start, if you are seeing starts in the mid to upper 800s, try starting with a GPU and see if that lowers the start temperature. If it does, then that means your battery is weak and needs to be replaced. Another tell-tale sign of a weak batter is the Ng doesn’t spool up properly (meaning it settles around 12-13%) or takes a really long time to spool up. Also, never start on the battery with less than 24 volts.
When there are multiple flights in one day, the pilot has to take into consideration the warm engine prior to starting. If the ITT, prior to the start sequence, is above 150 degrees, it is time to do some motoring of the engine.
What is motoring? It is simply using the starter to turn the engine, which leads to air being sucked into the engine allowing the engine to cool off prior to start. The theory is, the cooler your engine prior to start, the cooler the ITT peaks at during start.
Here’s the steps on how to dry motor a Piper Meridian:
Battery on
Strobes on
Fuel Pumps and Ignition off
Throttle idle
Condition Lever feather/cutoff
Push the start button
Monitor the ITT temperature
Reaching 150 degrees, if less than 30 seconds have elapsed:
Fuel Pumps on
Ignition On
Condition Lever run
Reaching 150 degrees, if 30 seconds have elapsed:
Push Manual/Stop button to stop the start
Let starter rest for 30 seconds
The starter has a 30 second limit on the Meridian, followed by a 30 second rest period. You can do the sequence twice, then, after the 3rd start, there is a 30 minute rest period. Typically, if the ITT won’t cool down to 150 after the 3rd time, there is probably something wrong.
The most important thing a pilot can remember is never, ever push the condition lever forward if the ITT is above 150 degrees. You’ll be well on your way to avoiding hot starts that way.
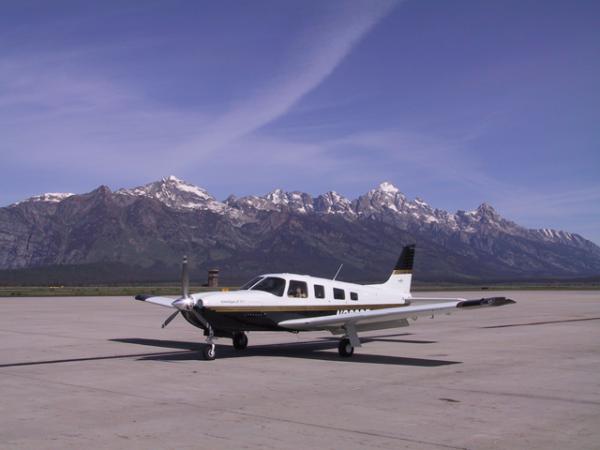
Recently, I assisted with the delivery of a 2007 Piper Saratoga Turbo from San Antonio to New York City. It was a very nicely equipped airplane, complete with a Garmin G1000 panel, an STEC 55x autopilot, and air conditioning. The owner joined me on the flight back to get trained in the airplane, getting him comfortable in it over our 2 day excursion back to NYC. Total flight time was 12 hours, though that did include several stops along the way and landing practice at the airports we stopped at.
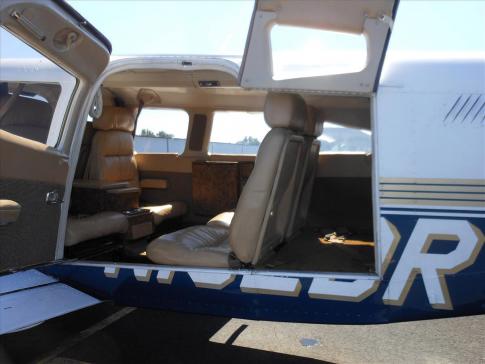
The 6 seat Turbo Saratoga is a very comfortable, very capable flying machine. It is made for hauling, with a gross weight of 3,600 pounds, but that’s not to say it isn’t lacking in comfort, either. The rear cabin has 4 seats, 2 facing forward and 2 facing rear. It would be a little tight for 4 full size adults in the back seat. To avoid knee knocking, the plane is an excellent 4 person and bags aircraft (or 4 adults and 2 kids).
The really nice part about the Piper Saratoga is the baggage door. Unlike the Bonanza, the Piper Saratoga has a baggage door that opens to the baggage compartment, creating a much easier way to load and unload baggage. The nose baggage compartment, which holds an additional 100 pounds, is a very nice feature, allowing the bag load to be spread out.
We typically saw cruise speeds of 155-165 KTAS depending on altitude. The highest we went was only about 9,000 feet, so we didn’t get up real high to see what the single turbo could do. Even though the Lycoming TIO-540 engine burns about 20 gallons an hour, with 102 gallons of gas on board, the fuel consistently outlasted our desire to continue flying.
Being equipped with the G1000 was a very nice feature of this particular Piper Saratoga. The screens are nice and big, larger than the displays on a high wing Cessna or a Corvalis. That allows for easier viewing of approach plates, NEXRAD, and the engine gauges.
There are always downsides to an airplane, and the Saratoga is no exception. The STEC Autopilot leaves some to be desired as I felt it hampered the capability of the G1000 when shooting approaches because the 12 knot crosswind limitation on the autopilot. You can still use the autopilot on an approach with higher than 12 knot crosswinds, but the autopilot tends to search around for the final approach course.
The air conditioning works very nicely, though it did have a tendency to freeze up at altitude. We discovered that quickly and just decided to turn it off and leave the blower on, since it was cool enough up high anyway.
Overall, the Turbo Saratoga is a very nice airplane. The speed leaves a little to be desired (you can get 10 KTAS more out of a Bonanza with a Continental engine, about 20 knots more if it is a Turbo Bonanza), but it is very high on comfort. The Piper Saratoga makes for a good family airplane or as a hauler. I liked the airplane a lot and thoroughly enjoyed my time in it.
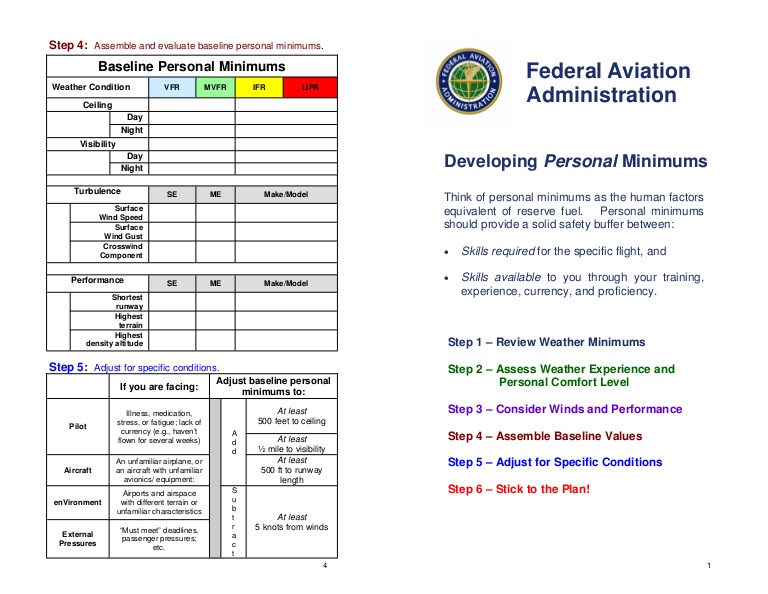
The FAA defines personal minimums “as an individual pilot’s set of procedures, rules, criteria, and guidelines for deciding whether and under what conditions to operate (or continue operating) in the National Airspace System.” Have you actually given thought as to why we choose the personal minimums we do? From the beginning of initial pilot training, weather minimums were established for day-to-day training and during solo flight. I didn’t realize it at first, but I later learned these limits were not just an insurance mandate, but these minimums were set at the time to safely operate an aircraft based on my “then” current experience.
So here’s the question: what are your personal minimums and WHY do YOU have them? Do you ever lower or raise your minimums? Are your minimums based solely on your overall experience level or do they take into account other variables such as advanced avionics? For pilots that fly multiple aircraft like I do, can and do your minimums change in regard to category or type of aircraft you are flying? It’s a judgment decision on how you chose your minimums. However, it’s important that time is taken before you strap into the cockpit for each flight to critically think about the different risk factors and variables which may affect your decision for the minimums you choose.
To guide us, let’s try briefly apply the FAA’s Personal Minimums Checklist to see how risk factors might shape what personal minimums or decisions we make for the day. Remember, just because you have been flying with a certain set of minimums one day, doesn’t mean you can’t adjust your minimums to a higher value given an ever-changing situation.
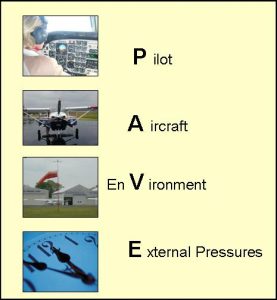
The acronym most pilots have heard is PAVE:
Pilot– We all should be familiar with the acronym IMSAFE associated with this. It addresses variables such as Illness, Medication, Stress, Alcohol, Fatigue, and Emotion. But how do you adjust your personal minimums using this guideline? Have you ever thought about raising your minimums for a training flight if you only got 4-6 hours of sleep, instead of 8? Or if you anticipate a hard IFR flight with a long day, maybe taking a safety pilot to mitigate the chance of a mistake if you’re forecasting having to shoot an approach to your weather planning minimums.
Aircraft– Personally, this is a really important factor for me when deciding what minimums to apply. I often spend a large majority of my time asking myself; is this aircraft properly equipped for the flight? This question goes beyond just looking at the logbook for a properly equipped and legal aircraft. A professional pilot should think further. Am I flying a traditional 6-pack “steam gauge” layout, non-slaved compass card, with a separate OBS gauge for course guidance? What if the aircraft doesn’t have an auto-pilot? What if I’m flying an aircraft equipped with a dual auto-pilot, dual GPS with an integrated glass cockpit? I can comfortably say my personal minimums change depending on the equipment I have available.
A pilot should also look at his/her recency with the aircraft. For example, if you are qualified to fly both airplanes and helicopters, maybe you should choose to have higher personal minimums in one particular airframe or if you haven’t flown that airframe within 30, 60 or 90 days. This is a very important factor for the owner/pilot.
EnVironment– Most of the time, when we think of environment, we ask ourselves, is the weather legal for me to take off and, more importantly, can I conduct this flight safely? Basic flight planning should have taught us to take into consideration crosswind limits, day versus night, and the type of airspace the flight is conducted in. Thought should also be given to how you set your personal minimums in regards to the particular type of environment you might rarely encounter. Flying an approach to your minimums in the flat plains of Texas during the day is one thing, but how would you adjust your weather minimums flying to a new airport, at night, with no moon illumination, in the mountains of Colorado? Could you reduce the risk and adjust your minimums in this scenario with two pilots?
External Pressures – What external pressures are affecting your flight? Passengers, the owner, “get-there-it is”, the desire to impress someone? Although external pressures should never be a factor when conducting a flight, they almost always play a role in your decision whether to conduct the flight or not. For example, a professional pilot gets hired to do a flight and the weather is below their personal minimums. The pilot could be tempted to lower their minimums by 100 feet to take the flight for a paying customer. This scenario plays out every day across the country whether it’s a professional pilot or owner/pilot. It would be foolish not to consider this type of pressure. Always make sure you have a plan if and when you encounter this situation. Planning your flight and having a plan to deal with these potential scenarios ahead of time ensures you stick to your minimums. It can be as simple as telling your passengers, or the owner, well ahead of your flight what your personal minimums are to accept the flight, and to ensure they, or you, have a back-up plan!
Most pilots will never break a hard limitation such as an airframe cross wind limitation, or engine limit, but the chances of breaking a personal minimum are realistic. Think about the last time you went on a diet and broke your plan because you were tempted by your friends or family during an outing. Self-imposed personal minimums can be hard to enforce and we need to acknowledge this as humans. Here are a few techniques that you can use to assist in making a decision using personal minimums and help reduce the influence of external pressures.
Step 1: Sit down with your CFI/CFII and fill out a personal minimums worksheet. Filling one out by yourself is a good start but having an outside objective view will help in making sure your personal minimums are realistic. Remember, it is easy to convince ourselves that we can do something even though we have set personal minimums. Talk with other pilots to see if you have set realistic expectations.
Step 2: Preflight planning must start a few days in advanced. It can be as easy as checking what the forecast might be and looking at the projected route, near-by alternate airports, and various approaches. This can be done quickly and will give you a heads up on whether the flight can be safely conducted or not. By alerting the passengers or owner early enough, alternate plans can be developed. An extra pilot can be added, the passengers can fly commercial, bring along a CFI, or cancel the trip altogether and seek alternate transportation. The main point is the decision was made well ahead of the flight when conditions didn’t look favorable. This helps in removing external pressures and ensures you don’t go below your personal minimums.
Step 3: Never be afraid to ask for a second opinion. Part 135 operators have set procedures for conducting flights which assist the pilots in making decisions. These set procedures help remove external pressures by allowing the pilot to say, “The rules don’t allow for this, or this is how we will conduct the flight!” However, under Part 91, the pilot has to take ownership for all phases of the flight. This is where talking it out with another pilot helps with mitigating external factors and the environment. Ideally, this person should have more experience and be able to talk through the situation. For instance, if I’m flying to a new destination, I often seek the advice from another pilot who’s familiar with the area. They may have key insights into weather patterns, preferred approaches, or hazards to avoid. In certain situations, asking for another pilot’s opinion might be what influences your go/no-go decision! You’ll be amazed how much you can learn just from talking to other pilots.
Step 4: Continue to build your experience and knowledge base. Building experience requires us to push our abilities, and sometimes this may be to the limit. However, this can be done in a controlled training environment or just going out and experiencing it. Get a new license, fly regularly with a CFI/CFII, and always try and take advantage of training opportunities. For example on your next flight from point A to point B, practice hand flying an approach, do a short field landing, a quick steep turn, etc. Quality flight time is always better than quantity. Continue to challenge yourself and try not to become complacent.
Personal minimums are a tool to assist in every pilot’s aeronautical decision making process. Use your personal minimums to guide your final go/no-go decision and remember to stick to the plan. I encourage you to review the FAA’s Risk Management Handbook (FAA-H-8083-2). Appendix B has Sample Risk Management Scenarios and reviewing them will give a better understanding how to apply the techniques discussed to your everyday flying.
Pedro Vargas-Lebron is a King Air 200 and uH-60 Blackhawk Instructor pilot with the Texas Army National Guard. Pedro is a CFI/CFII/MEI both in airplanes and helicopters with over 4000 hours of flight time, half as an instructor pilot.