We spend time training for them, but real-world emergencies are rare enough that it’s easy to get complacent. They don’t always happen to “other pilots,” though, and preparation can make a big difference when things don’t go as planned:
• What if you lose 500 rpm during takeoff, but the engine is running smoothly?
• What if the ammeter drops to zero during a flight in IMC?
• What if your left aileron develops a strong vibration in flight?
Our new seminar is full of expert tips on handling those “up here, but wishing you were down there” scenarios. We focus on how to keep abnormal situations from becoming full-blown emergencies, offer advice on keeping critical problems under control, and give our best advice on off-airport landings.
Find an AOPA Emergency Seminar near you!
Monday January 11, 2016-The Woodlands Waterway, 7pm-9pm
1601 Lake Robbins Drive, The Woodlands, TX 77380
Tuesday January 12, 2016-Wyndham Houston West, 7pm-9pm
14703 Park Row Blvd., Houston, TX 77079
Wednesday January 13, 2016, Holiday Inn San Antonio Airport, 7pm-9pm
77 NE Loop 410, San Antonio, TX 78216
Thursday January 14, 2016, Omni Austin Hotel at Southwark, 7pm-9pm
As was the case with the Class B Airspace around Houston several months ago, the Class B Dallas airspace has been overhauled as well. These changes were implemented at the last database update on September 18th. If you’ll be flying into any of the Dallas airspace airports IFR, make sure you have current charts and your GPS databases are updated.
According to AOPA, 14 SIDs and STARs were deleted, a number of new procedures were added, and changes were made to most of the other remaining procedures. The new procedures in the Dallas airspace consist mainly of RNAV procedures for turboprops and jets, so most GA aircraft won’t be affected by those. The legacy procedures that remained in place over went changes, including new frequencies, so piston aircraft going into the Dallas airspace are still affected.
From AOPA, departures from Dallas Love (KDAL) that file their flight plan with special equipment /G in their flight plan will automatically be given an RNAV departure procedure. This does not appear to affect piston aircraft as all the new RNAV SIDs in the Dallas airspace are for turboprops or turbojets.
The reason for the changes to the Dallas airspace? Similar to the changes in Houston, these airspace changes are meant to streamline departures and arrivals in the Dallas airspace area, reduce controller workload, and give continuous descent angles for arriving high altitude traffic.
Don’t be surprised the next time you are in the Dallas airspace area if you receive a clearance that states: “Descend via the arrival.” In that case, just check the chart and aim for the appropriate altitudes at the appropriate fixes. As we move closer to the ADS-B requirement, I believe we will see more and more of these terminal procedure overhauls, so be prepared and keep those charts and databases up to date.
As was the case with the Class B Airspace around Houston several months ago, the Class B Dallas airspace has been overhauled as well. These changes were implemented at the last database update on September 18th. If you’ll be flying into any of the Dallas airspace airports IFR, make sure you have current charts and your…
Ah, fall is finally here. In Texas, it arrived about a month late, but showed up with a vengeance. A strong cold front caused a 40 degree temperature drop in 12 hours earlier this week, bringing rain, lower freezing levels, and lots of wind.
Fall means cooler temps, but fall also means less light. The sun begins to set sooner, plus the fall back time change in November cause darkness to spring upon an unaware pilot.
Before getting in to too many night landings tips, just a friendly reminder, passengers can only be carried at night if the PIC has completed 3 takeoffs and landings to a full stop in the last 90 days during the time period of 1 hour after sunset to 1 hour before sunrise.
Lots of us have been landing long before sunset for most of the past couple of months, so those night flying skills might be a little rusty. The best way to remedy night flying rustiness? Call an instructor and go get some practice.
In the meantime, here are some tips as to what to expect for your next night flying experience.
Your Eyes Are Very Important. This may seem like an obvious statement, but night vision can be affected by many things. Before you takeoff, you want to make sure you can see in the dark. The FAA recommends no bright lights 30 minutes prior to takeoff. They also recommend using oxygen at night as this greatly improves night vision, even at low altitudes. Use off center viewing to help spot traffic or other objects in the air. Finally, when preflighting, use a red flashlight as much as possible, but if you do have to use a white light, close one eye to keep one eye from being blinded.
Utilize Approach Lights onLanding. Night landings are very different then day landings. It is very difficult to get the proper depth perception, not too mention see obstacles below you on your final approach to a runway. PAPI’s, VASI’s, and instrument approach glide slope’s become very important. If you are VFR only pilot, if your airport has a PAPI or a VASI, keep 2 white and 2 red (or 1 white and 1 red) lights. If you see 3 red (or 2 red), climb. If you see 4 red, definitely climb. If you are an IFR pilot, I highly recommend always flying an approach at night. What if your airport doesn’t have a PAPI, VASI, or approach with a glide slope? You might not want to utilize it at night. One side note on VFR flight: Clouds are nearly invisible at night. If you do fly into a cloud (a clue is your strobe lights start reflecting back at you), don’t panic. If you have an autopilot, turn it on and execute a 180 degree level turn. If you don’t have an autopilot, start scanning your instruments, keep your attitude indicator blue side up, and make a shallow 180 degree while maintaining altitude. Then call ATC, advise them what happened, and ask for help. One more note: I highly recommend that if a pilot finds that he/she will fly at night at lot, get an instrument rating and fly IFR at night. It’s much safer.
Practice Landings Before Carrying Passengers. The tendency when landing at night is to level off too high before flaring, causing the airplane to bleed off speed and energy too high above the runway. This can lead to a stall, a hard landing, and/or too high of a pitch attitude at touch down causing a tail strike. A good tip is start your level off when you can see the tire marks on the runway. Make sure you practice night landings, preferably with an experienced instructor who is night current and proficient, before carrying any passengers on board, even if you are night current, but haven’t landed at night in a while.
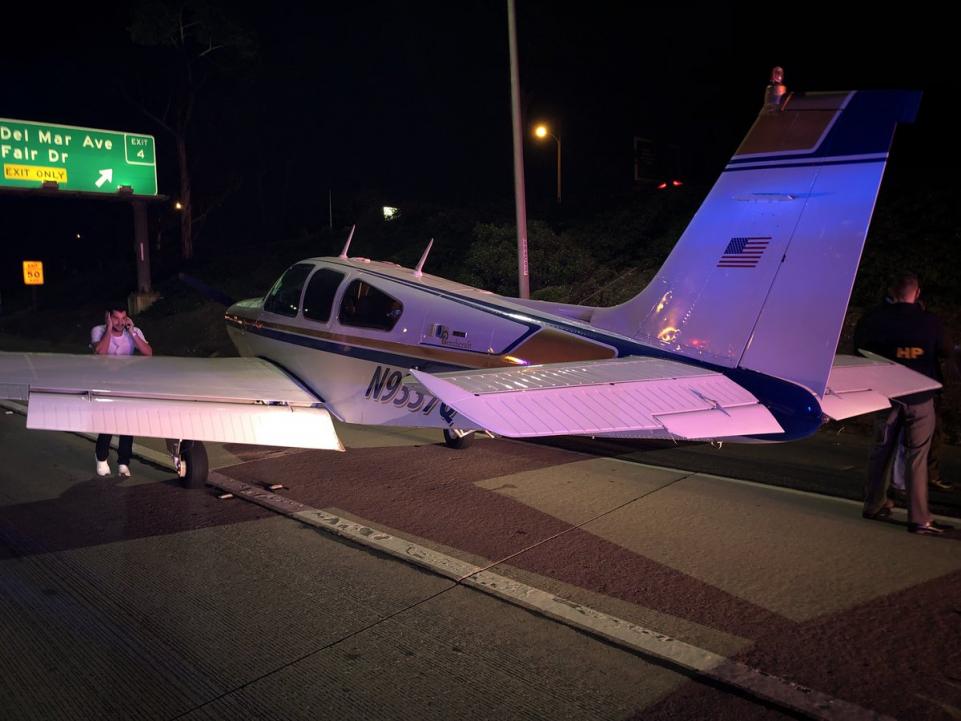
Night Emergencies. For engine failures at night, you are very limited on options. Unless you have a Cirrus equipped with a CAPS parachute system, you really have two options if an airport isn’t within gliding distance. Find a wide, lighted road that appears to be lightly trafficked. A word of caution, though: be careful of light poles, fences, concrete medians, cars, and buildings. The LA freeway would not be a good option (though there are exceptions to this rule as is evidenced by the picture below). The second option is find a dark spot and pray it’s a field (or the Hudson River). As you get closer, you can turn your landing light on to see what the ground looks like. If it looks good, keep the light on and continue. If you don’t like what you see, turn your landing light off and continue….
Flying at night can be the best time of day to fly. It’s usually smoother, cooler, and you get to see all the city lights. It is a very different environment, however, so make sure to get some training before darkness settles in on your next trip.
Ah, fall is finally here. In Texas, it arrived about a month late, but showed up with a vengeance. A strong cold front caused a 40 degree temperature drop in 12 hours earlier this week, bringing rain, lower freezing levels, and lots of wind. Fall means cooler temps, but fall also means less light. The…
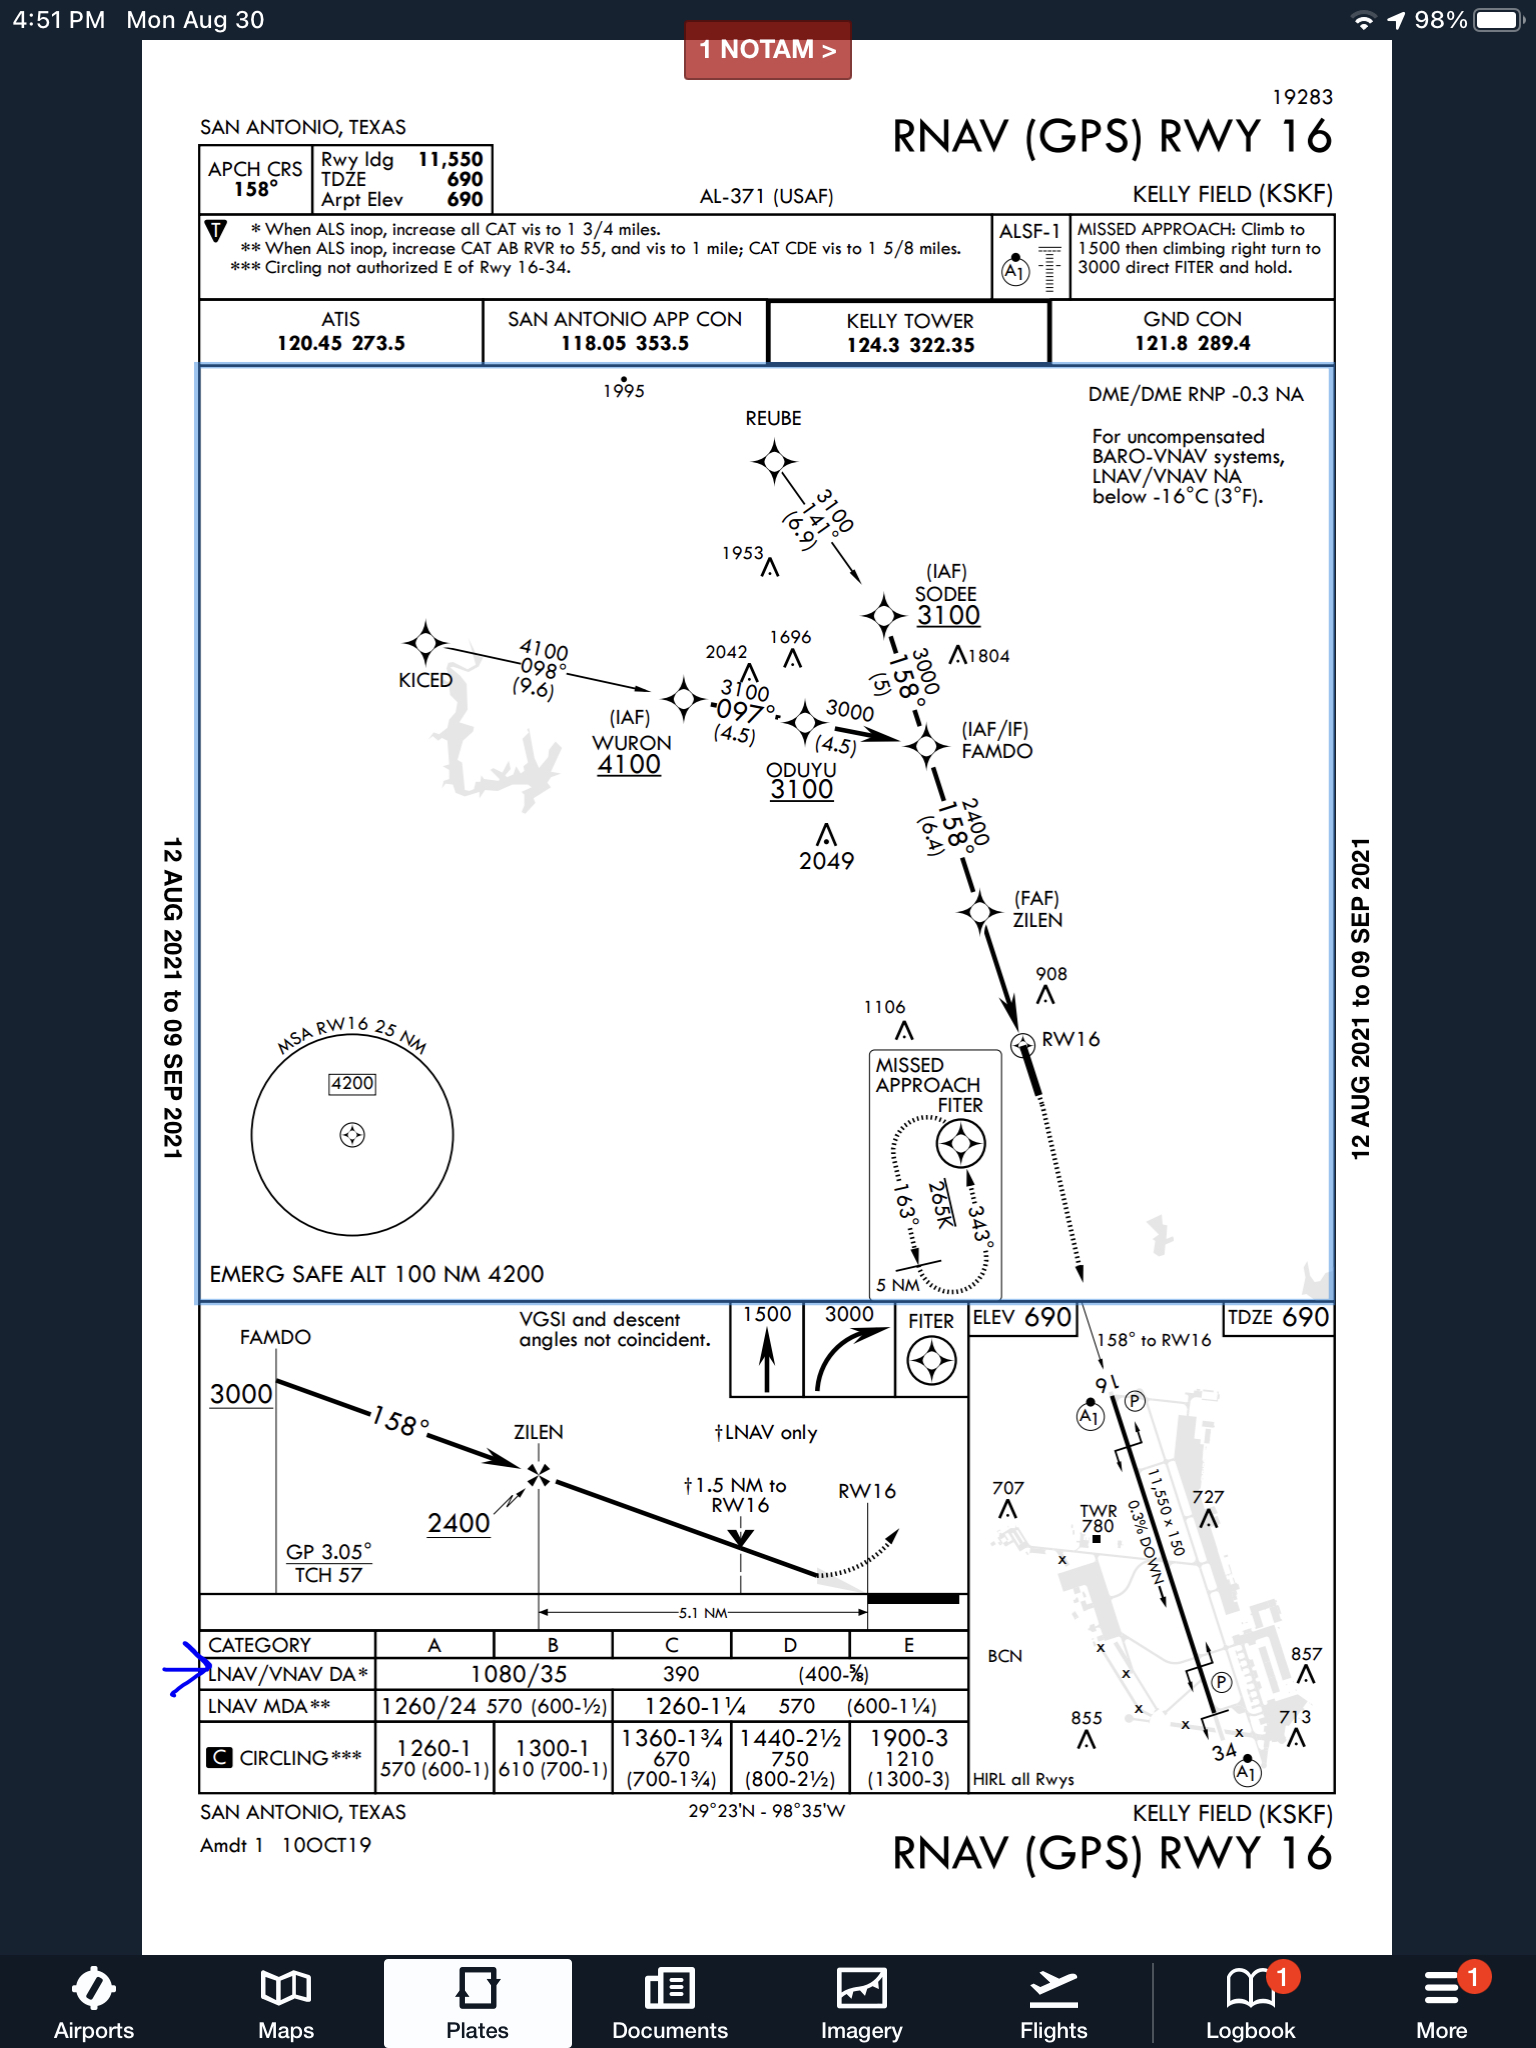
When flying a WAAS GPS approach, there are several different levels of WAAS signal that a GPS receiver can get. The most precise is an LPV signal. LPV stands for Localizer Performance with Vertical guidance. An LPV approach has the lowest minimums of all the WAAS GPS approaches, typically in the range of 200-300 feet AGL. A GPS glide path (GP) is guaranteed with an LPV approach and the minimum altitude is a decision altitude (DA).
Just like a localizer, an LPV course width get’s tighter and the CDI becomes more sensitive the closer the plane get’s to the runway. Even though the LPV approach minimums are so low and the approach is down to a DA, they still aren’t considered precision approaches by the FAA (which leads to some extra planning when selecting an airport as an alternate that only has GPS approaches, since the AIM specifies only the LNAV minimum are to be considered if an alternate airport only has GPS approaches, bringing the 800 foot ceiling requirement to bear)
An LNAV/VNAV approach is still a WAAS approach that has a GPS glidepath, but is slightly different than an LPV approach. An LNAV/VNAV final approach course does not get more sensitive the closer the plane gets to the runway. The smallest course width on an LNAV/VNAV approach is 0.3 miles either side of center. LNAV/VNAV approaches will, most of the time, have higher minimums than LPV approaches and can have minimums no lower than 250′ AGL.
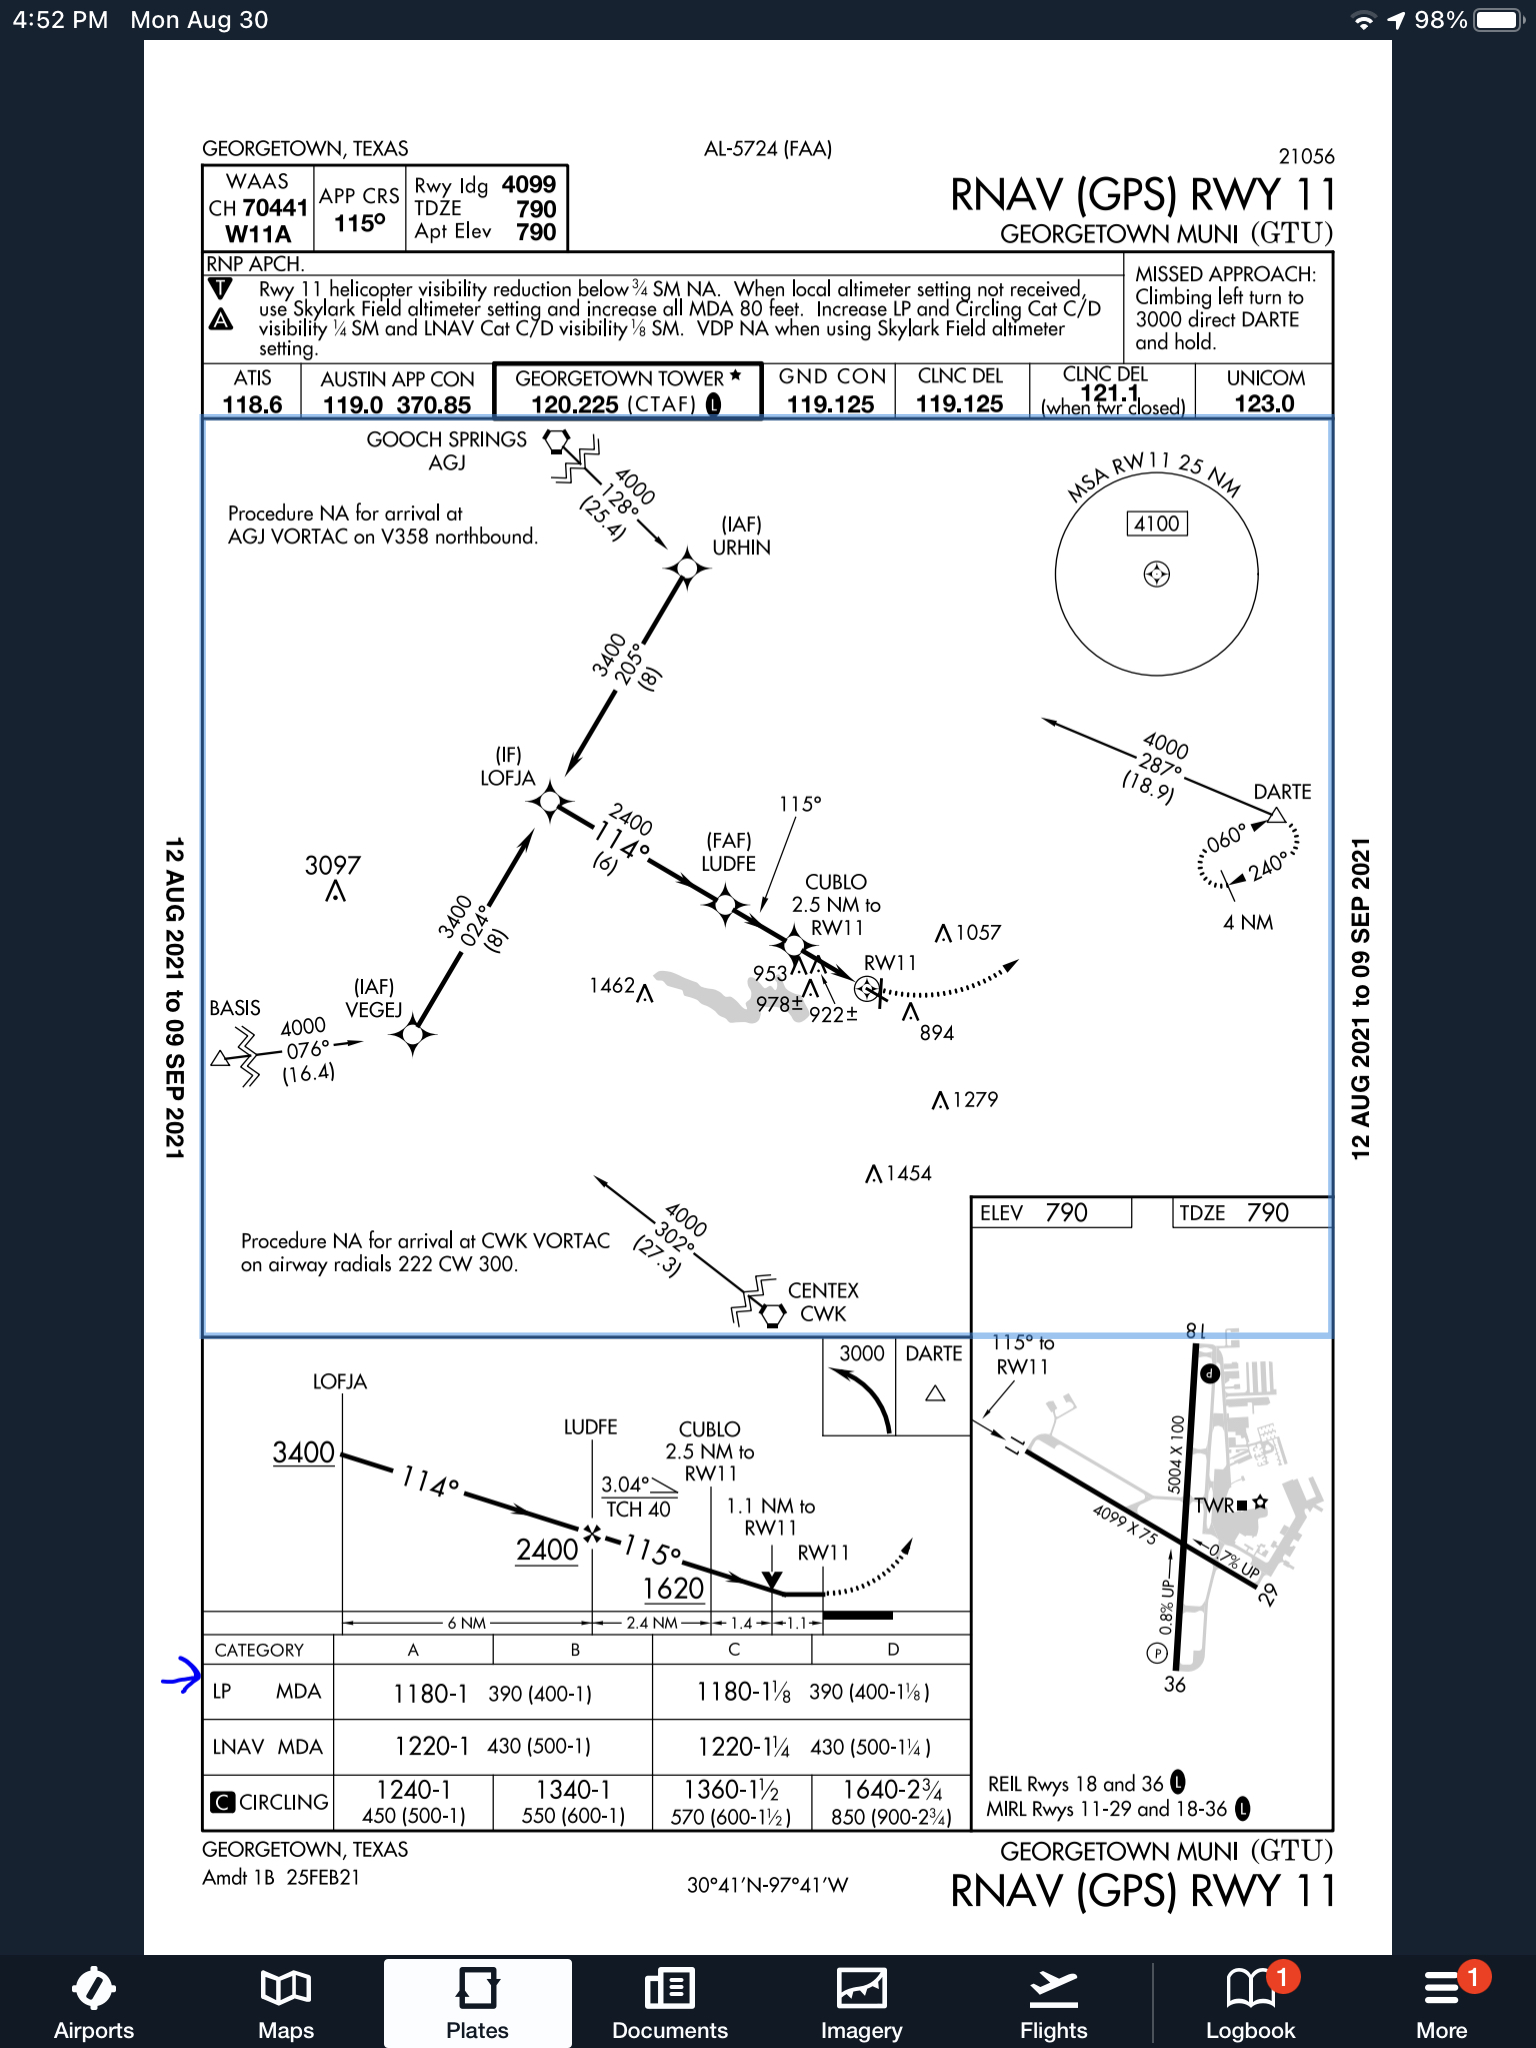
The third type of WAAS approach is strictly a non-precision approach with a Minimum Descent Altitude (MDA). These are designated LP approaches, which stands for Localizer Performance. These are like old school Localizer only approaches that, similar to the lateral portion of an LPV approach, the course width tightens the closer to the runway that a pilot is. There is no glide path by definition of an LP approach, though there is a caveat.
Now, by looking at an approach plate that is a WAAS approach, but only has LP minimums listed, a pilot would assume there would be no glide path. Depending on what type of GPS unit the airplane has, that pilot could be wrong. Garmin Perspective units (Cirrus G1000), all GTN 750s and GTN 650s, All G1000 NXi units, most Garmin 430W and 530W, and all Avidyne IFD 550/540 and 440 units will display an advisory glide path on an LP approach, designated LP+V.
What does LP+V indicate? An advisory glide path is just advisory, but it is totally legal to follow down on a non-precision LP approach. The kicker is obstacle clearance is not guaranteed and the pilot needs to keep an eye on minimum altitudes at the different waypoints on the approach. The big thing I tell people is, when you arrive at the MDA and the runway is in sight, following the advisory glide path below the MDA could get you in trouble with obstacles. Don’t just hone in on your instruments when you break out of the clouds. Look out the windscreen and make sure you won’t hit anything.
If you arrive at the MDA on the advisory glide path and the runway isn’t in sight, DON’T GO BELOW THE MDA! Most autopilots won’t level off at the MDA, even if that altitude is set in the altitude pre-select, so this will involve turning off the autopilot before the MDA and manually leveling off, or engaging the altitude mode of your autopilot at the MDA.
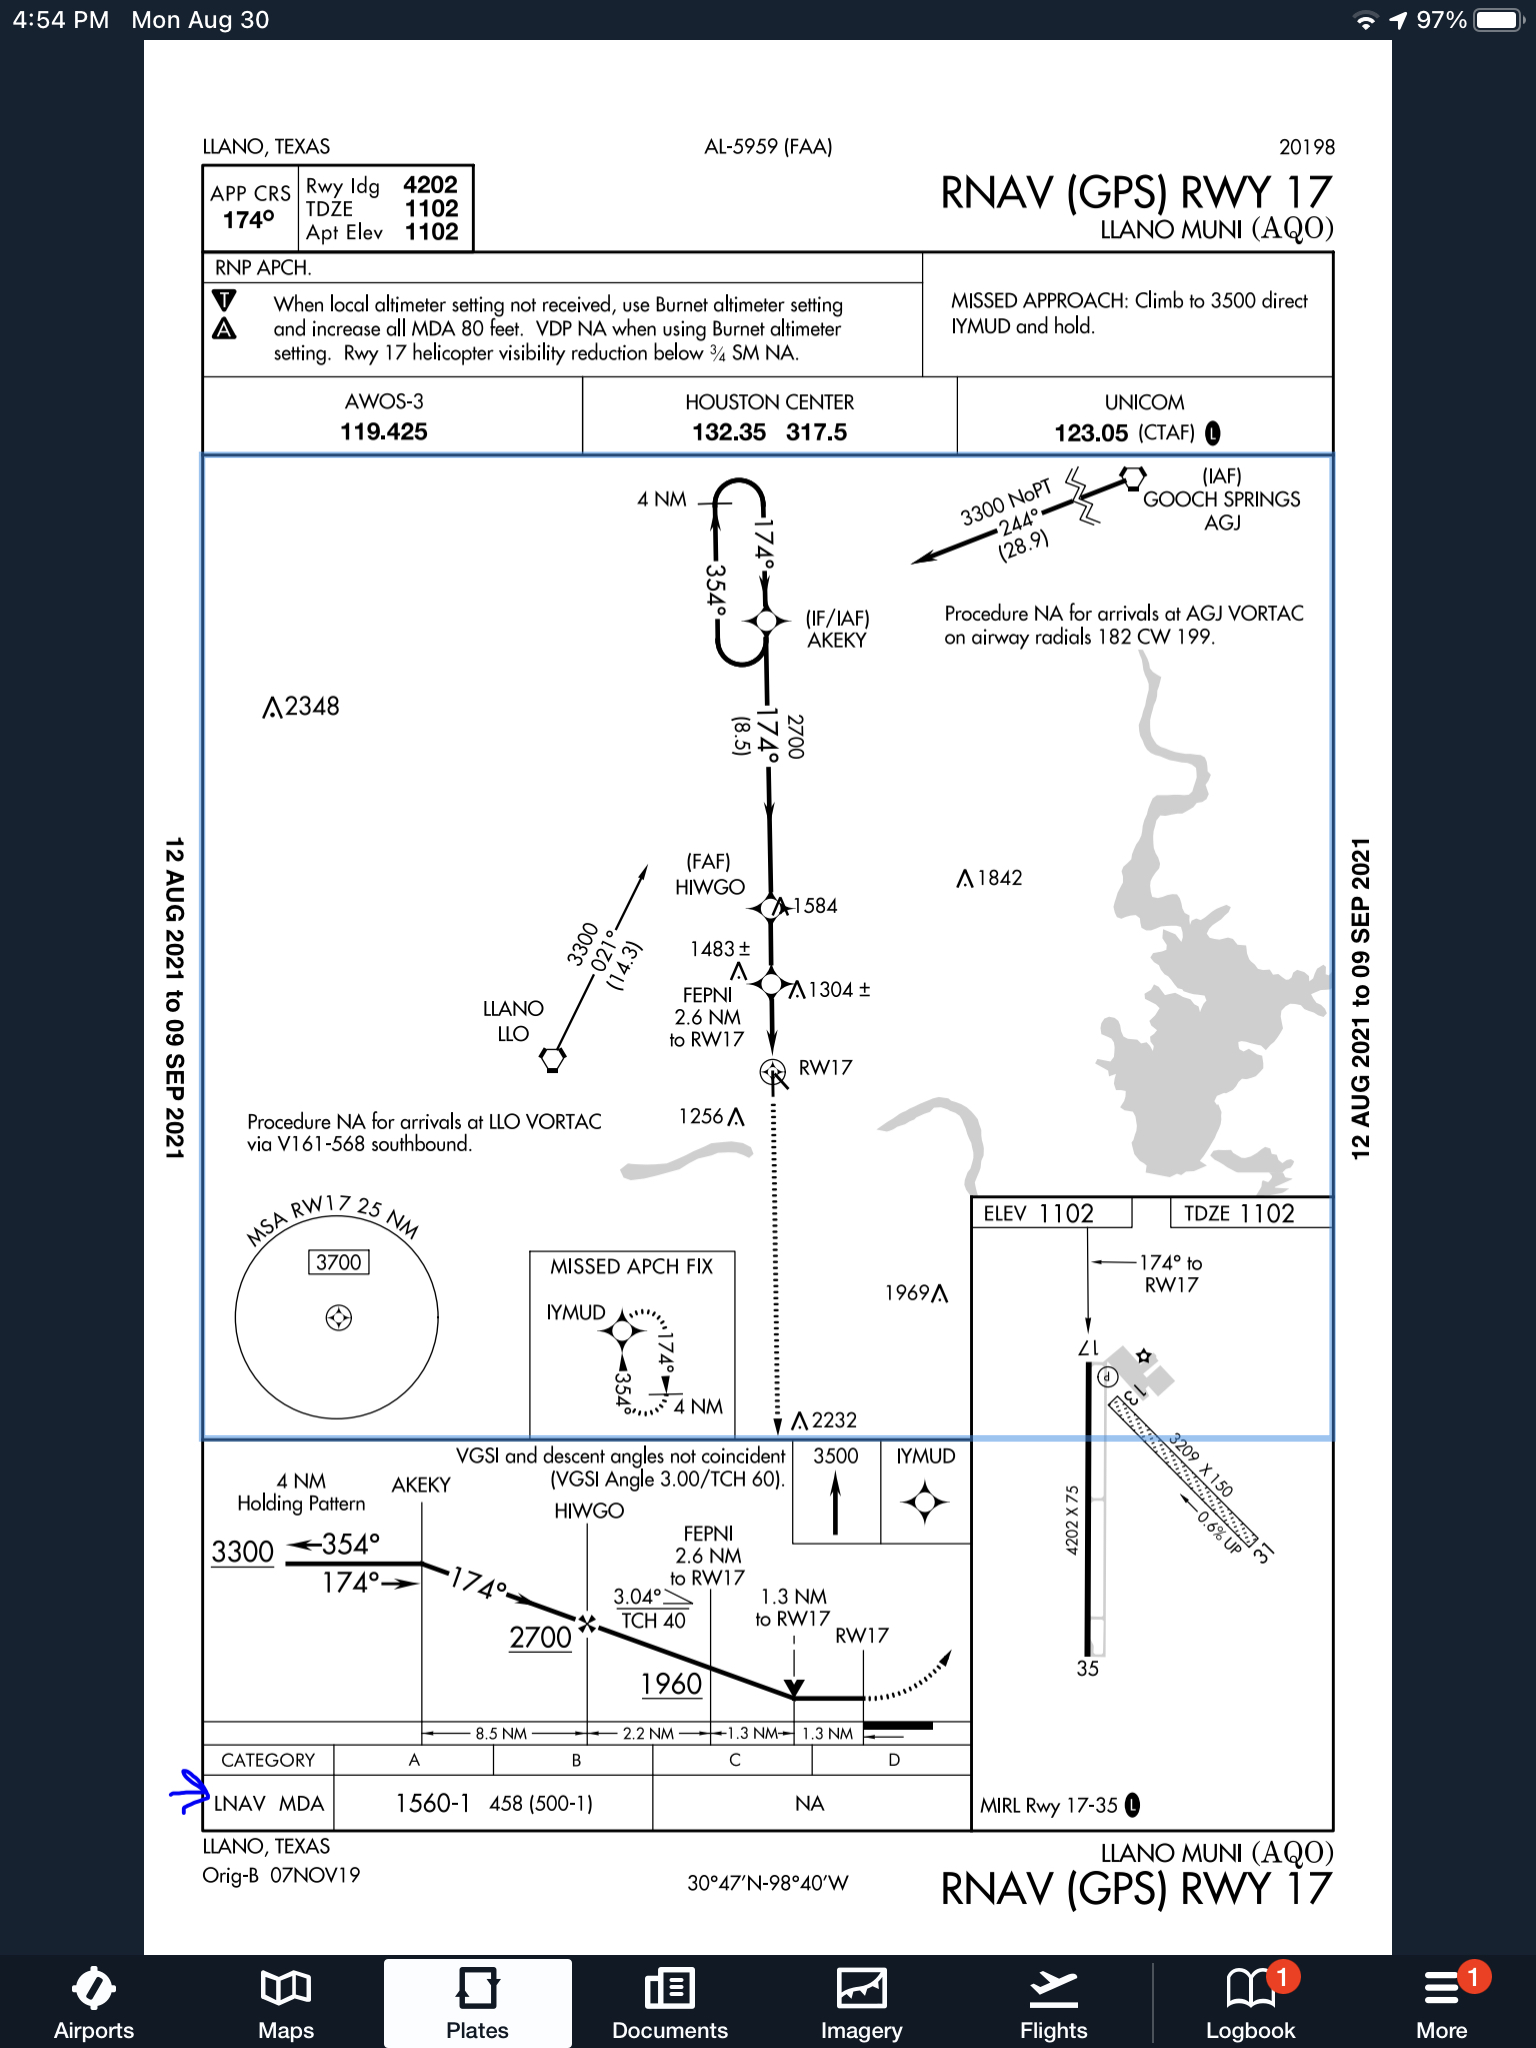
One other type of GPS approach that you will encounter is an LNAV approach. This is a non-WAAS approach down to an MDA, but your GPS unit may still give you a +V. Most modern ones will.
When flying a WAAS GPS approach, there are several different levels of WAAS signal that a GPS receiver can get. The most precise is an LPV signal. LPV stands for Localizer Performance with Vertical guidance. An LPV approach has the lowest minimums of all the WAAS GPS approaches, typically in the range of 200-300 feet…
The Bluebonnet Fly-In at Redbird Skyport has been rescheduled due to weather and the recent flooding in San Marcos. The new date for the Bluebonnet Fly-In will be Saturday, June 6th from 10am-4pm.
Hank Gibson of Texas Top Aviation will still be presenting on Garmin 430/530 Approaches this Saturday at 2pm in the large conference room at Redbird.
The Bluebonnet Fly-In at Redbird Skyport has been rescheduled due to weather and the recent flooding in San Marcos. The new date for the Bluebonnet Fly-In will be Saturday, June 6th from 10am-4pm. Hank Gibson of Texas Top Aviation will still be presenting on Garmin 430/530 Approaches this Saturday at 2pm in the large conference…
The Angelina County Airport in Lufkin, TX (KLFK) will be hosting the Angelina County Airfest on Saturday, October 10th. The airport will open up at 9am.
Prepare for a day of food, fun, and some great performances. There will be warbirds and many other classic airplanes on display, not too mention a number of aerobatic performances as the day goes on.
The Angelina County Airport in Lufkin, TX (KLFK) will be hosting the Angelina County Airfest on Saturday, October 10th. The airport will open up at 9am. Prepare for a day of food, fun, and some great performances. There will be warbirds and many other classic airplanes on display, not too mention a number of aerobatic…
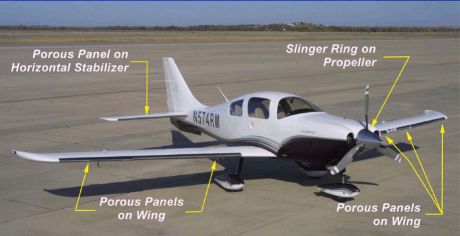
When cleaning airplanes, the majority of people don’t know how to properly maintain their TKS panels. TKS panels provide wing leading edge, horizontal stabilizer leading edge, and, in the case of FIKI airplanes, vertical stabilizer leading edge de-icing protection. For those not familiar with them, they are metal strips that have thousands of holes drilled into them where the TKS fluid seeps out. They have become quite prevalent on Cirrus aircraft, the Cessna TTx, and Mooney aircraft manufactured in the last decade or so. The system is also known as a weeping wing system.
Being on the leading edges, these panels pick up bugs very easily. For the uninitiated, it would make sense to just use normal airplane cleaner to spray the panels and scrub the bugs. Don’t!
Using anything that contains Methyl Ethyl Ketone (MEK) as that can harm the TKS bladders behind the panels. Any aircraft cleaner containing wax could cause the pores to clog, preventing the TKS fluid from properly seeping onto the wing.
What’s the best thing to do? Soap and water with a soft cloth is a good start (again, make sure it doesn’t have wax in it. Dish soap would be suitable). No hose available? Just simply turn the TKS system on, let it run till you start to see fluid drip off the wings onto the ground, and use the fluid to clean the panels.
A soft cloth would work fine, but, if the panels are really buggy, take a green scouring pad to do some scrubbing. Just make sure the scrubbing motion is up and down with the grain, not side to side. You can find the green scouring sponges on the dishwashing aisle in the grocery store. Just leave one in the hangar for when you need it.
When cleaning airplanes, the majority of people don’t know how to properly maintain their TKS panels. TKS panels provide wing leading edge, horizontal stabilizer leading edge, and, in the case of FIKI airplanes, vertical stabilizer leading edge de-icing protection. For those not familiar with them, they are metal strips that have thousands of holes drilled…