As was the case with the Class B Airspace around Houston several months ago, the Class B Dallas airspace has been overhauled as well. These changes were implemented at the last database update on September 18th. If you’ll be flying into any of the Dallas airspace airports IFR, make sure you have current charts and your GPS databases are updated.
According to AOPA, 14 SIDs and STARs were deleted, a number of new procedures were added, and changes were made to most of the other remaining procedures. The new procedures in the Dallas airspace consist mainly of RNAV procedures for turboprops and jets, so most GA aircraft won’t be affected by those. The legacy procedures that remained in place over went changes, including new frequencies, so piston aircraft going into the Dallas airspace are still affected.
From AOPA, departures from Dallas Love (KDAL) that file their flight plan with special equipment /G in their flight plan will automatically be given an RNAV departure procedure. This does not appear to affect piston aircraft as all the new RNAV SIDs in the Dallas airspace are for turboprops or turbojets.
The reason for the changes to the Dallas airspace? Similar to the changes in Houston, these airspace changes are meant to streamline departures and arrivals in the Dallas airspace area, reduce controller workload, and give continuous descent angles for arriving high altitude traffic.
Don’t be surprised the next time you are in the Dallas airspace area if you receive a clearance that states: “Descend via the arrival.” In that case, just check the chart and aim for the appropriate altitudes at the appropriate fixes. As we move closer to the ADS-B requirement, I believe we will see more and more of these terminal procedure overhauls, so be prepared and keep those charts and databases up to date.
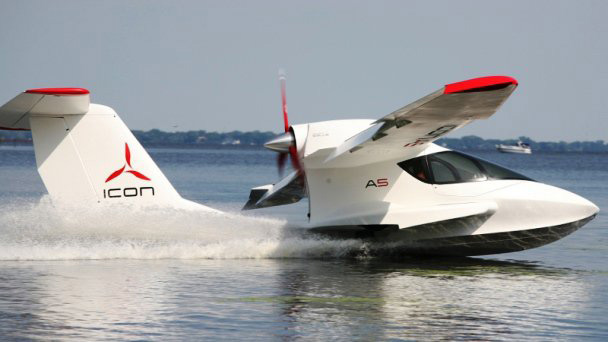
Most pilots have seen the Icon A5 light sport amphibious aircraft. It’s a neat design that can land on water or on a runway. The high wing design with a pusher prop has foldable wings that allow it to be put on a trailer and towed behind a vehicle, allowing it to be offloaded at boat ramps (it also begs the question can you wakeboard behind it?).
Apparently, not all non-pilots know about the Icon A5. Last week, one landed in the water near a beach in Southern California, but most of the beach goers and local authorities believed it had crash landed in the water. Emergency crews were dispatched, but everyone was surprised when the two occupants crawled out on the wings, had a cup of coffee, and took back off.
Most pilots have seen the Icon A5 light sport amphibious aircraft. It’s a neat design that can land on water or on a runway. The high wing design with a pusher prop has foldable wings that allow it to be put on a trailer and towed behind a vehicle, allowing it to be offloaded…
The Cirrus Pilot Proficiency Program is coming back to the Lone Star Airport in Conroe, TX (KCXO) on October 23rd-25th. Wondering what the CPPP program is?
“CPPP offers a weekend event for Cirrus owners and their partners that focuses on Cirrus-specific knowledge and flying proficiency. We bring some of the most experienced flight instructors who regularly teach in all kinds of Cirrus airplanes flown for all kinds of missions. We have prepared an extensive syllabus of ground courses that complement the transition training and delve into areas of greatest need for Cirrus pilots.” (from CirrusPilots.org)
The weekend starts off with a group dinner on Friday night. The Saturday morning ground session focuses on General Aviation Safety with special focus on the Cirrus accident statistics. Normal and emergency procedures are also reviewed.
In the afternoon on Saturday, the attendees are split into two groups. The first group has a myriad of options for ground sessions covering all topics related to Cirrus aircraft and operations. The second group flies, then they switch for the second 3 hour session. Sunday brings the same split, with more courses offered and more flying.
While the Cirrus pilots are flying and learning more about their airplanes, CPPP offers a Partner in Command course for flying partners on Saturday. This allows flying partners to be more comfortable in the airplane and teaches them what to do if something were to happen to the pilot.
All in all, attending a CPPP will improve both Cirrus knowledge and Cirrus flying skills. It’s highly recommended for all Cirrus pilots.
To register for the CPPP event in Conroe, check out the CPPP website.
The Cirrus Pilot Proficiency Program is coming back to the Lone Star Airport in Conroe, TX (KCXO) on October 23rd-25th. Wondering what the CPPP program is? “CPPP offers a weekend event for Cirrus owners and their partners that focuses on Cirrus-specific knowledge and flying proficiency. We bring some of the most experienced flight instructors who…
There are many different ways to upgrade an instrument panel. Putting in a 696 here, a JPI engine monitoring system there, even an Electronic HSI. But, if you want to swing for the fences and get a serious upgrade, you have to go for a complete glass instrument panel. For good measure, you might as well throw in a touch screen GPS while you are at it.
The Garmin G500
The Aspen EFD 2500
Which panel to go with? There are two mainstream options (Garmin and Aspen) and a handful of other companies that make glass panel replacements (Avidyne being one, King for a short period of time at the end of the last decade being another with the KFD 840). Around 2010, there were a lot of companies trying to get into the glass panel retrofit game, but many of the products didn’t gain a whole lot of popularity, leaving Garmin and Aspen at the top of the heap.
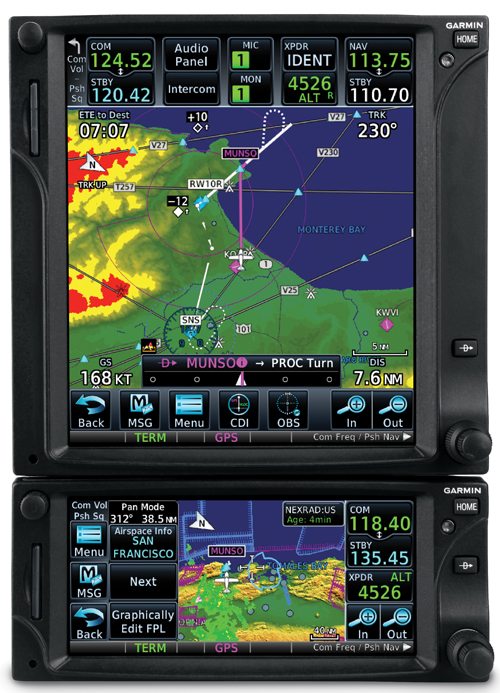
What about the touch screen GPS market? Garmin has this pretty much cornered as well, with Avidyne and King just getting into the game. The gap between Garmin’s GTN series and Avidyne and King is pretty wide.
The answer is pretty easy when it comes to the GPS (go with Garmin!), but not so easy when it comes to the panel. The G500 and the Aspen Evolution series are both excellent interfaces with strong reliability, so which one do you go with? Feature-wise, both have a lot of the same features: traffic, weather, terrain, synthetic vision, to name a few. The presentation for each feature is a little different between the two interfaces. It just depends on what you like better.
The nice thing about the Aspen system is you can go glass, but you have options on how much glass you want: 1 screen, 2 screens, or 3 screens? With the single screen PFD, you have all your instrumentation, traffic, weather, and optional synthetic vision. You don’t need the synthetic vision for the traffic and weather, as it shows up behind your HSI. It is an honest to goodness glass panel retrofit.
When you decide to upgrade to 2 screens, this is where Aspen has a leg up. The second screen is a completely redundant PFD and, if you get the 2 hour emergency backup battery installed, acts as the backup instrumentation to the main PFD. This means you can take out the old steam gauge standby instruments. This helps clean the panel up.
I personally don’t see the need for 3 screens, but maybe there is someone out there who needs it.
One selling point that Aspen has over Garmin is the wide variety of autopilots and GPS units that Aspen units are compatible with. The G500 is only compatible with King autopilots, it’s own GFC 700 autopilot (which would be a retrofit), some Collins autopilots, and the Century 21, 31, 41, and 2000. This does cover a wide array of autopilots, but it keeps some on the outside. Aspen, on the other hand, is compatible with most autopilots on the market.
Finally, let’s talk price. Going with an Aspen EFD 1000 PFD (this is the single screen Aspen) will run you somewhere in the area of $12,000. The price will vary based on the shop and the airplane. When you want to add a screen, it’s an additional $6,000. This is for the base, so if you want to add weather or synthetic vision, it’ll run you a little more.
The Garmin G500 comes in around $20,000, again depending on the shop and the airplane. The screens are bigger on the G500, which is kind of nice, and you are buying a Garmin product, which has a fabulous track record in the aviation industry.
Decisions, decisions. There really is no wrong answer here. Both are excellent products with very good track records. Both have really nice features and don’t hardly fail. Really, the choice comes down to what you want.
Need training on your upgraded GPS or glass panel retrofit? Contact Texas Top Aviation for thorough training on your new avionics today.
There are many different ways to upgrade an instrument panel. Putting in a 696 here, a JPI engine monitoring system there, even an Electronic HSI. But, if you want to swing for the fences and get a serious upgrade, you have to go for a complete glass instrument panel. For good measure, you might as…
You just bought your Cirrus SR22. You do some flying, and soon find yourself with a brake temp sticker that isn’t white anymore. You remember from your transition training that any color other than white is a no go. You now ponder…. I don’t remember getting on the brakes hard, or riding the brakes while taxiing, but sure enough they aren’t white anymore. You now start thinking that all the horrible rumors of Cirrus brakes are true. They overheat so fast!
I would like to share some little-known facts about the Cirrus factory equipped braking system. Following the procedures below can help make the brakes last a little longer. There is also a very popular STC that allows upgraded brakes to be installed on all SR series aircraft. More to come on that.
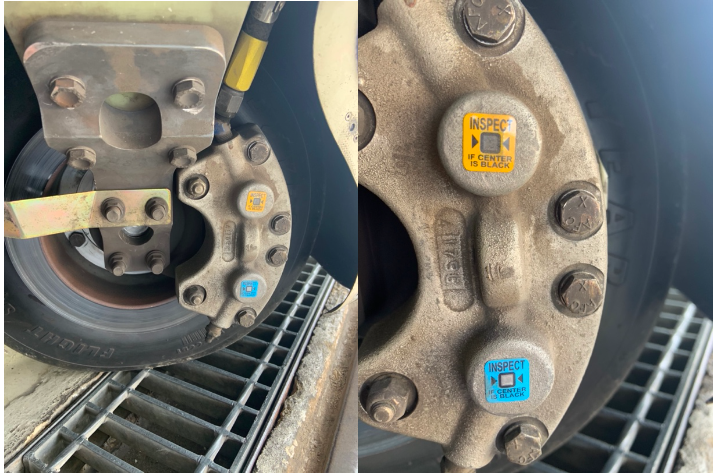
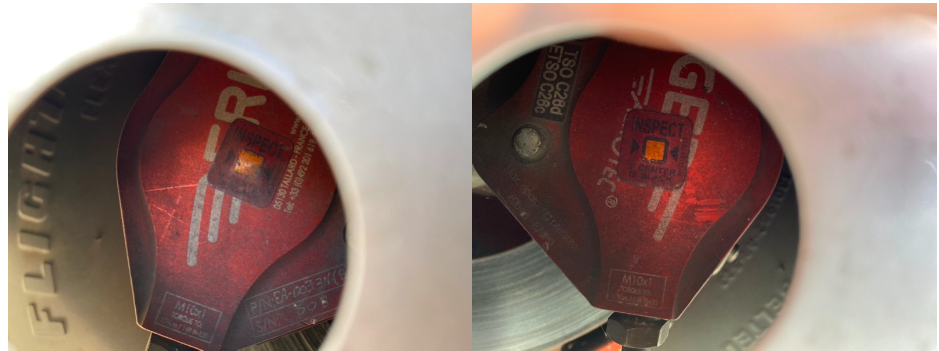
Notice the Top Yellow sticker is far darker than the Bottom. The Yellow temperature indicator turns at 300 Degrees, while the bottom Blue indicator turns at 330 Degrees. This is an indication to the pilot that if the bottom sticker has turned colors, that the braking system has exceeded 330 degrees and is in need of servicing.
Above is a photograph of an SR22 G1 braking system with turned brake temp stickers. The first things you may notice is that there are in fact two brake temperature stickers. We can only see the bottom blue sticker from the inspection port on the wheel pants. The other is higher on the caliper; in order to see it, the wheel pant must be removed. This isn’t common knowledge because there is no mention of this additional indicator in the POH.
Now you may be asking yourself, what can I do to extend the service life of my factory equipped Cirrus brakes? Here are some tips. First, always taxi at 1000 RPM and use the rudder as much as you can while only tapping the brakes. This is not fool proof, since sometimes, depending on the grade, you will have no choice but to utilize brake tapping to keep the aircraft going straight. Taxiing is not typically where the brakes get overheated, though, but this is still a good practice to follow.
What we tend to see is that the Cleveland brakes are generally overheated on landing. We always recommend to make sure your final approach speed is not excessive, land in the first 1/3 of the runway, and let the aircraft rollout to a smooth stop. What tends to happen is that the aircraft is too fast, and the pilot tries to exit at a certain taxi way, or brakes hard and continues to ride the brakes after landing during taxi. If you do your best to avoid these habits, it will serve you well.
This braking system remained unchanged all the way until the 2016 G5 Cirrus SR series. Starting in 2016, the factory equipped G5 and G6 Cirrus SR series all now come standard with a single piston hydraulic braking system from Beringer. The Cirrus Beringer brakes far exceed the braking power and durability of the old system. The new system is more robust, withstands heat better, and is is very well built. There is also an option for an upgraded dual caliper system to increase durability and stopping power. A braking system STC for the older Cirrus G1 through early G5 models was created to upgrade those airplanes to the better stopping power and cooling of the Cirrus Beringer brakes.
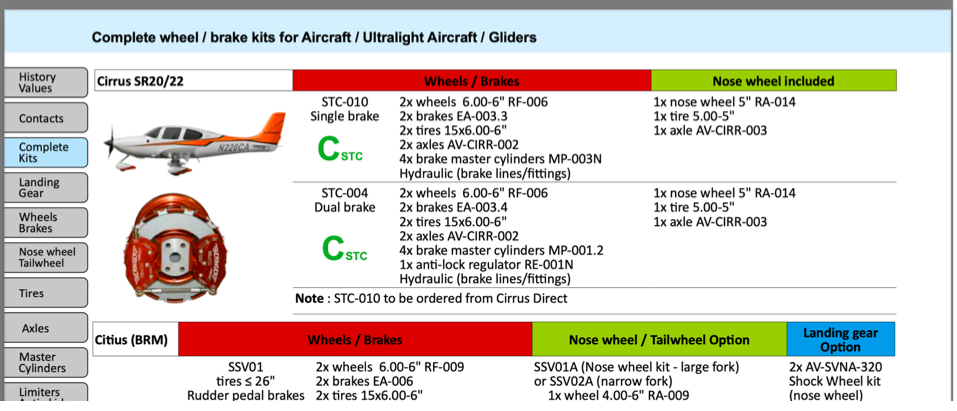
Seen above is a page from a Beringer catalog highlighting the Cirrus SR series STC kits. Your local Cirrus service center will be able to quote prices for the kits. We have over 1000Hrs spent behind Beringer equipped Cirrus aircraft and the difference is quite apparent. The pilot has better control of the aircraft, no spongy pedal, and the confidence to get the plane stopped without possibly overheating the braking system. This, in our opinion, is one of the best upgrades you can do to your Cirrus.Above is what an STC upgraded braking kit from Beringer looks like, as well as the new temperature indicator for the pre/post flight inspection. Notice the black spot on the left hand picture. These brakes have been overheated.
One other difference for a pilot to note is that once upgraded to the Cirrus Beringer brakes, there is only one temperature indicator and it changes color at a whopping 450 Degrees Fahrenheit! Needless to say, it can handle some heat! The new temperature indicator is now Orange in color and turns grey/black when overheated.
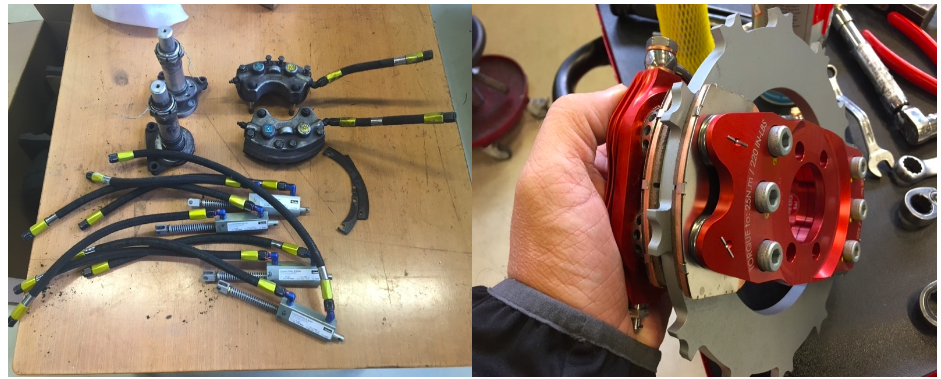
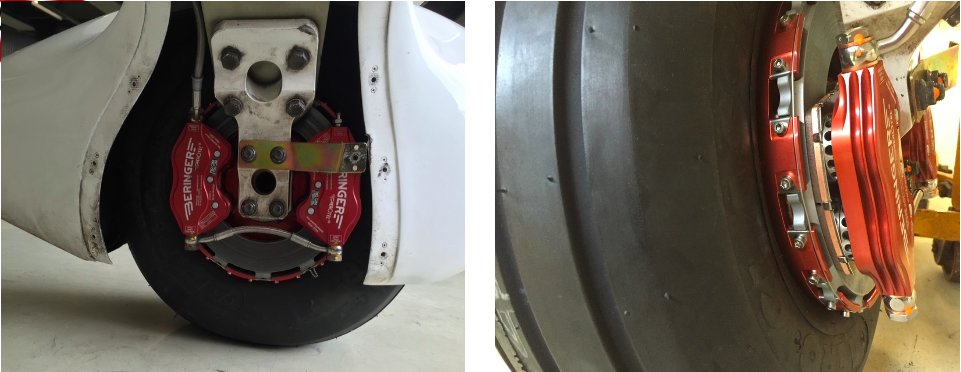
On the left are the original Cirrus factory brakes. On the right is the caliper to the new Beringer brakes for a Cirrus.Dual Caliper Cirrus Beringer Brakes
The Cirrus Beringer brakes upgrade is quite a step up in the world of slowing down. However, this doesn’t mean that they are completely issue free. There is one little-known problem with Beringer brakes that is not that big of a deal and can be fixed with relative ease.
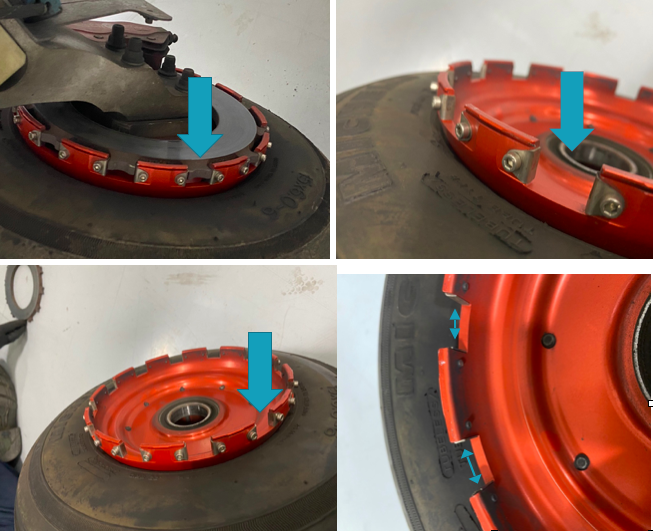
The rotor on the Beringer braking systems is “free floating,” meaning it is not necessarily “fixed” in position when secured down to the spindle. It is “keyed” into the wheel rim with the male and female side interlocking.
The brakes occasionally will get noisy, causing a “knocking” noise when brakes are applied. This noise is caused by the small metal tabs that tighten up the space between the wheel and the brake rotor. This is so the small tabs wear with use instead of the aluminum rim that they are fixed to. So, if your Beringers are making a knocking noise when brakes applied, this is most likely your culprit.
These gaps above are the “keyed” position where the rotor finds home in the rim. Without these tabs that wear with use, we would be replacing the rim more often than the much cheaper replaceable tabs.
It is highly recommended to upgrade your original Cirrus factory brakes to the new Beringer braking system. You will deal with less maintenance, less chance of a brake overheat, and less confusion on whether or not your brakes are airworthy. For more info, you can check out the Cirrus website for the single or dual caliper Beringer brakes.
Zach Anderson is a Cirrus Standardized Instructor Pilot (CSIP) for Texas Top Aviation. Zach comes from a auto mechanic background and is very familiar with the ins and outs of maintenance. He started working for Texas Top Aviation in December 2020.
You just bought your Cirrus SR22. You do some flying, and soon find yourself with a brake temp sticker that isn’t white anymore. You remember from your transition training that any color other than white is a no go. You now ponder…. I don’t remember getting on the brakes hard, or riding the brakes while…
My first chief flight instructor had an addage he would impart to his flight instructors when we began working at that flight school. “Pitch + Power = Performance” he would tell us. Then he’d glare at us and follow up with, “nobody teaches that right, so make sure your students know it.”
Now, having been a CFI for seven years, I would tend to agree with him. I have moved on from doing mostly primary training to transition training. Transition training is taking someone who is already a pilot and teaching them how to fly a different type of airplane. In jets, you get a type rating. In piston engine airplanes, there is no FAA requirement to go through any type of extra training as long as you are rated in category and class (eg. single engine piston). But, insurance companies know that Mr. Fresh Private Pilot can’t just hop from a Cessna 172 into a Cirrus SR22 or a Bonanza, so they require transition training before insuring those pilots.
What did my chief instructor mean when he imparted his wisdom? He was speaking about a particular phase of flight, the final approach phase, regardless of whether it’s a VFR approach or an IFR approach. The pitch of the airplane and the power setting of the airplane have to be utilized together to achieve the proper speed and descent rate (performance).
VFR
On the final approach leg of a VFR pattern, most piston engine aircraft are configured with landing gear down and flaps down in the landing position. This puts the airplane on the back side of the power curve in the region of reverse command. In the region of positive command, in cruise, for example, the more power you add, the faster you are going to go and, if you pitch up, you will go up and you pitch down, you will go down. But, they work together (if you point the nose down, you will accelerate unless you reduce the power); remember, Pitch + Power = Performance.
In the region of reverse command, the pitch controls the airspeed and the power controls your rate of descent, but, again, they work together. Let’s say the airplane is 5 knots above it’s approach speed on final. Initially, the pilot will need to pitch up slightly to bleed off that airspeed. The airplane will want to climb, so as he is pitching up, he’ll need to make a slight power reduction to stay on glide slope.
Alternatively, let’s say the airplane is high, but is on speed. The pilot will make a power reduction to descend to the glide path, but he’ll also need to pitch down to maintain the proper airspeed.
What you don’t want to do is this: if the airplane is high on final, don’t push the nose down to try and get down. This does cause the airplane to lose altitude quickly, but the airspeed increases quickly. With a higher airspeed, the airplane has a lot more energy to dissipate when it gets to the runway, meaning you’ll float longer which can lead to forcing the airplane down or using up too much runway and not being able to get the airplane stopped in time.
IFR
On an instrument approach, you are on the front side of the power curve. When trying to stay on glide slope, the power is controlling the speed of the airplane and the pitch is keeping the airplane on glide slope. This can be a little bit confusing for VFR pilots transitioning to instrument approaches as they are not used to being on the front side of the power curve.
Keeping in mind that Pitch + Power = Performance, let’s put the airplane above the glide slope on an ILS approach. In order to get down to the glide slope, the pitch needs to be lowered as much as needed (it’s always better to pick a pitch attitude to fly and see if it is working to bring the glide slope back to center. If it doesn’t work, pick a new one. Don’t just push the nose down until the glide slope moves) and the power needs to be reduced to maintain airspeed (again, pick a specific power setting). Once the glide slope centers, then the pitch will be raised slightly and the power will need to be increased to hold glide slope and speed respectively.
My first chief flight instructor had an addage he would impart to his flight instructors when we began working at that flight school. “Pitch + Power = Performance” he would tell us. Then he’d glare at us and follow up with, “nobody teaches that right, so make sure your students know it.” Now, having been…