Maintaining TKS Panels

Columbia TKS Panels

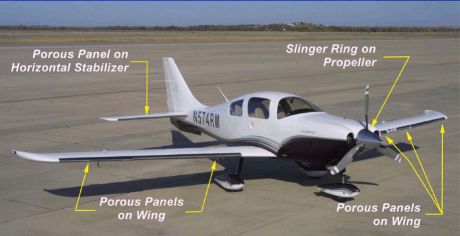
When cleaning airplanes, the majority of people don’t know how to properly maintain their TKS panels.  TKS panels provide wing leading edge, horizontal stabilizer leading edge, and, in the case of FIKI airplanes, vertical stabilizer leading edge de-icing protection.  For those not familiar with them, they are metal strips that have thousands of holes drilled into them where the TKS fluid seeps out. They have become quite prevalent on Cirrus aircraft, the Cessna TTx, and Mooney aircraft manufactured in the last decade or so.  The system is also known as a weeping wing system.

Being on the leading edges, these panels pick up bugs very easily.  For the uninitiated, it would make sense to just use normal airplane cleaner to spray the panels and scrub the bugs.  Don’t!

Using anything that contains Methyl Ethyl Ketone (MEK) as that can harm the TKS bladders behind the panels.  Any aircraft cleaner containing wax could cause the pores to clog, preventing the TKS fluid from properly seeping onto the wing.

What’s the best thing to do?  Soap and water with a soft cloth is a good start (again, make sure it doesn’t have wax in it.  Dish soap would be suitable).  No hose available?  Just simply turn the TKS system on, let it run till you start to see fluid drip off the wings onto the ground, and use the fluid to clean the panels.

A soft cloth would work fine, but, if the panels are really buggy, take a green scouring pad to do some scrubbing.  Just make sure the scrubbing motion is up and down with the grain, not side to side.  You can find the green scouring sponges on the dishwashing aisle in the grocery store.  Just leave one in the hangar for when you need it.

Similar Posts

  • I Learn To Speak Seaplane

    From the time I started flying, I have always had the dream to learn how to fly a seaplane.  As I learned in November, it’s actually learning to land a seaplane, and the veterans call them floatplanes.

    ProMark Aviation at the Burnet Airport (KBMQ) offers a weekend float plane course that is high on fun and low on stress.  The school has a Piper PA12 Super Cruiser on amphibious floats (amphibs as I was corrected at one point.  I mean, if you’re going to fly a seaplane, er, floatplane, you have to know the lingo) that will land and takeoff on water, but does little else with ease and grace.  At 150 HP with those big floats and all the associated rigging hanging underneath the airplane, you are lucky to get to 500 feet before you get to your destination.

    We weren’t working on setting any speed records.  I was learning the lay of the water.  I learned about the step, the keel, pumping the floats, how to read the water, currents, ducks (yes, ducks and birds are important to know about when you are flying low on the water), buoys, docking, and ditching.  Step taxiing was fun as you are basically at 3/4 throttle screaming across the top of the water just below flying speed.  It’s the best way to taxi a seaplane (truly, it is.  You get more air in your engine, you can see better, and you are moving.  Just don’t try and turn sharp).

    Floatplanes also don’t have any shock absorbers, so the higher the wave, the more you get knocked around, so wind velocity and, in turn, wave height is very important.

    A very important nuance of an amphibious floatplane compared to a straight floatplane (one that doesn’t have wheels that come out of the floats), is at one point, you want to make sure your gear is down for landing (runway landing) and at another, you want to make absolutely sure your gear is up for landing (water landing).  If you land wheels down in the water, you will capsize, 100% of the time.  Thankfully from my good instruction, I did not capsize.

    Ken Wittekiend, my instructor, and I spent the majority of the weekend landing and taking off on Lake Buchanan (I was informed by locals it is pronounced “Buk-cannon”, not “Bue-cannon”), which is more open and therefore has more waves.  We did one landing on Inks Lake so my kids could see me land, which they thought was the best thing since cheese sticks.

    There is a check ride at the end of the training, but, as Ken reassured me, it’s the most fun check ride you’ll ever have.  I still hate check rides, but that one I think I hated least of all.

    I hope someday I can put my floatplane skills to practice, but for now, I can vouch that I now speak seaplane!

  • Need To Breath


    I got a call today from a friend asking me about oxygen requirements.  That got my brain pondering about the different items the FAA would like all pilots to know. I did a little refreshing and found several other tidbits directly from the FAA that I thought worth sharing. No matter what you’re flying, I think these apply to all of us. 

    First off, what are our general oxygen requirements? If you jump on over to the FAR’s and take a look at 91.211 you’ll see: 

    1. At cabin pressure altitudes above 12,500ft MSL to 14,000ft MSL, pilots
    required to use oxygen unless the segment is less than 30 minutes of flight.

    2. At cabin pressure altitudes above 14,000ft MSL, the crew is required to use
    oxygen.

    3. At cabin pressure altitudes above 15,000ft MSL, each occupant must be
    provided the use of oxygen. This doesn’t necessarily mean they have to use it.


    Things get a little more in depth when you get to pressurized aircraft.

    These requirements are also listed in 91.211: 

    1. If you’re flying above Flight Level 250, a 10 minute supply of oxygen is
    required for each person onboard.

    2. If you’re flying above Flight Level 350-410, and one pilot leaves their seat, the other pilot will be required to wear an oxygen mask, unless both seats are equipped with quick-donning oxygen masks.


    There are three basic components to any oxygen system in an aircraft:  the storage system, the delivery system, and the mask or cannula. First, there are several types of storage systems. 

    Gaseous aviators breathing oxygen is the first. This is the standard green tank that everyone is familiar with. There are two types of tanks. Either the high- pressure with 1800-2200 psi or the low pressure tank with 400-450 psi. The major issue with these and General Aviation aircraft is weight. Some of these tanks can get bulky and heavy and therefore don’t work for everyone. 

    Liquid aviators breathing oxygen or LOX is another form of storage. The major advantage of LOX is that it has a 900 to 1 expansion ratio, meaning that 1 liter of liquid oxygen can be expanded into 900 gaseous liters of Aviators Breathing Oxygen. The disadvantages of LOX are they are extremely volatile and have to be stored at -197F. If it comes in contact with exposed skin, severe frost bite can occur. 

    Sodium chlorate candles or oxygen generators have a weight advantage like LOX. They’re essentially a canister that when activated mix sodium chloride and iron powder and produce oxygen. They general have a 600 to 1 expansion ratio, which goes back to the weight savings. However, once these are started they are very hard to stop. Another disadvantage is these devices produce a fair amount of heat, so proper precautions need to be taken. 

    Next are the delivery systems. The main systems are Continuous Flow, Diluter Demand, and Pressure Demand. Continuous Flow, is exactly as it sounds. The oxygen is allowed to flow continuously from the tank to the user. The benefits of continuous flow are you don’t need a complicated mask or regulator. The downside to this system is since it continuously pumps oxygen, you’re wasting oxygen when you exhale. Most of continuous flow systems are used on aircraft that generally fly below 28,000 feet. 

    Diluter Demand was designed to fix the negative of the Continuous Flow systems. Diluter Demand only sends oxygen to the user when the user inhales. The system also allows cabin air to be introduced in, sending the perfect mixture of oxygen to the user when needed. These systems are very efficient and generally tend to be used up to 40,000 feet. 

    Pressure Demand is designed to essentially “over inflate” the users lungs. This will basically pressurize the the users lugs and allow the user to fly above 40,000 feet. This is needed at flights above FL400 because 100% oxygen without positive pressure will not suffice. 

    The final portion of the oxygen system is the mask or cannula. Nasal cannulas generally are more comfortable and are regulated to 18,000 feet service altitude. Masks come in a couple different variants. From re-breathers to quick-donning, most masks accomplish the same task with a few small differences. Quick-donning must be able to be put on within five seconds and are rated up to FL400. 

    Since that was a lot of information, what does all of it mean to you? Most fair weather flyers will never run into any of this. However, the high performance owner/operator will run into oxygen use situations a fair amount. Taking the family up to Colorado on a ski trip, jumping up to 12,500 feet to get above some weather, or flying above 5,000 feet at night on a long xc are all situations where you may want to have oxygen on board. 

    If you are planning on doing any of this type of flying or are currently doing these types of flights, training is a must. If you’ve never been in an altitude chamber, I would highly recommend it. In college, I went with a group to Oklahoma City to the FAA’s headquarters where they hold a class on Hypoxia and High Altitude flying. It’s very informative to be in the chamber as it simulates being oxygen deprived. You get to see how you’ll react and what kind of symptoms you’ll have when in a loss of oxygen situation. Each person has different symptoms, so it’s important to see how you will react.

    It’s also good to fly with an experienced instructor. Finding an instructor who will allow you to learn in a safe environment is worth its weight in gold. 


    Ryne Bergren is currently a First Officer with Mesa Airlines in the CRJ 900. Ryne has experience in many different areas of aviation, from corporate to airlines to teaching to ferrying across the Atlantic Ocean. His passion is for all things that travel across the big blue sky.

  • Pitch + Power = Performance

    My first chief flight instructor had an addage he would impart to his flight instructors when we began working at that flight school. “Pitch + Power = Performance” he would tell us. Then he’d glare at us and follow up with, “nobody teaches that right, so make sure your students know it.”

    Now, having been a CFI for seven years, I would tend to agree with him. I have moved on from doing mostly primary training to transition training. Transition training is taking someone who is already a pilot and teaching them how to fly a different type of airplane. In jets, you get a type rating. In piston engine airplanes, there is no FAA requirement to go through any type of extra training as long as you are rated in category and class (eg. single engine piston). But, insurance companies know that Mr. Fresh Private Pilot can’t just hop from a Cessna 172 into a Cirrus SR22 or a Bonanza, so they require transition training before insuring those pilots.

    What did my chief instructor mean when he imparted his wisdom? He was speaking about a particular phase of flight, the final approach phase, regardless of whether it’s a VFR approach or an IFR approach. The pitch of the airplane and the power setting of the airplane have to be utilized together to achieve the proper speed and descent rate (performance).

    VFR

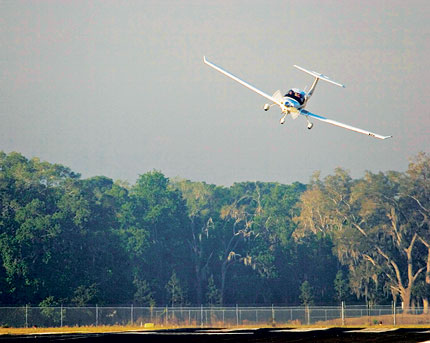
    On the final approach leg of a VFR pattern, most piston engine aircraft are configured with landing gear down and flaps down in the landing position. This puts the airplane on the back side of the power curve in the region of reverse command. In the region of positive command, in cruise, for example, the more power you add, the faster you are going to go and, if you pitch up, you will go up and you pitch down, you will go down. But, they work together (if you point the nose down, you will accelerate unless you reduce the power); remember, Pitch + Power = Performance.
    diamond-landing

    In the region of reverse command, the pitch controls the airspeed and the power controls your rate of descent, but, again, they work together. Let’s say the airplane is 5 knots above it’s approach speed on final. Initially, the pilot will need to pitch up slightly to bleed off that airspeed. The airplane will want to climb, so as he is pitching up, he’ll need to make a slight power reduction to stay on glide slope.

    Alternatively, let’s say the airplane is high, but is on speed. The pilot will make a power reduction to descend to the glide path, but he’ll also need to pitch down to maintain the proper airspeed.

    What you don’t want to do is this: if the airplane is high on final, don’t push the nose down to try and get down. This does cause the airplane to lose altitude quickly, but the airspeed increases quickly. With a higher airspeed, the airplane has a lot more energy to dissipate when it gets to the runway, meaning you’ll float longer which can lead to forcing the airplane down or using up too much runway and not being able to get the airplane stopped in time.

    IFR

    On an instrument approach, you are on the front side of the power curve. When trying to stay on glide slope, the power is controlling the speed of the airplane and the pitch is keeping the airplane on glide slope. This can be a little bit confusing for VFR pilots transitioning to instrument approaches as they are not used to being on the front side of the power curve.

    Keeping in mind that Pitch + Power = Performance, let’s put the airplane above the glide slope on an ILS approach. In order to get down to the glide slope, the pitch needs to be lowered as much as needed (it’s always better to pick a pitch attitude to fly and see if it is working to bring the glide slope back to center. If it doesn’t work, pick a new one. Don’t just push the nose down until the glide slope moves) and the power needs to be reduced to maintain airspeed (again, pick a specific power setting). Once the glide slope centers, then the pitch will be raised slightly and the power will need to be increased to hold glide slope and speed respectively.

  • Lightspeed Headsets and Modern Audio Panels

    I love Lightspeed headsets.  They are very comfortable, durable, and reasonably priced.  Plus, when you call Customer Service, you are actually talking to someone who works for the company and knows what they are talking about.

    One thing to watch out for with Lightspeed headsets is the Mono vs. Stereo option.  On the Zulu 3, there is a very small control panel underneath the battery compartment to change from Mono to Stereo.  If you have any kind of modern audio panel, you will definitely want to do this.  Here’s why.

    I was flying in a Cirrus SR22 G5 last fall with a Garmin 350 Audio Panel.  Everything worked fine talking to the ground and tower controllers.  Once I took off and was switched to approach, everything went quiet.  I could hear the approach controller, but couldn’t transmit.  I thought my headset had bit the dust. There was another set in the plane that I switched to, but I thought the transmit function of mine was out.

    I sent the headset back to Lightspeed for repair.  The headset was still under their 5 year warranty, which is really nice!  I got it back a few days later, plugged it in to another Cirrus, and still had nothing.  I was getting frustrated, but then a light went on.  One of my colleagues had mentioned something about mono and stereo in the Lightspeed.  I popped the batteries out, flipped the switch over to stereo, and wa-la!  Everything was fully operational.

    If you get Lightspeed headsets, you’ll want to make sure it is set on Stereo, as they all come from the factory on Mono.  If you get a PFX, there is an easy access button on the side of the battery unit to switch from Mono to Stereo.

  • Conroe, TX CPPP

    The Cirrus Pilot Proficiency Program (CPPP) will be coming to the Galaxy FBO at the Lone Star Executive Airport in Conroe, TX again this year.  The dates of the event will be October 14th-16th.

    Wondering what the CPPP program is?

    “CPPP offers a weekend event for Cirrus owners and their partners that focuses on Cirrus-specific knowledge and flying proficiency.  We bring some of the most experienced flight instructors who regularly teach in all kinds of Cirrus airplanes flown for all kinds of missions.  We have prepared an extensive syllabus of ground courses that complement the transition training and delve into areas of greatest need for Cirrus pilots.” (from CirrusPilots.org)

    CPPP

    The weekend starts off with a group dinner on Friday night. The Saturday morning ground session focuses on General Aviation Safety with special focus on the Cirrus accident statistics.  Normal and emergency procedures are also reviewed.

    In the afternoon on Saturday, the attendees are split into two groups.  The first group has a myriad of options for ground sessions covering all topics related to Cirrus aircraft and operations.  The second group flies, then they switch for the second 3 hour session.  Sunday brings the same split, with more courses offered and more flying.

    While the Cirrus pilots are flying and learning more about their airplanes, CPPP offers a Partner in Command course for flying partners on Saturday.  This allows flying partners to be more comfortable in the airplane and teaches them what to do if something were to happen to the pilot.

    All in all, attending a CPPP will improve both Cirrus knowledge and Cirrus flying skills.  It’s highly recommended for all Cirrus pilots.

    To register for the CPPP event in Conroe, check out the CPPP website.

  • The Glass Panel Cockpit Seminar

    Have you looked longingly at the Aspen PFD or Garmin G500, imagining those beautiful glass panels set in your airplane?  Think it’s too advanced for your flying skills?  Well, think again!  Hank Gibson of Texas Top Aviation will be hosting a seminar at the Redbird Skyport FBO at the San Marcos Airport (KHYI) on Thursday, September 25th  at 7pm to enlighten everyone on all the different glass panel and modern GPS options out there.

    Aspen 2500 The Glass Panel Cockpit Seminar

    No panel is too complex!  No GPS is too complicated!  Come hear about how you can upgrade your steam gauge airplane to a modern, glass panel cockpit that will be the envy of all your pilot buddies.

    The seminar begins at 7pm in the large conference room at the Redbird Skyport.  Come see this beautiful facility which hosted the AOPA Fly In this past April.  There will be two drawings for free flight training in your airplane, so make sure you get your entry in once you arrive.  WINGS credit will also be given.

    Redbird welcomes pilots flying in for the event.  If you are flying in, please show your support for Redbird by purchasing fuel!  

    Signup is required for the event.  To sign up, please click here.

    We hope to see you there!!!

Leave a Reply

Your email address will not be published. Required fields are marked *