VFR Flight Plans in the Modern Age

Raise your hand if, after you have officially become a pilot by passing your private pilot check ride, you consistently file VFR flight plans with Flight Service.

Anybody?

Okay, let’s revise the question.  Raise your hand if you have filed VFR flight plans at least 5 times in the last year.

Okay, one or two hands go up.

That’s it?

To be perfectly honest, I have filed VFR Flight Plans twice (I think) in the last year.  The only reason I did was because I was flying in an area that had poor radar/radio communications and I wanted someone to know where I was (I was ferrying an airplane through southern Oregon and northern Nevada which is mountainous and is hard to get coverage into at lower altitudes).  I was so unaccustomed to doing it that I nearly forgot to call and close my flight plan.
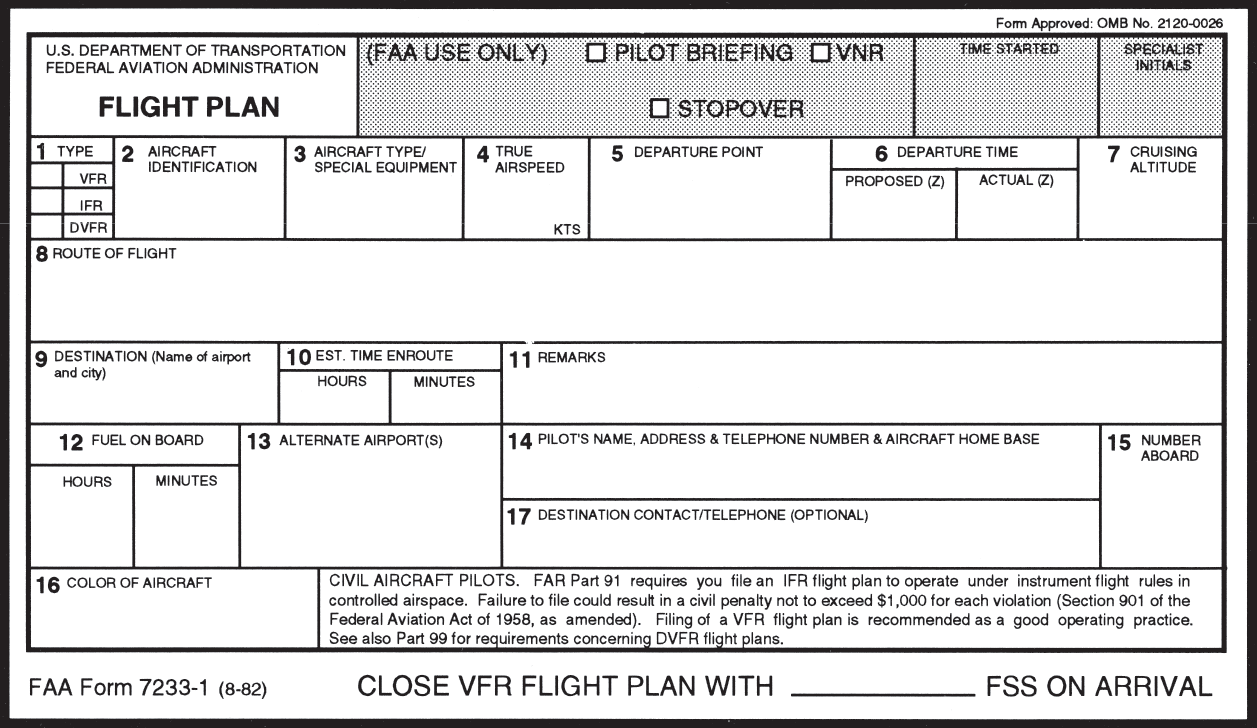
FlightPlanForm

This is a common complaint amongst pilots concerning VFR flight plans.  It’s extremely easy to get to your destination, hop in the car and completely forget to close your VFR flight plans.  Thankfully, now a days, the Flight Service Station will typically call the number you put in your VFR flight plans (your cell phone number most of the time) to make sure you are on the ground before initiating search and rescue services.

Another complaint is that it is cumbersome to call the Flight Service Station after departing to open the VFR flight plans.  This is especially true in a busy airspace area or if the pilot is getting a VFR Flight Following and talking to ATC on a different frequency.

I still think it is a great idea to file and utilize VFR flight plans.  If you don’t show up at your destination, someone will come looking for you which could mean the difference between getting stranded after an off airport landing and getting a warm cup of coffee at the end of the day.  Even if the you get flight following from ATC, it’s still good to file a flight plan.

Lockheed Martin, who runs all the Flight Service Stations across the US, heard these complaints from pilots and decided to come into the modern age and make it easier to open and close flight plans.  They developed EasyActivate and EasyClose.

These services are very simple.  Just go to Lockheed Martin’s Flight Service Station website, set up a new account, then file VFR flight plans to see the services in action.

File your VFR flight plans first, through calling the FSS or on your favorite iPad app.  Then, for EasyActivate, you’ll receive an email 30 minutes prior to your ETD with a link in it.  Simply click/tap on the link and your flight plan is activated.  No having to call FSS in the air, no having to try to get them on the ground.  Just tap the link and you’re good to go.

For EasyClose, you’ll receive an email 30 minutes prior to your ETA at your destination.  When you get on the ground, you’ll see the email in your phone or iPad and you just tap the link and your flight plan is closed.  Since we all have our phones and iPads with us constantly, there will be no more forgetting to close the flight plan and getting that angry call from the FSS.

Sign up is quick and easy.  All Lockheed Martin needs is your email address, last name and phone number. They’ll send you the password to set up your account.  Log in (they will have you change your password immediately), then just click on EasyActivate/EasyClose up at the top.  You have to register the email address you want (you can also put in a phone number to receive a text message, and you can put multiple email addresses and phone numbers if you’d like), then you are all set to go.

Similar Posts

  • Cirrus Approach

    Earlier this year, Cirrus debuted it’s new Learning Management System (LMS), Cirrus Approach. For several years, Cirrus has led the way in online systems training while using several different platforms for it’s LMS. Cirrus Approach is the culmination of lots of sampling and tinkering, and boy, did Cirrus knock it out of the park.

    For those of you unfamiliar with the Cirrus training program, here is the quick rundown. When a pilot who has no Cirrus time buys a Cirrus aircraft, initial transition training is required to familiarize the pilot with the aircraft systems, speeds to fly, power settings, etc. The Cirrus Transition Course is a 3 day that gets a VFR pilot up to speed in the airplane. Under the Cirrus Embark program, those 3 days of training are covered by Cirrus and free to the new owner.

    If the pilot is an IFR pilot, then the 5 day Cirrus Advanced Transition Training Course is required. If the pilot has Cirrus experience, but with a different engine or avionics configuration, there are courses for that too. The Cirrus Embark program covers 3 days of training for most courses for a new Cirrus owner.

    As part of the aforementioned courses, there are systems to learn about and procedures to understand. This is where the Cirrus Approach LMS excels. Cirrus has done a great job of putting together lots of good videos (that are actually interesting but not annoying) on the airplane, systems, how to fly it, etc. for each course. It cuts down greatly on the time that the training instructor has to spend on the ground with the pilot since the pilot has already compiled knowledge through Cirrus Approach.

    Cirrus Approach is accessible online at learning.cirrusapproach.com. To get access to the courses, create an account, then select the Learning Catalog. The courses are categorized based on the type of training (Transition, Advanced Transition, Avionics Differences, Airframe & Powerplant Differences, Recurrent, and Specialty), then further broken down into the type of airplane, engine and avionics (eg. SR22T G6 Perspective+). Make sure the correct engine and avionics configuration is selected! Notice, there is a difference between the SR22T and SR22 (Turbo & Non-Turbo).

    Anyone can do the specialty courses. I would highly recommend for everyone to take the Engine Management course as well as the Icing Awareness Course for you TKS and FIKI operators. The Takeoff & Landing course is a good refresher course for a pilot who hasn’t done any training in a while.

    The Recurrent Training courses are encouraged for all Cirrus pilots. There is an IFR Refresher, a VFR Refresher, and a Skills Refresher. These are recommended to rotate through with a CSIP (Cirrus Standardized Instructor Pilot) on a yearly basis. With a little extra ground, a Flight Review and an IPC can be accomplished yearly using these courses.


    Interested in Initial or Recurrent training in your Cirrus using Cirrus Approach? Contact Texas Top Aviation today!

  • Airspace Alert: Houston Executive Tower Opens

    For those of you who frequent the Houston area, make sure to check your NOTAMs.  The Houston Executive Airport (KTME) in Katy recently opened a control tower.  The Houston Executive tower information won’t show up on the sectional chart till the new chart comes out in the spring.  The only way to get the information about the tower and the airspace will be via NOTAMs or when the new Airport/Facilities Directory comes out on November 3rd.  The tower opened October 1st.

    According to AOPA, the airspace will remain Class G around the airport, even though there is a control tower in place.  Since the Houston Executive tower is there, it will be mandatory to contact the tower when passing through the airspace.  KTME’s airspace stretches up to 2,000 feet MSL and goes out to a 4 sm radius around the airport.  It is a VFR Only tower, so the controllers do not have radar.

    The tower is open from 6am-10pm, local time, 7 days a week.

    Frequency Information

    Houston Executive Tower:  126.975

    Houston Executive Ground Control/Clearance Delivery:  132.075

    Houston Executive ATIS:  119.525


  • The Anatomy of a Hot Start

    Are you one of those pilots who hates fuel stops simply for the fact that the engine doesn’t have time to cool off?  You pump gas into the plane, hit the bathroom, get in the plane and the oil temperature is still up at 160-170 degrees, leading you to have to figure out how to get the plane going again with a hot engine.  For those without proper training, this usually means a lot of jockeying around with the throttle, mixture, and fuel pump to try and get the thing started without flooding it.  After coughing and wheezing several times, the engine finally comes to life, leaving you to only guess what worked and without the knowledge of how to duplicate it.

    Hot Start 2

    Let’s take a step back for a minute to see what is actually happening with a hot engine.  Once the engine is shut off, the fuel in the lines leading from the tank to the engine is vaporized, meaning there is more air in the fuel lines than liquid fuel.  In the engine block itself, there is still liquid fuel in the injectors, but only enough for the engine to cough then quit if started.

    When a normal priming and starting procedure is performed, too much fuel is forced into the cylinders and the engine becomes flooded.  A flooded engine just means that the stoichiometric ratio is way too rich, meaning there is too much fuel and not enough air.  The prime does the trick of getting the fuel vapor out of the fuel lines, but it shoves too much fuel into the cylinders.  Once the engine is flooded, it’s a waiting game to allow air into the engine to get the mixture right.  All Lycoming powered high performance and turbo charged engines are notoriously easy to flood when hot.

    So, what’s the solution?  By taking a step back to see what is actually happening, you can attack the problem from the source, which is the fuel lines.  You need to get the vapor out of the fuel lines and get some liquid fuel in there.  The procedure for this varies based on the make and model of engine, but I’m going to use the example of the Continental IO-550-N that is in a Cirrus SR22.  I found this procedure in the Continental Engine Manual and it works every time.

    (Pilots of other airplanes, keep reading.  I have sections below for PA46s, Columbias, and Bonanzas as well )

    • Mixture:  Full Lean (this allows fuel in the fuel lines, but prevents it from going past the mixture control into the engine, sending all fuel back to the fuel tank; a small amount of fuel leaks past the mixture control providing prime for the engine)
    • Throttle:  Idle
    • Low Boost Pump:  Run for 30-60 seconds (see note below)  (15 seconds in the Turbo Cirrus)
    • Mixture:  Full Rich
    • Throttle:  Open about 1/4 travel (not 1/4″, that won’t be enough)
    • Boost Pump:  Off, but have your finger on Low Boost
    • Starter:  Crank (engine will turn over a few more times before firing, this is normal)
    • At the first indication of start, turn the Low Boost on, increase the throttle to ensure the engine catches,  then adjust the throttle for 1,000 RPM
      • The engine will fire right about the time you start thinking it isn’t going to work

    A few notes regarding engine temperatures:

    • If the oil temperature is above 150 degrees, a hot start will be required.  If oil temp is close to 200 degrees, run low boost for 60 seconds in a non-turbo.  If oil temp is 175, run low boost for 45 seconds in a non-turbo.  If oil temp is 150, run low boost for 30 seconds in a non-turbo.  Use 15 seconds for all temps above 150 in a Cirrus Turbo.
    • If the oil temperature is between 125-150, skip the hot start procedure, don’t prime the engine, leave the boost pump off, and crank the engine, then boost pump on when it starts and slightly increase throttle to make sure the engine catches
    • If the oil temperature is between 100-125, skip the hot start, don’t prime the engine, and perform a normal start with the boost pump on
    • If the oil temperature is below 100, perform a normal prime and start

    Piper Malibu (PA46-310P with Continental Engine)

    • Mixture:  Full Lean (this allows fuel in the fuel lines, but prevents it from going past the mixture control into the engine, sending all fuel back to the fuel tank; a small amount of fuel leaks past the mixture control providing prime for the engine)
    • Throttle:  Idle
    • Low Boost Pump:  Run for 15-30 seconds depending on oil temperature…
      • Greater than 150 degrees: 30 seconds
      • Less than 125-150 degrees:  15 seconds
      • Less than 100-125 degrees, no need to run the Low Boost
      • Perform normal cold start below 100 degrees
    • Mixture:  Full Rich
    • Throttle:  Open about 1/4 travel (not 1/4″, that won’t be enough)
    • Boost Pump:  Off, but have your finger on the Primer Button
    • Magnetos:  On
    • Starter:  Crank (engine will turn over a few more times before firing, this is normal)
    • Engine should fire with the Low Boost Pump off, but…
      • If the engine starts to die, simultaneously increase the throttle a little bit and hit the primer button.
      • Only tap the primer button, don’t hold it as you’ll flood the engine if you hold it At the first indication of start, turn the Low Boost on, increase the throttle to ensure the engine catches,  then adjust the throttle for 1,000 RPM

    Piper Mirage & Matrix (PA46-350P and PA46-350T with Lycoming Engine)

    • Leave throttle and mixture idle
      • Before you turn the battery on, ensure the mixture is idle cutoff
      • If the mixture is forward and the battery is on, the low boost pump in the fuel tank will start pumping fuel to the engine and quickly flood it
    • Ensure Magneto switches are on
    • Open throttle 1/4 travel (not 1/4″ as this won’t be enough)
    • Crank
    • As soon as the engine begins coughing and wheezing (and this is what it will sound like), push the mixture 3/4 of the way forward
    • Once the engine has a good solid fire, smoothly and swiftly push the mixture all the way forward
    • Reduce throttle
    • Note:  The Emergency Boost Pump can be used as part of the hot start technique, but I usually leave it off.
      • Pro to the Emergency Boost Pump is it can help suck more fuel in and purge vapor during the start
      • Con is that if the engine doesn’t start on the first try, you are flooding your motor

    Columbia 400

    • Throttle and Mixture Idle Cutoff
    • Vapor Suppression:  Run for 30-60 seconds.  Reference above temperatures on the non-turbo Cirrus for run times
    • Mixture full forward
    • Throttle 1″ in
    • Prime for 3 seconds, then off
    • Crank
    • Once engine fires, primer might need to be pushed momentarily to purge excess vapor
      • On Columbia 350s, the throttle should be twisted (or pushed depending on if it’s an Avidyne or Garmin Columbia) in while cranking
      • Be prepared to reduce power once engine fires

    Beechcraft 36 Bonanza

    • Throttle and Mixture Idle Cutoff
    • Low Boost:  Run for 30-60 seconds.  Reference above temperatures on the non-turbo Cirrus for run times
    • Mixture full forward
    • Throttle open 1″
    • High Boost until fuel flow peaks, then off
    • Crank
    • Once engine fires, Low Boost might need to be engaged momentarily to purge excess vapor

    There are other “procedures” for hot starting out there, but most of them involve starting with full throttle, which can lead to the airplane shooting ahead on a ramp or taxi way if the brakes aren’t properly set.  This can lead to high repair costs, so always be cautious.  Figuring out what is happening when the engine is hot will give you a better chance of getting it started right away.

  • 3 Tips to Better Landings

    In my 3,000+ hours of flight training, I have developed some tips and tricks to help people fly better.  With teaching landings, I have 3 specific tips that will make smoother landings every time, guaranteed.

    A Good Pattern

    A wise flight instructor whom I would love to give credit to (but don’t know who it is!) once said that a good landing starts off with a good traffic pattern.  So true!  A good landing all begins with the setup.  This is true for a VFR rectangular traffic pattern or an IFR instrument approach.  Flying the proper speeds and being at the proper AGL altitudes helps immensely in making a good landing. Being at 600 feet AGL on a 1/2 mile final (or the alternative of 60 feet off the ground on a mile final!) makes it hard to make a good landing.

    Proper Use & Understanding of Pitch and Power

    Once flaps are used in the pattern, the plane is now on the back side of the power curve (or in the region of reverse command).  Power is now being used to control the plane’s rate of descent while pitch is being used to control airspeed.  The key is, both pitch and power work together, so if the pilot changes the power, he’ll also need to change the pitch and vice versa.

    The common mistake I see here is when the airplane gets low on final, the pilot tends to (quite naturally) pitch up.  All this does is bleed off airspeed and cause the airplane to sink faster.  The proper input would be to add power, then adjust the pitch for airspeed.

    Look Down the Runway

    Now that we have gotten to the point of the round-out and touchdown, it’s the most important part.  The best thing the pilot can do to make the best landing possible, is to look at the trees at the end of the runway.  When I worked with college students, I told them to find the owl in the trees at the end of the runway.

    The tendency is to stare at the pavement (or concrete) the whole way down to the landing.  When a pilot’s eyes are fixated on the ground, this destroys his depth perception and causes a level off too low to the runway, resulting in a 3 point landing and/or a bounce.

    By looking at the trees at the end of the runway, this gives the pilot much better depth perception and allows him to properly judge where to level off the airplane.

    The question now is when should the pilot start looking at the trees?  My recommendation is crossing the threshold of the runway.  For some, it works better to start looking at the trees when turning final.  Others, right before the level off.  Regardless, find that owl!

  • Garmin G1000 Updates

    You have just received the keys of your shiny new (to you) airplane complete with a beautiful Garmin G1000 glass panel flight deck. Synthetic Vision, WAAS, and ADS-B are all installed. You are ready to cruise in high technology.

    You turn on the PFD and MFD and notice one problem. All your databases are expired. No big deal, right? Your Garmin 530W was easy as pie to update with it’s single data card.

    You start looking around and can’t find the data card. Then you notice that there are several SD cards in slots on the panels. SD cards won’t fit in your Blue Jepp Skybound card reader. Confusion sets in which quickly leads to full on panic.

    What have you gotten yourself into?!

    No need to fear, Texas Top Aviation is here to help with your Garmin G1000 database update confusion (and hopefully not panic).

    Database Update Providers

    First, you have to choose who to get your Garmin G1000 updates from. You have two options. One is Garmin (fly.garmin.com; always use either Firefox or Chrome to update, don’t use Safari). The other is Jeppesen.

    Honestly, there is no difference between the data that each provides. If you had a 530 or 430 before, you used Jepp already. Just keep the Jepp account, call them, and have them get you set up for your Garmin G1000 updates.

    If you didn’t have a Jepp account before, I would use Garmin, for a couple of reasons. You get multiple downloads in case you mess something up (Jepp NavData gives 1 download per month, while Safe Taxi, etc. you get 2-3). On Jepp, you have to call in and have them reset the account, which can be a pain if it’s after hours or a Saturday or Sunday.

    The other problem with Jepp is since Boeing bought Jeppesen, I have found it extremely difficult to find online where to set up a new account and purchase databases. Yes, you can always call, but, again, problematic after hours or on a weekend.

    The only problem with Fly Garmin for your Garmin G1000 updates is Garmin is constantly updating their program. You have to update their downloader quite often, which can be a bit frustrating.

    I’m going to use Fly Garmin as my example.

    What to Buy

    Garmin gives you a couple of different bundle options for your Garmin G1000 updates, the OnePak and the PilotPak. The main difference between the two is the PilotPak includes approach charts that display on your PFD and the OnePak doesn’t. Therefore, the OnePak is about $200 cheaper.

    Both include Navigation Data, SafeTaxi, Obstacles, Airport Directory, Terrain, and the BaseMap.

    How to Update

    Once you have followed all the instructions on Garmin’s website (or gotten Jeppesen set up), here is what to put on which SD card.

    NOTE: YOU WILL NEED TO PURCHASE ONE OR TWO BLANK SD CARDS FOR THE NAVIGATION DATABASES. DO NOT PUT THE NAVIGATION DATA ON THE SD CARD THAT IS ALREADY IN THE TOP SLOT ON THE MFD. THAT IS FOR ENGINE DATA LOGGING ONLY. NO NAVIGATION DATA SHOULD EVER BE PUT THAT ON THAT CARD.

    Bottom Card, PFD

    • SafeTaxi
    • Obstacles

    Bottom Card, MFD

    • SafeTaxi
    • Obstacles
    • Airport Directory
    • Flite Charts

    Top Card, PFD & MFD (This is the new blank SD card(s) you bought)

    NOTE: REMOVE THE TOP SD CARD IN THE MFD THAT IS ALREADY IN THE SLOT AND DON’T PUT ANY DATABASE INFORMATION ON IT.

    • Navigation Data

    Garmin G1000 NXi Users (or Cirrus Perspective + Users)

    Ignore everything above and put all databases on the bottom card of the MFD. You have database sync, so you don’t have to mess with multiple cards. When you do an update though, go to the AUX chapter on the MFD and scroll down to the Databases page. Ensure that all dates match what you just put on the SD Card.


    For you Jeppesen users, check out the new Bad Elf Wombat updater that works with the iPad JDM app for updates.

  • Hurricane Harvey

    Texas Top Aviation wants to express our heartfelt concerns and prayers for those affected by Hurricane Harvey along the Texas Gulf Coast and in Houston.  We have several customers in Houston and hope and pray that they are all safe.

    The Houston Hobby Airport after Hurricane Harvey’s Torrential downpour

    If you would like to donate to the relief effort, there are several organizations that are accepting support.  A few are below.

    Samaritan’s Purse

    American Red Cross

Leave a Reply

Your email address will not be published. Required fields are marked *