An Innovative ADS-B Solution from uAvionix

The closer we get to 2020, the more innovative companies are getting with ADS-B out solutions.  There are a myriad of transponders out there that have been released in to meet the ADS-B out requirement and to offer ADS-B in options.  L3 has the Lynx transponder line (and hardware to upgrade an already installed GTX 327 or GTX 330), Garmin has the GTX 345 and offers upgrades to the GTX 330, Appareo has it’s Stratus ESGi ADS-B out transponder, and Avidyne offers it’s AXP340 transponder, among others.

Most of the ADS-B solutions require some kind of panel work, whether it’s pulling out the Garmin GTX 330 to send off, or making panel modifications to fit the L3 Lynx in.  Very few are actual slide in replacements, so there is some labor involved in swapping transponders.

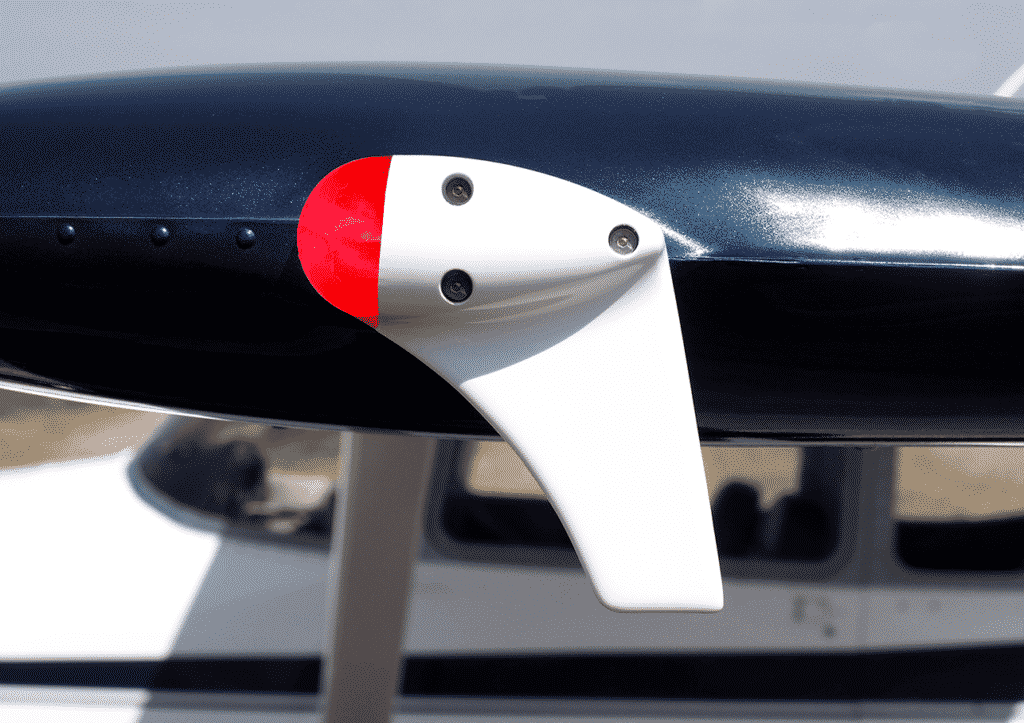
Want a simpler and more innovative solution?  uAvionix, a Montana based company that makes the recently released Scout portable ADS-B In solution, has a product for you.  Meet the SkyBeacon.

What is it?  The uAvionix SkyBeacon is simply a navigation light replacement that bolts on your wing with a fin that hangs down.  All the ADS-B out transmitting equipment is placed behind the nav light on the device.  It has an integrated WAAS GPS unit, can work with any Mode C or Mode S transponder wirelessly, and it mounts directly in to where the original nav light was, same screws and everything.  No additional hardware needed.  uAvionix claims installation should take 10 minutes.

Configuration is super easy too, as it is all done on a smart phone on the uAvionix app.

Right now, the uAvionix SkyBeacon is only approved for experimental aircraft, but, according to their website, uAvionix expects FAA certification in early spring.  With a price tag of only $1,500 and a strobe light to be added as well, this is your simplest and easiest ADS-B compliance solution.

Similar Posts

  • Keeping Your Margin

    Just south of the equator in the mountains of Papua, Indonesia on the island of New Guinea, pilots spend their days carrying food, building supplies, doctors, pigs, and passengers into some of the most remote and extreme airstrips on the planet. That’s where I fly.

    Each morning I load my Cessna Grand Caravan with 2,600 lbs of (insert strange cargo here) and depart my home base of Wamena just after the sun sends its first rays of light across the waking skies above. I spend my day winding through narrow valleys and crossing high altitude mountain passes with building clouds and poor communication, only to land on short, narrow airstrips with steep slopes and little room for error. Most of these one-way in, one-way out runways require me to commit to landing well before touchdown due to terrain that is too close to allow for a safe go-around. Everything better be right when I cross that decision point or I could be in for some excitement.

    DCIM100GOPRO

    The need to keep wide margins of safety might seem obvious in environments like mine, but that doesn’t make them any less important where you fly. You may be a new pilot or an old timer, but keeping your margin should always be on the top of your priority list.

    Let’s unpack this further. Margin is not just maintaining the regulatory requirements for cloud clearances or minimum altitudes. It’s more than planning for an alternate airport or carrying the required fuel reserve. Margin is breathing room. It is that extra maneuvering room, the Plan C, the well thought out options that provide you multiple “outs” in any given situation. Margin is what gets you home when things take a turn for the worse.

    Margin comes in all shapes and sizes. For myself it includes maintaining double my required turn radius in narrow valleys or choosing not to land when my groundspeed is just 1 knot too high at a short and slippery airstrip. For you, it could be determining a ceiling or visibility minimum requirement that is more conservative than the legal ones or setting a wind limitation that you know is reasonable. When it comes down to it, keeping your margin means you don’t push to the ragged edge of your skill or the aircraft’s capability.

    Margin can also refer to your mental or emotional capacity. Are you mentally prepared to divert and miss that important event because the weather is getting bad? Are you ready to handle the disappointment of passengers when you arrive over your airstrip and choose not to land due to approaching rain or a factor that is difficult for a non-pilot to understand? Are you willing to cancel a flight on an important client because you are coming down with a cold or didn’t get adequate sleep? As the PIC of your flying machine, you alone are responsible for the safety of the aircraft and the people on board and those are the tough calls that only you can make.

    Fatigue, overconfidence, and complacency are the biggest obstacles to keeping your margin. They are all very subtle dangers and you may be experiencing them without even recognizing it. Fatigue can slow down your thought process leaving you behind the plane and backed into a corner before you know it. Overconfidence might cause you to push weather or commit to a course of action that has no favorable alternatives. Complacency will lead you to believe that, because you have 2000 hours in a particular make and model, you don’t need to do a thorough preflight or complete the pre-landing checklist.

    Regardless of experience level, operating environment, fancy avionics, and level of proficiency, margin is something that we all need plenty of. So as you go about your upcoming flights, be asking yourself what you can do to build in more margin. It just might be what gets you home.

    Pete Greenwald is a transplant to Atlanta, Georgia who has fallen in love with all things Southern, including his wife, Ashley.  As a pilot and A&P with Mission Aviation Fellowship, he flies the Cessna Grand Caravan in Papua, Indonesia serving people who live in isolation. In his spare time he is on the hunt for the best burger around.

  • Flight Service Station

    When is the last time you talked to the Flight Service Station?

    Believe it or not, FSS is still in existence.  Over the past 10 years, they went from FAA run, the being bought by Lockheed Martin, to now being privately run by a company called Leidos. 1-800-WX Brief will get you connected with a weather briefer, but you’ll hear “Leidos Flight Service Station” now when the briefer picks up.

    Since the advent of Foreflight, most pilots these days get their weather briefings digitally on the iPad. Foreflight has come a long way since it’s inception.  The briefing part of their Flights page is quite comprehensive, with lots of information, and counts as a legal weather briefing (which pilots are still required to get before a flight).

    Why does a pilot even need to call Flight Service?  Well, when’s the last time you tried to interpret everything the Briefing on Foreflight told you?  As I said before, it’s a lot of information and a lot of it can be confusing.  Pilots are not fully trained on interpreting Prog Charts and getting an overall weather picture for a flight.  A weather briefer is.

    I have over 5,000 hours and I still call a weather briefer before almost every flight.  On the way to the airport is a great opportunity to get a weather briefing.  I get a great picture of what’s going on in my area or over my route, frontal movement, bad weather areas, and whether or not it’s a good idea to even take off. Calling in the car alleviates the main complaint I hear about calling the Flight Service Station, which is it’s inconvenient and causes a delay since you have to call them on the phone.

    I don’t do much private pilot training anymore, but when I do, I always teach my students how to get a weather briefing from the Flight Service Station.  I’ll show them how to get the briefing on Foreflight too, but usually their eyes bug out of their heads when they start trying to read everything.  A breathe of relief is released when I tell them there is a trained professional just a phone call away who can clear everything up.

    The other thing that the Flight Service Station provides that is important to a lot of folks are PIREPs.  It’s vital in sketchy weather areas for the FSS to get a report of what’s actually going on in the air.  This helps other pilots out greatly as they are getting information about icing, cloud bases and tops, turbulence and a myriad of other things from airplanes who are actually in the conditions.

    Finally, the most used portion of the Flight Service Station is the Clearance Delivery line (888-766-8267). At airports without a tower or a clearance delivery frequency, with IFR conditions present, the only way to get your IFR clearance is to call Clearance Delivery.  Yes, it can take a little time sometimes, but you will get a clearance every time, unlike taking off and trying to dodge the clouds without hitting anything, while trying to call Center on the radio (which isn’t safe or legal).

    Been a while since you’ve talked to the Flight Service Station?  Give them a call, either on the phone or on the radio.  Odds are, they are bored and just wanting someone to talk to, just like you are on that long cross country flight!

    Checkout 1800WXBrief.com to see all the cool stuff the Flight Service Station does.

  • Cirrus SR20 vs. Diamond DA40

    Note:  For this article I am comparing a 2008 Cirrus SR20 G3 and a 2008 Diamond DA40 XLS.

    Aircraft shopping can be a tedious process.  First, a buyer needs to know what the mission is.  How far will flights typically be, how many people will be on board, and how fast does the airplane need to be.  Then, the buyer has to figure out what the budget is.  Finally, a prospective owner needs to figure out how much airplane he or she can handle.

    Two very good airplanes for newer pilots transitioning from a flight school 172 who need a faster airplane to build experience in, but also want to experience a glass panel, are the Cirrus SR20 G3 and the Diamond DA40 XLS.

    Cirrus SR20 G3

    The 2008 Cirrus SR20 G3 is a good airplane.  The G3 is equipped with the 6 cylinder, Continental IO-360-ES, 200 HP engine.  Performance-wise, an owner can expect 135-140 knots true at 9 GPH (Lean of Peak) or 145-150 knots true at 11.5-12 GPH (Rich of Peak).  The 3 blade propeller equipped models have better takeoff and climb performance than the 2 blade propeller equipped planes, especially in high density altitude conditions.

    Cirrus SR20 Comparison

    The airplane is equipped with the Avidyne Entegra EX 5000 glass panel system.  Most models out there will have Avidyne’s CMAX (Chart View) and all will have the Avidyne EMAX (Engine Monitoring).  All came from the factory with the STEC 55x autopilot (though a handful will have the STEC 55 SR, which doesn’t have glideslope functionality).  They also came from the factory with dual Garmin 430s. Most units have been upgraded to WAAS.

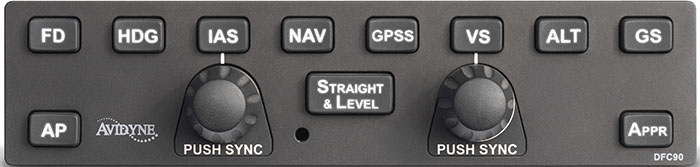
    Some owners have upgraded the autopilot to the Avidyne DFC 90, which is a nice upgrade.  The STEC 55x is a rate based autopilot which takes it’s commands from a hidden turn coordinator that is behind the instrument panel in front of the co-pilot’s seat.  The STEC has some crosswind limitations on approaches where the pilot can actually fly better than the autopilot.

    The DFC 90, however, is an attitude based autopilot that  takes it’s commands from the attitude indicator on the Primary Flight Display (PFD).  It also adds a Straight and Level button as well as an Indicated Airspeed hold button, adding safety and functionality.  It does much better in crosswinds on an instrument approach then the STEC.

    A select few SR20s have been upgraded to a single (or dual) Garmin GTN 650 touch screen GPS unit.  The GTN 650 is a very nice upgrade.  The Garmin 430 is a great unit, but the learning curve with the GTN 650 is much less.  The touch screen setup makes a little more sense to the new user.

    Values on the 2008 SR20 G3 with 1,000 hours or less run somewhere between $220,000-$260,000, depending on total time and equipment.

    Diamond DA40 XLS

    A handful of 2007 XLS DA40s were made, but not many.  Most XLS models you will see are 2008 and later. These are equipped with the Lycoming IO-360, 4 cylinder, 180 HP engine with the Powerflow Exhaust STC. Due to the Powerflow Exhaust, the performance is equal to the SR20.  At 6,000-8,000 feet, you will routinely see 140 knots true at 10-10.5 GPH.  Higher altitudes will give slightly better performance and lower fuel burn.  Like the SR20, the Diamond DA40 XLS comes with either a 2 blade or 3 blade prop.  Go with the 3 blade as the takeoff and climb performance is much better.

    Diamond DA40 Comparison

    Where the DA40 XLS has a leg up on the 2008 SR20 G3 Avidyne is in the avionics.  Diamond got on the Garmin G1000 train a little sooner than Cirrus did and the XLS is equipped with the G1000 and GFC 700 autopilot.  The Garmin GFC 700 autopilot is the best GA autopilot I have flown with.  It is an amazing piece of equipment.

    Most, if not all, DA40 XLS models will have both WAAS and Synthetic Vision.  Cirrus didn’t get Synthetic Vision till they put the Cirrus Perspective by Garmin in their aircraft in the middle of 2008.

    The DA40 has great visibility due to the massive amount of glass surrounding the pilot.  The big glider wings give it excellent pop off the runway, but quite a different climb pitch attitude than most other piston single engine airplanes.  The airplane does like to float on landing if the pilot doesn’t get the speed right.

    Values on the 2008 Diamond DA40 XLS equipped with the Garmin G1000 are around the low-mid $200,000 range.

    Comparison

    Performance wise, the airplanes are about equal.  Rich of peak, the Cirrus out performs the Diamond, but uses more fuel.  Both have about 5 hour ranges (though the Cirrus has bigger fuel tanks, 56 gallons usable compared to the Diamond long range tanks of 50 gallons usable).  Useful load is slightly better in the Diamond due to the fact that the Lycoming engine has 2 fewer cylinders than the Cirrus.  The Cirrus does have a roomier back seat, a larger baggage area, and a side stick instead of a center stick, but the DA40 has a back door.  The Cirrus also has the CAPS system, though an owner has to do a $15,000 repack every ten years.  Airplane values are about the same.

    I give a slight edge to the Diamond, though, and here’s why.  For about the same price, a purchaser can get the Garmin G1000 system complete with the GFC 700 autopilot in the DA40 XLS.  The Avidyne and STEC system is great, but the Garmin system is definitely above and beyond.  To get the Garmin G1000 in an SR20, you’d have to look at the Cirrus Perspective by Garmin, which came out in late 2008, and you’d be paying $300,000 or more for a single engine piston with 200 HP (though you do get Air Conditioning!).

    So for my money, I would go for the Diamond DA40 XLS.  I believe you get a little bit more bang for your buck and you don’t lose anything with the DA40 XLS.  Don’t get me wrong, I love the Cirrus, but comparing the two, I think the Diamond DA40 XLS rates a little higher.

  • Circle to Land Approaches

    When I was doing my instrument and multi-engine training, we did a lot of circle to land approaches.  As a student, I could never figure out why these types of approaches would ever be practical when you could an approach straight in to another runway.  But, as a good student, I never asked my instructors the purpose of them, I just did them to the best of my ability.

    Now, having been flying in the IFR system for almost a decade, I’m finally beginning to fully understand the practical purpose of a circle to land approach.  I have actually elected to do an approach where I had to circle to land on several occasions in actual IMC conditions.

    One important note to remember on circle to land approaches is that the minimum descent altitude (MDA) is always higher than on a straight in approach.  The reason for this is that you are basically joining the pattern for a different runway and you have to be able to visually keep yourself clear of towers and other obstacles.  So, you need a higher visibility and a higher ceiling than if you were just lining up to come straight in.

    Here are a couple of practical circumstances where it would make sense to do a circle to land approach.

    Airports with only 1 straight in approach

    This one is easy.  There are a number of airports scattered around the US that have only 1 straight in instrument approach published for it.  Around my part of Texas, the first one that pops into my mind is the RNAV 31 at T85 in Yoakum, TX.  Most of the year, the prevailing wind is out of the south, so 13 is the favored runway at T85.  During the winter is when most of the IMC weather happens in South Texas, so that is why the approach is for 31.

    Of course, especially this year during the summer, there are some IMC days where an approach to T85 would be necessary.  When there is a strong wind out of the south, landing on 31 is impractical, so a pilot would fly the approach to 31, then circle to land on 13.

    Approaching from the opposite direction

    Take a look at the RNAV 19 at KBMQ, Burnet, TX.  The two initial approach fixes (IAF) are IXANY and JIBAJ.  If a flight is approaching BMQ from the west or north, this is an easy approach to join.  If a flight is coming from Austin (directly the the east and a little south) or San Antonio (almost directly south), it would be a bit of extra flying to get configured properly for the approach.  Especially coming from Austin, because the degree of turn to join at JIBAJ wouldn’t make the approach practical.

    Well, how about vectors?  Unfortunately, Houston Center doesn’t have this approach depicted so vectors aren’t a possibility.  Center can give you vectors north to make the angle a little easier to join at JIBAJ, but they can’t vector you onto the approach.

    Direct DLORA to join is another option, but again, if you are approaching from the southeast, the angle is wrong.

    Insert the RNAV 01 approach with a circle to land.  AMUSE is right on V163, so it’s really easy to join the approach there coming from the south.  Coming from Austin, joining the approach at SUBIE works out great. Fly down to the MDA, join the left downwind for 19, and everyone is happy.

    VOR Circle to Land Approaches

    Every instrument pilot has had an instructor “force” them to do a VOR A or VOR B approach and no one enjoys them.  I personally think they are good practice.  With the number of RNAV systems and RNAV approaches out there, though, VOR approaches are becoming a bit archaic.

    They do have a place in this discussion, though.  A VOR approach is given an A or B designation when the angle of the final approach course is greater than 30 degrees to the runway (VOR A KLZZ), or the final approach course is lined up with the runway, but the MDA is too high to practically descend and land (VOR A KGRK or the VOR/DME C KASE).

    So, there are practical uses for a Circle to Land approach.  The next time you do some IMC work with an instructor, ask him/her if you can include one.

  • Present Position Hold

    When I was working on my instrument rating back in 2007, my instructor and I did a lot of unpublished holds.  In ground school, I heard a lot about holding for weather or holding due to a traffic delay.  At my first job, my chief flight instructor was also a Continental (now United) captain and he told me a lot about having to hold for weather going into different places.

    I heard all this, but I figured it would never happen to me when I’m flying GA airplanes.

    Boy was I wrong!

    I was flying a Piper Malibu into Phoenix with two passengers for Super Bowl weekend and the weather was awful.  No thunderstorms, but moderate precipitation and low ceilings.  We were coming into Deer Valley (KDVT) on the north side of Phoenix and about an hour out, ATC advised me that arrivals into DVT were having to hold and to expect a delay.  The controller said the delay would be about 30 minutes, so by doing a quick calculation, I determined the delay would probably be all cleared up by the time I got in the area.  At the time, I didn’t know if the delay was due to weather or traffic congestion.

    Twenty minutes later, the controller advised me that there was still a delay.  I queried what it was for and he informed me it was due to weather.  He asked me if I wanted to hold or divert.  I listened to the ATIS and heard the ceilings were variable from just below the minimums to just above.  I told him I would hold as the TAF I saw predicted the ceilings to go up.

    “Malibu, hold present position, hold east, expect further clearance 2140 Zulu.”  Gulp.

    At this point, my autopilot had gone out, it was turbulent and I was definitely in the soup.  This was going to be fun.

    After recovering my wits, I read back the clearance, then set about setting up this hold without getting too far from my present position.  The Malibu I was flying had a Garmin 530 which I was using as my primary means of navigation.  I was on V190, but I didn’t have all the fixes in my flight plan.  What to do?  And what to do fast?

    The 530 has a rarely used function called a User Waypoint.  It comes in handy in situations like these.  On the moving map, you can turn the cursor on, move the cursor to any point on the map, and, by pressing enter, create a User Waypoint.  This is what I did on V190.  After I created it, I had to go to my flight plan, find the right spot, and input the User Waypoint just like I would any fix.  Just a note here, when you create a User Waypoint, make sure you remember what you named it so you can find it again.

    After I input the User Waypoint in the flight plan, I had to go back and activate the leg that the User Waypoint was the end point on.  Then, to make sure the flight plan didn’t go to the next waypoint once I crossed my User Waypoint, I had to press the OBS button on the 530 in order to put the GPS in suspend mode.

    Keep in mind, my autopilot wasn’t working, so this involved a lot of multi-tasking!

    That’s how to do a present position hold using the Garmin 530.  Got all that?  Here’s a concise review:

    • Create a User Waypoint
      • Turn the cursor on by pressing the FMS knob
      • Move the cursor to the point where you want your User Waypoint
      • Press enter and name the User Waypoint
    • Press the Flight Plan button
    • Input the User Waypoint into your flight plan at the proper point
    • Activate the leg that the User Waypoint is the end point on
    • Finally, press the OBS button to put the GPS in suspend mode
    • After you’re cleared onward, just press the OBS button again to take the GPS out of suspend mode
  • Garmin GFC 700 Autopilot

    The Garmin GFC 700 Autopilot is an amazing machine.  Fully digital and fully integrated with the Garmin G1000 glass panel, it makes a pilot’s workload a lot easier, especially in busy airspace.

    I train a lot of pilots in airplanes that have the Garmin GFC 700 autopilot.  The Cirrus SR22, the Columbia 350 & 400, the G36 Bonanza, and the Piper Mirage and M350 to name a few.  The most common problem I see for pilots transitioning into the Garmin GFC 700 equipped aircraft is that it doesn’t act like other autopilots.

    STECs and DFC 90 Autopilots function like this:  you push the button for the mode you want on the autopilot controller and that turns the autopilot on.

    Not so on the Garmin GFC 700.  If you push the button for the mode on the GFC 700, then the flight director engages, but not the autopilot.  This confuses folks a lot who move up from different autopilots because their autopilot primacy side of their brain is telling them the autopilot is on whenever they push one of the buttons on the GFC 700 controller.

    Here’s an example:  A pilot has just departed and is ready to turn on course.  In his old airplane with an STEC 55x autopilot, the pilot pushes the direct to key to go to his first waypoint, then pushes NAV on the autopilot controller and the STEC 55x comes on and starts flying on course.  Then he presses VS and ALT to initiate a climb.

    With the same scenario and a Garmin GFC 700 autopilot, the same pilot (who is used to a 55x), pushes the direct to key, then pushes NAV on the autopilot controller and pushes IAS or FLC to initiate the climb.  He lets go of the flight controls thinking the autopilot is engaged.  The airplane starts nosing over and he starts panicking.

    Why did this happen?  The pilot in the second scenario never pushed the AP button on the Garmin GFC 700 so the autopilot never engaged.  All he did by pressing the NAV button and IAS button was to turn the flight director on.

    How to remedy this?  Get in the habit of checking your scoreboard.  On the top of the G1000 or Garmin Perspective PFD, there is an autopilot annunciation strip (or scoreboard as I like to call it).  In the very middle of the scoreboard is an area to show if the autopilot or flight director is engaged.  AP means the autopilot is on; FD means the flight director is engaged but the autopilot is not.

    I teach pilots to be in the habit of checking your scoreboard each time you get done pressing buttons on the autopilot controller to ensure the Garmin GFC 700 is in the proper mode.  This saves some of those panic moments when it is supposed the AP is engaged, but it’s only the FD.

Leave a Reply

Your email address will not be published. Required fields are marked *