Simplified Instrument Approach Briefing

In instrument flying, I am all about keeping things simple.  There is a ton of detail that an instrument pilot can get bogged down in.  When an instrument pilot gets bogged down, he gets distracted from flying the airplane.  When he gets distracted from flying the airplane, dangerous circumstances can happen.

I like to keep things simple.  When I first started instructing, I developed a very simple instrument approach briefing that captures everything that is necessary on an approach plate, but prevents getting bogged down in the details.

I call it the BBC instrument approach briefing.  Here it is:

Brief

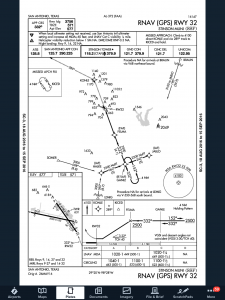
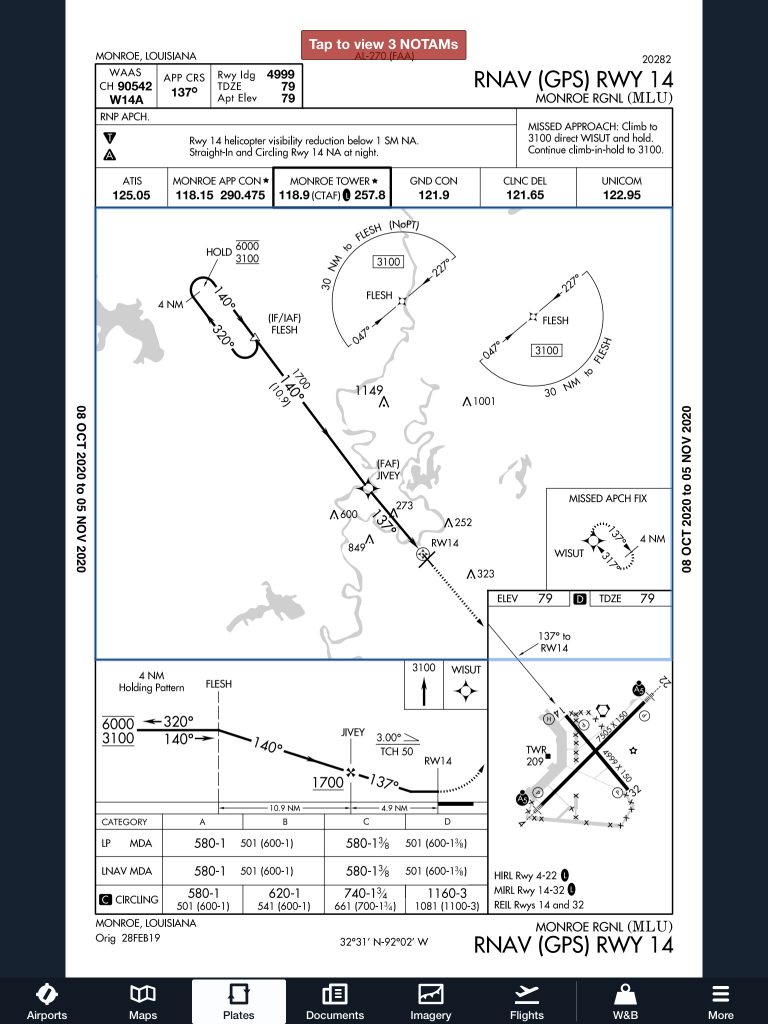
rnav-32-kssfFirst things first.  The first step of an instrument approach briefing is to brief the approach plate.  There are a bunch of acronyms out there that instructors tell their students to memorize that only cause confusion instead of helping get the plate briefed.  To keep it simple, just work your way across the plate and you’ll get all the information you need.
Start in the top left hand corner of the plate, with the approach course, then work your way right and down, as follows:

  • Approach Course (or Nav frequency if flying a VOR/ILS/LOC)
  • Runway information
  • Notes (these are good to brief the night before as a lot are irrelevant to GA pilots
  • Missed approach
  • Frequencies
  • Planview and MSA
  • Profile View and Minimums

Simple enough, right?

Build

Now that you know what you are planning on doing, you can now take the second step in the instrument approach briefing and build the approach in your GPS.  You know your approach type, you know your transition, and you know what your minimums are.  Taking all that information, you can now build it in to your system.

Checklists

Once everything else is done, don’t forget the checklists.  The descent and before landing checklists still need to be done as part of an approach.  The best time to do these is before joining the approach so that you don’t have to worry about flying the approach and looking at a checklist at the same time.  Even better, memorize the checklist and you don’t have to look at anything!

Most importantly, you want to be configured properly for the approach by the final approach fix.  Gear, flaps set, power set, so all you have to worry about at that point is following the needles and trusting your instruments.

ifr-cartoon

Similar Posts

  • Cessna TTx Production Ceases

    Sadly, in January, a pretty great airplane was put out to pasture.  Textron (the conglomerate that now owns Cessna, Beechcraft, Hawker, and Lycoming) announced it was ceasing production of the Cessna TTx.  With the end of the Cessna TTx production, an airplane that was the main “competitor” to Cirrus (if you can call it competition; Cirrus consistently outsold the Cessna TTx by a wide margin each year), it leaves the SR series to stand alone atop the High Performance piston single market.

    I got to go through Cessna’s FITS Accepted Instructor (CFAI) course back in 2012 and have flown in the Cessna 350 and 400 (which is what they were known as at the time; the Cessna TTx name came around in 2011) for about 120 hours.  I really like the airplanes.  I’m partial to the Cirrus, but the Cessna 350 & 400 are fast airplanes and great for 1-2 people.  I flew a 350 (the non-turbo charged version) from New York to San Antonio last fall and routinely saw 170 knots at 12 GPH.

    Columbia started out making the 350 & 400 (the turbo-charged version) in the early 2000s, but went bankrupt in 2007.  Lancair started Columbia to make a certified version of their popular kit planes.  If you see a Lancair ES floating around, you would swear it’s a Columbia with only 1 door.  Cessna bought the design from Columbia in 2007 to begin manufacturing the airplanes themselves.

    Cessna then made a huge mistake as they moved the production facility from Bend, Oregon to Mexico. Production completely halted in 2009 as the planes coming out of Mexico were found to have defective composite work.  The sales never really recovered, even though Cessna put the Garmin G2000 panel in the Cessna TTx, complete with a touchscreen key pad.  A FIKI system was added as an option in 2012.

    A prospective buyer can still get a great value on a used 350, 400, or TTx, as they are valued a little lower than a Cirrus.  The 350, 400 or TTx all make excellent single pilot or two person speedsters with very comfortable amenities.

    Information for this article was taken from Flying Magazine’s website.

  • Flying Through Rain

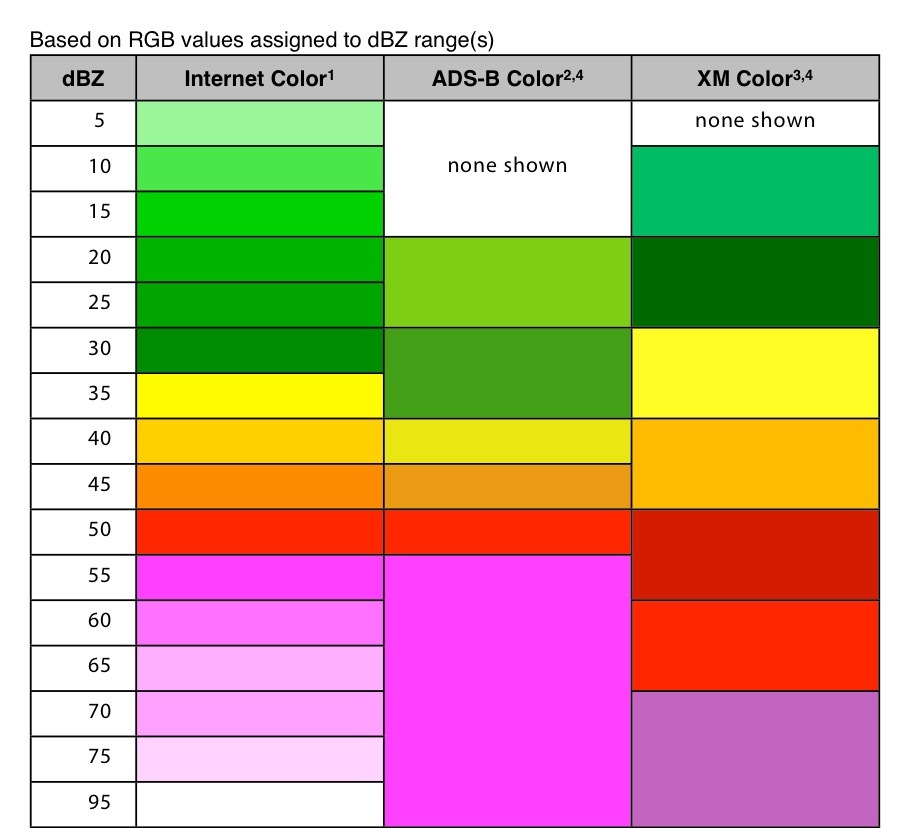
    For the most part, flying through rain is a non-event. If the NexRad or Radar is showing light green or dark green, usually there aren’t that many bumps and your plane just gets a wash. Sometimes the visibility drops down a little bit making us IFR pilots have to transition to our instruments.

    It get’s a little more exciting when the precipitation on your screen turns to yellow. This means there is a lot more precipitation echoes either in the clouds or coming out of the clouds, meaning harder rain. I usually tend to stay away from yellow unless it’s absolutely necessary to go through it.

    I had a situation a few weeks ago where I deemed it necessary to fly through some yellow NexRad returns. I was flying a G1000 Columbia into Monroe, Louisiana, KMLU. The winds were mostly light, but slightly favoring runway 04, which was the runway in use. As I got closer, a decent size rain shower with mostly yellow returns was sitting over the final approach fix for runway 04 and slowly tracking to the northeast.

    I didn’t particularly want to spend the entire approach getting beat on with rain, so I decided to fly the RNAV 14 approach at MLU and circle to land on runway 04. The rain hadn’t quite reached the airport yet, so I decided that circling to 04 should be no problem.

    I started the RNAV 14 at the FLESH IAF. Since I was approaching from the west, I did not need to do the procedure turn, so I joined the Final Approach Course (FAC) after crossing FLESH.

    In the meantime, that rain shower was inching closer to the FAC for the RNAV 14. I wasn’t concerned about my safety if I flew through some of it and I didn’t have passengers on board who would get nervous, so I elected to continue. I wasn’t seeing any lightning coming out of the clouds, so it appeared to only be moderate rain.

    Just before I got to JIVEY, the FAF, I entered the clouds and the rain. About 20 seconds later, my altimeter and airspeed started bouncing around a lot. Now, based on all I’ve said so far, what would cause that, and what would you do?

    (Jeopardy theme song playing while contestants ponder questions)

    The answers? Due to the moderate precipitation, water had gotten into my static port and caused the unusual readings on my altimeter and airspeed indicators on the G1000.

    I had experienced this before, so I knew what to do. I reached down and turned the static source from primary to alternate, which starts taking static pressure from inside the cabin in the Columbia. Instantly, everything went normal.

    The other time I had experienced this was also in a Columbia, so I’m under the impression that the way the Columbia static ports are designed, they are a little bit more susceptible to water creeping into them than other airplanes.

    Moral of the story? If your pitot/static instruments start jumping around, the first thing you do is turn your alternate static source on.

  • The Go Around Button

    Back in the old days, when flying an approach in an early Cirrus SR22 (circa 2004; yes, in airplane technology, those were the old days), performing a missed approach procedure was a lot of work.  You were low to the ground and weren’t able to see the runway.  Then, you had to start climbing so you don’t hit the ground, then push a lot of buttons in order to get the GPS and autopilot set fly the missed approach procedure.  It was very easy to get distracted with button pushing, then forget to fly the airplane, putting yourself and passengers in very unsafe circumstances.  The go around button has changed all that.

    Going Missed the Old Fashioned Way

    Let’s stick with our example of the 2004 Cirrus.  The SR22 in 2004 was equipped with the Avidyne Entegra system, complete with dual Garmin 430 GPS units, and an STEC 55x Autopilot.  A very capable IFR flying machine (we could use the same example of a 2004 or 2005 Lancair Columbia 350 or 400 that was equipped the same way, except the screens were vertical instead of horizontal).

    Avidyne Cirrus Go Around Button

    We’ll use the ILS 15 at the Temple airport, KTPL, for our example.  You pass TPL, the outer marker at 1,683 with the glide slope already centered.  Everything is going well so far.  The number 1 Garmin 430 is set to VLOC and the autopilot is showing NAV and APR for the lateral guidance and GS on the vertical, tracking the glide slope.  The last weather report stated the clouds were Broken at 500 feet, so it appears like you’ll be able to get in on the approach.

    As you get closer to the Decision Altitude, the clouds aren’t letting up at all.  You hit 1,000 feet on your altimeter, 120 feet above the minimums, and you still can’t see a thing.  Another 100 feet lower doesn’t change anything, so you elect to proceed with the missed approach.  This means things are about to get busy.

    Here’s the process:

    • Fly the airplane first, meaning shut off the autopilot, pitch the nose up to about 7 degrees, TRIM, add full power, retract the flaps, and step on the right rudder
    • The Garmin 430 is now in SUSP mode, meaning the missed approach point is locked in as the active waypoint.  So, you have to press the OBS button to cause the GPS to cycle over to the missed approach procedure
    • You have to press the VLOC button on the Garmin 430 in order to change the CDI back to GPS
    • You have to re-engage the autopilot by pressing NAV twice (which engages GPS Steering mode)
    • You have to reset your altitude bug (if you hadn’t set it for the missed approach altitude previously)
    • You have to press VS and ALT on your autopilot to have the STEC continue the climb

    That’s a lot of work, isn’t it?  Plus, that’s an extensive amount of head down time in the cockpit, with your eyes looking elsewhere other than the instruments while hand flying.  All very low to the ground, I might add.  Can you see how this can be dangerous?  (Note:  The Avidyne IFD 550 has made this a little easier with automatically switching from VLOC to GPS and automatically engaging the missed approach procedure in the flight plan)

    The advent of the Go Around Button has streamlined the process, leading to safer operations where it matters most.  The functions of the Go Around Button vary based on the airplane, but here are three examples, the Garmin G1000 Cessna Corvalis TT, the Garmin G1000 Piper Mirage, and the Garmin Perspective Cirrus SR22.

    Cessna Corvalis TT

    We’ll take the above situation and swap out the airplanes.  Gone is the 2004 Cirrus SR22.  Insert a 2008 Cessna Corvalis TT, equipped with the Garmin G1000 suite and the GFC 700 autopilot.  The go around button is positioned directly above the twist in throttle.

    Cessna Corvalis G1000 Go Around Button

    When you push the Go Around Button, here’s what the system does:

    • Disconnects the Autopilot
    • Sets the Flight Director for 7.5 degrees pitch up (which is about your normal climb angle) and wings level
    • Switches the CDI back to GPS
    • Takes the GPS out of SUSP mode and cycles the flight plan to the first waypoint on the missed approach procedure

    Here’s what you have to do:

    • Follow the flight director by pitching the nose up and TRIM
    • Add full mixture, prop and throttle (prop & throttle should be full already)
    • Retract the flaps
    • Step on the right rudder
    • Re-engage the autopilot, then press NAV and VS (or FLC) and set your altitude bug if it isn’t already set

    Not too bad, eh?  Makes the whole situation streamlined and safer.

    Piper PA46-350P Mirage

    Same situation, different airplane.  You’ll notice the procedure for the Piper Mirage is almost exactly the same as the  Corvalis procedure.  The difference between the two airplanes is where the autopilot controller is.  In the Corvalis, the autopilot controller is positioned on the left side of the MFD, making it easy to scan back and forth while pushing buttons on the autopilot.

    The Piper Mirage autopilot controller is positioned below both screens and in front of the power quadrant. With this positioning, the pilot’s eyes have to go a lot further to see which autopilot button he is pushing. In this case, it becomes very important to get the airplane climbing and trimmed before going down to engage the autopilot.

    As in the Corvalis, here is what the Go Around button does:

    • Disconnects the Autopilot
    • Sets the Flight Director for 7.5 degrees pitch up (which is about your normal climb angle) and wings level
    • Switches the CDI back to GPS
    • Takes the GPS out of SUSP mode and cycles the flight plan to the first waypoint on the missed approach procedure

    And here’s what you have to do:

    • Follow the flight director by pitching the nose up, then TRIM
    • Add full mixture, prop and throttle (prop & throttle should be full already)
    • Retract the flaps
    • Step on the right rudder
    • Re-engage the autopilot, then press NAV and VS (or FLC) and set your altitude bug if it isn’t already set

    Cirrus SR22

    Cirrus Perspective Go Around Button

    This time, we’ll use the 2010 Cirrus SR22T with the Garmin Perspective and GFC 700 Autopilot. One thing I really like about how Cirrus configured their system is where the Go Around button is.  It’s actually on the throttle itself, making it much more intuitive.  This way, you can press the Go Around button while adding full throttle.

    There is one major difference between the Garmin Perspective in the Cirrus and the G1000 in the Corvalis. When you press the Go Around button in the Cirrus, the autopilot actually stays on.

    Here’s what happens when you press the Go Around button in the Cirrus:

    • Flight Director pitches to 7.5 degrees pitch up and wings level
    • AP Mode switches to Go Around mode, following the flight director
    • GPS comes out of SUSP mode
    • CDI switches back to GPS

    All the pilot really has to do is add power, take the flaps up, then press NAV on the GFC 700 to get the autopilot following the missed approach procedure.

    If you aren’t familiar with the Go Around button or haven’t used the one in your plane lately, it’s good to go up with a knowledgeable instructor and fly a couple of approaches where you perform the published missed approach afterward.  That way, he or she can assist you through the first missed approach, then give you pointers until  you get comfortable with the Go Around button.

  • Conroe, TX CPPP

    The Cirrus Pilot Proficiency Program (CPPP) will be coming to the Galaxy FBO at the Lone Star Executive Airport in Conroe, TX again this year.  The dates of the event will be October 14th-16th.

    Wondering what the CPPP program is?

    “CPPP offers a weekend event for Cirrus owners and their partners that focuses on Cirrus-specific knowledge and flying proficiency.  We bring some of the most experienced flight instructors who regularly teach in all kinds of Cirrus airplanes flown for all kinds of missions.  We have prepared an extensive syllabus of ground courses that complement the transition training and delve into areas of greatest need for Cirrus pilots.” (from CirrusPilots.org)

    CPPP

    The weekend starts off with a group dinner on Friday night. The Saturday morning ground session focuses on General Aviation Safety with special focus on the Cirrus accident statistics.  Normal and emergency procedures are also reviewed.

    In the afternoon on Saturday, the attendees are split into two groups.  The first group has a myriad of options for ground sessions covering all topics related to Cirrus aircraft and operations.  The second group flies, then they switch for the second 3 hour session.  Sunday brings the same split, with more courses offered and more flying.

    While the Cirrus pilots are flying and learning more about their airplanes, CPPP offers a Partner in Command course for flying partners on Saturday.  This allows flying partners to be more comfortable in the airplane and teaches them what to do if something were to happen to the pilot.

    All in all, attending a CPPP will improve both Cirrus knowledge and Cirrus flying skills.  It’s highly recommended for all Cirrus pilots.

    To register for the CPPP event in Conroe, check out the CPPP website.

  • The Aunt Betty Directive: PFD Failures

    Glass panel displays, ballistic parachute aircraft recovery systems, portable tablet computers enabling paperless cockpits, and widely available three axis autopilot systems have changed the way we fly, the way we train, and the way we are expected to perform on check rides. Our training and testing paradigms have tried to stay in synch, yet always seem to be catching up to the latest levels of technology.

    This is very apparent when we instructors are preparing a student for an FAA practical test. When training aircraft had no autopilots, no GPS, and certainly no parachutes, the general philosophy was that during training, the student should have the lowest level of technology available. This was also the expectation on the check ride. This theory has changed over the years and now the Practical Test Standards require that an applicant integrate all available technology while demonstrating mastery of his or her aircraft. This raises numerous questions from instructors and students about what technology will be available for each task.

    One example of this dilemma is found when contemplating an instrument airplane practical test in a Cirrus SR20/SR22. The test requires the task “Instrument Approach without Primary Flight Display”, which has taken the place of what was the partial panel approach, accomplished without use of gyroscopic heading and attitude indicators. In the Cirrus, the standby attitude indicator, standby airspeed, and standby altimeter are available, as is the Multi-Function Display. Guidance from the FAA has us shooting a GPS approach using the moving map display on the MFD after disabling the PFD. Those of us who trained and tested in steam gauge aircraft think that this task should be fairly easy. With a fully functional Attitude Indicator and a nice big moving map display showing our course, a reasonably competent instrument pilot should have little trouble adapting to this setup and flying a good approach.

    But, in the Cirrus specifically, and perhaps in other aircraft as well, another question comes up. Can the applicant use the autopilot (which still works just fine after a display failure) during the approach without the PFD? A rather famous DPE who writes for a national magazine says “yes”, opining that not to allow its use would be introducing simultaneous multiple systems failures, which is strictly forbidden in the minds of some. If we follow this logic, we would not test simulated engine failure emergencies in these aircraft either, because to do so would imply failure of not only the engine, but the CAPS parachute system as well. In my former role as a pilot examiner, I always said no, that the approach should be hand flown. Here is my logic.

    I was amazed that flight instructors and examiners would accept the substitution of autopilot technology for the skill required to fly an approach without the PFD. I would argue that the intent and the well described emphasis of the PTS is that the applicant must demonstrate the ability to control the airplane after a loss of the primary flight display, not observe and monitor the autopilot controlling the airplane! This argument was generally unpersuasive, so I approached from a different point of view, that of a concerned family member.

    “Aunt Betty” represents a future passenger flying with the soon to be rated instrument pilot. Here is the question posed to Aunt Betty: “When we train and test pilots for instrument proficiency, we require them to demonstrate the ability to safely and skillfully fly the airplane without their primary instruments. Now, Betty, in this airplane, we can test this task in one of two ways. We would like your input on which way you would prefer, seeing as you will be a frequent passenger with your nephew. We can either have the pilot (might be your son, brother, husband, or nephew) demonstrate that he can fly the airplane by hand without the PFD, which does require a little more skill and a slightly different technique, or, we can require the pilot to perform this task using the autopilot so that the pilot basically monitors the airplane flying itself on the approach.

    “Now, Aunt Betty, a pilot allowed to use the autopilot system on this approach may not have the skill or technique to fly the approach by hand in the clouds should the autopilot shut down due to turbulence or mechanical failure. Should this happen to a pilot without the skill and practice normally required, the odds of a fatal accident occurring would be quite high.

    “So what do you think, Aunt Betty? Would you feel more comfortable flying with this fellow if he has demonstrated mastery of the aircraft (sans PFD) without the autopilot or only with its assistance?”

    This leads us to a larger discussion about the use of other technology, iPad, GPS moving map, and more. If technology is used as a replacement for pilot proficiency during training and testing, we end up with less skillful, less competent and ultimately less safe pilots. But, if we require that our students demonstrate mastery with the lowest available level of automation and technology (which, by the way, implies excellent fundamental aircraft control skills) then, when technology is added into the equation, we have a safer pilot.

    Technology can be a value added safety multiplier, or it can be a crutch needed to make up for lack of fundamental and advanced skills. Crutch or Safety Multiplier, which one will you choose? I know which one Aunt Betty prefers.

    Charles McDougal is a flight instructor, corporate pilot, and former DPE ‎who offers basic and advanced flight instruction in the San Antonio area.  To find out more information about Charles or to contact him, visit his website, www.flighttrainingcoalition.com.

  • IM SAFE: Are You Really?

    As pilots, we are all familiar with the IM SAFE acronym that the FAA puts out.  It comes up as part of the ground training over Human Factors during private pilot ground school.  We all memorize it, spit it out for our check rides, then most of us promptly forget about it.

    When I was training for my pilot’s licenses, I was at a Part 141 school that was very standardized (LeTourneau University, who has a fabulous aviation school).  Before each flight, we had to do a self evaluation based on the weather and the IM SAFE checklist.  Based on our answers, we would then determine if the conditions were conducive to flying as well as if I was physically okay to fly.

    This was a great tool because not only do pilots have to pre-flight the airplane, they also need to pre-flight themselves.  It’s very easy to fall into one of the “Hazardous Attitudes” if there is a pressing meeting or you haven’t flown in a while and it’s a beautiful day, but maybe you aren’t physically fit to control an airplane.

    Let’s break down the IM SAFE checklist to dig a little deeper into the physically fit side of flying.

    Illness

    This one is pretty easy.  Are you sick?  If so, how sick?  If you can’t hardly talk or your body feels like it was hit by a truck, then flying probably isn’t in your best interest.

    The tricky area can become if you are only a little sick.  Maybe you have a cough or a little cold or a headache is starting to form.  You probably could go fly, but is it really a good idea?  It could be something worse, or it may be nothing.  You have to know yourself and put limits on yourself before you wake up on the day of your big meeting two states over.  Set illness personal minimums and stick to them.

    Medication

    There are a slew of drugs, both prescription and over the counter, that pilots cannot take and fly.  AOPA has a hotline to call for pilots to find out if they can fly with the medication they are taking, or what meds they can take to give them relief and still operate an aircraft.

    Another great resource is your medical examiner.  Just give him/her a call and they will be more than happy to let you know what you can and can’t take.  They’ve been educated in the area of aviation so they are very knowledgeable.

    Stress

    StressometerThis is a huge one that pilots ignore a lot.  Maybe it was a stressful day at work, maybe you are running late to the airport, your meeting got moved up, whatever.  Stress can jump on you and mess up a pilot’s thinking very quickly.  If you have a lot of other things on your mind and you aren’t able to focus just on flying, it might be a good idea to stay on the ground.


    Alcohol

    Out of the whole IM SAFE list, the alcohol limitations are very clearly defined.  8 hours bottle to throttle, no more than 0.04% BAC, no operating an airplane while under the influence, and no carrying passengers who are visibly intoxicated.  For your personal minimums, it’s a good idea to increase that time to 12, 18 or even 24 hours bottle to throttle.

    Fatigue

    Learning to fly while a college student led to a fair share of canceled flights due to fatigue.  I operate best on 8 hours of sleep in the past 24 hours.  I can function on 6, but anything less than 6 hours, my performance drastically drops off, sometimes to a point where I wouldn’t be safe.  I discovered this while with my flight instructor attempting to do a holding pattern and completely botching it up.

    I observed this as a CFI quite often.  If I was doing ground with a student and they were struggling, my first question would be, how much sleep did you get last night?  More often than not, if I had to ask that question, I would get an average answer of 3 to 4 hours (I even had one guy show up for a flight block on 2 hours sleep.  I sent him back to the dorm).

    Fatigue is very easily overlooked because it’s not measurable.  Needing to get a flight lesson done or needing to get somewhere when you are obviously fatigued is not a good idea.  Make sure you get a good night’s sleep before a flight and don’t be afraid to cancel if you didn’t.  Set some sleep personal minimums and make them hard and fast.

    Eating

    Don’t skip meals and fly.  Performance greatly decreases when a pilot is hungry.  At the very least, stick a couple of food bars in your flight bag to give you some nourishment.

    Also, stay hydrated, especially in the summer time.  I carry a huge bottle of water with me on all my flights because I get headaches if I don’t drink enough.  Getting dehydrated on a long flight can lead to all sorts of performance problems (over hydration is also a problem in the air, but that’s what Gatorade bottles are for, right?).

    All this to say, have some personal minimums when it comes to you and your body.  Check the plane, check the weather and check yourself.  If anything falls in the “red” area in any one of those three categories, stay on the ground and don’t press your luck.

Leave a Reply

Your email address will not be published. Required fields are marked *