A common practice when ATC is setting an aircraft up for a visual approach is giving a clearance direct to the Final Approach Fix (FAF) for the approach for that runway. The theory is, the pilot will fly to the FAF, then he’ll pick up the airport and fly visually in. It is a handy way of setting the pilot up for a 5 mile straight in visual approach.
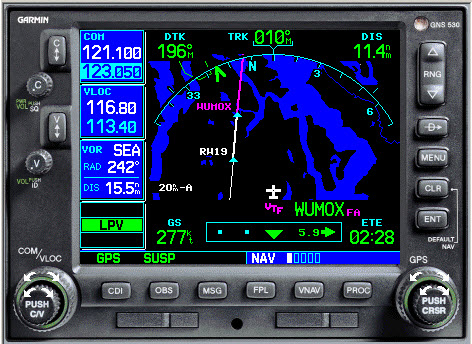
For anyone who flies with a Garmin GPS, whether is be a 430, a G1000, or a GTN 750, you have probably discovered a little nuance with going direct to the FAF. Once an approach is loaded into the flight plan, whether is is loaded via vectors or via an IAF, all the waypoints on the approach go into the flight plan. If the FAF is selected in the flight plan and the direct to command is given, the plane turns to the FAF and flies direct to it.
The fun starts once the plane gets to the FAF. The Garmin doesn’t sequence to the next waypoint. It just keeps the FAF as the active waypoint and the airplane just continues on the course it had to get to the FAF. This has probably caused some stress and frustration as the pilot is expecting the airplane to turn inbound (if the autopilot is engaged), but then it keeps flying, usually away from the runway.
How to fix this? If a Garmin GPS is closely inspected once the direct to the FAF command is selected, the pilot will notice that the GPS goes into Suspend mode. The Garmin programers thought this was a good idea to do.
How to get it to sequence properly? Well, once the FAF is the active waypoint and the airplane is flying direct to it, simply unsuspend the GPS, then the airplane will turn inbound on the final approach course and track inbound and the glide slope will pop up. On the 430 or 530, just press the OBS key. On the G1000, press SUSP. On the GTN 750, tap UNSUSP on the bottom of the unit.
Hopefully, this will lead to reduced frustration on what otherwise should be a simple approach to an airport.
On March 30th, Texas Governor Greg Abbott issued an Executive Order mandating that all travelers (including Texas air travelers operating or traveling in private aircraft) from the following designated areas were to self-quarantine for 14 days (or the extent of their stay in Texas, whichever was shorter) upon entering the State:
California
Louisiana
Washington State
Atlanta, Georgia
Chicago, Illinois
Detroit, Michigan
Miami, Florida
If you traveled to Texas by air from any of the above designated areas, you are required to fill out the Arrivals from Areas Designated for Mandatory Self-Quarantine Form. Failure to do so could lead to a $1,000 fine or 180 days in jail, or both. For private aircraft owners/operators, put your Tail Number in for Flight Number and “Private” for Airline.
Aircraft owners, stay away from the designated areas listed above and you won’t have any worries. A lot of you reading this are from Texas, so make Louisiana a fly over state for now and don’t make any landings in Cajun country.
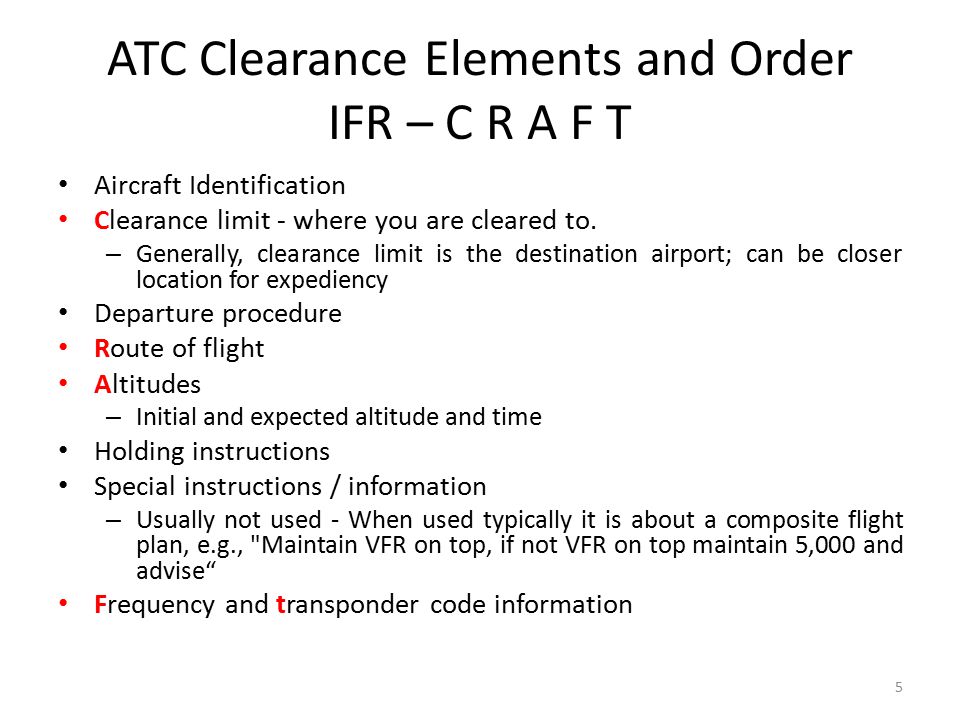
Picking up an IFR clearance at first can seem very simple. But, when taking off from an untowered field, especially if a pilot is based at a towered airport, it can be a little more complex. Based at an untowered field? The towered procedures are a little more streamlined, but still different.
Towered Airports
Class B or Class C
At Class B or Class C airports, there is a dedicated frequency to get an IFR clearance and VFR departure instructions called Clearance Delivery. It is published in the airport facilities directory as well as most approach plates. Before you call Clearance Delivery, get the ATIS and tell the controller you have it as well as where you are located on the airport.
Class D
Some Class D airports have a Clearance Delivery frequency (see KADS, Addison, TX), but for the most part, you’ll get your IFR clearance on the Ground frequency. If there is a dedicated Clearance Delivery frequency, the ATIS will specify whether or not to get your clearance on it or on ground control.
Class D towers are only part time towers, usually closing between 7pm and 10pm local time, depending on how busy the airspace is. These airports usually have published Clearance Delivery frequencies to contact either the local approach control or center to pick up an IFR clearance on the ground. They will be published on approach plates and in the A/FD.
Untowered Airports
Class E
There are a number of Class E airports that are Class E all the way down to the surface (see KLFK, Angelina County). At these airports, there will either be a Clearance Delivery frequency or you call on the Center or Approach frequency to get your clearance (at KLFK, you call Center as there is no Clearance Delivery frequency. At Temple, KTPL, there is a published Clearance Delivery frequency which you would be talking to Grey Approach).
Class G
There are two ways to pick up an IFR clearance at a Class G airport, one typically a little safer than the other.
The first option is to take off and maintain VFR while calling Center or Approach control. They will give you your clearance making you IFR and allowing you to enter the clouds. This option can be unsafe depending on the terrain surrounding the airport and how low the ceiling is. If the ceiling is overcast at 1,000, you can legally remain VFR in Class G airspace at 500 AGL, but that isn’t the safest option and you might not be able to raise ATC at that altitude.
The second, and safer option, is to call on the phone. Flight Service has a nationwide Clearance Delivery phone number that every pilot should have saved in their contacts (888-766-8267). Typically, you want to wait to call them until after you are done with your runup because they only give you a five or ten minute window to get off the ground. With bluetooth equipped headsets, this usually isn’t a problem.
Be prepared when calling Clearance Delivery on the phone to wait a few minutes. Us pilots aren’t good at being patient sometimes, but the FSS has to call Center on the phone to get your clearance and release and this can take a few minutes. Be prepared for that going in and just be patient. Remember, this is the safer option!
There are a handful of Class G airports around the US that have a GCO, a Ground Communications Outlet. With a GCO, you tune up the frequency, then click the mic 4 times to talk to ATC or 6 times to talk to FSS. Each mic click must be at least one second, so if you click the mic too quickly, it won’t work.
At certain airports that are underlying an approach control’s airspace, you can actually call the TRACON directly and get your clearance from them (5C1, the Boerne Stage Airport, for example. San Antonio approach is the controlling agency and you can call them directly to pick up your clearance). It’s a good practice to get the TRACON phone number and save that in your contacts as well.
This is a Press Release from Daher’s website, the maker of the TBM 960.
Sun ‘n Fun Aerospace Expo, Lakeland, Florida, April 5, 2022 – Daher today unveiled the latest high-end version of its TBM pressurized single turboprop aircraft family – the TBM 960 – which incorporates Pratt & Whitney Canada’s advanced PT6E-66XT engine and a fully digital e-throttle, along with a digitally-controlled cabin that incorporates an all-new environmental control system, LED ambience lighting and electrically-dimmable windows.
The TBM 960 was introduced at the Sun ‘n Fun Aerospace Expo in Lakeland, Florida, where Daher is exhibiting the first production airplane (exhibit stand #MD-22B).
“The TBM 960 is the quintessential TBM, representing the fifth evolution of our very fast turboprop aircraft family since the TBM 900-series’ introduction in 2014,” commented Nicolas Chabbert, the Senior Vice President of Daher’s Aircraft Division. “It takes the maximum advantage of today’s turboprop technology to provide digital control of the engine and the propeller.”
The TBM 960 retains the rapid speed of Daher’s TBM family while enabling lower fuel consumption. At Daher’s recommended cruise setting of 308 kts., the fuel consumption is only 57 U.S. gallons per hour, which is a 10% fuel economy compared to maximum cruise setting for more sustainability.
At the heart of this latest TBM version is the intelligent PT6E-66XT powerplant and Hartzell Propeller’s five-blade RaptorTM composite propeller, both of which are linked to the dual-channel digital Engine and Propeller Electronic Control System (EPECS).
With the EPECS, the PT6E-66XT’s startup is fully automated after a single-switch activation. The cockpit’s power lever is an e-throttle, using a single forward position from takeoff to landing – with the EPECS optimizing powerplant performance throughout the flight envelope while
Daher unveils the TBM 960 at Sun ‘n Fun Aerospace Expo
reducing pilot workload by integrating all functions and protecting the engine’s life. Analysis of engine parameters is driven by 100-plus smart data inputs.
The RaptorTM propeller is fully integrated into the propulsion system. It is specifically designed to reduce overall weight and improve the TBM 960’s takeoff distance, climb and cruise speed. Turning at 1,925 rpm during maximum power output, the Raptor contributes to limiting noise and vibration. Its sound level during takeoff is just 76.4 decibels, meeting the most stringent international noise standards.
With its G3000® integrated flight deck, the TBM 960 retains Daher’s e-copilot® concentration of technological innovation and safety systems in the TBM, which can be compared to an “electronic copilot.” This includes an icing protection system, flight envelope monitoring through the Electronic Stability and Protection (ESP) and the Under-speed Protection (USP) systems, the Emergency Descent Mode (EDM) function, as well as the game-changing HomeSafeTM emergency autoland system.
New to the TBM 960 is the Garmin GWXTM 8000 doppler weather radar with advanced surveillance features such as lightning and hail prediction, turbulence detection, zero blind range for close-in returns, and ground clutter suppression. The TBM 960 also is the first application of Garmin’s GDL® 60 next-generation data transmitter for automatic database upload and interconnection with mobile devices.
The TBM 960’s Prestige cabin extends Daher’s use of digital power inside the aircraft, featuring an all-new environmental control system, LED ambience strip lighting integrated into both sides of the overhead ceiling panel, and electronically-dimmable windows – all controlled by a PassengerComfortDisplay(PCD). Enhancementsinthecabin’sstyleandcomfortalsoinclude new ergonomically enhanced seats, USB-A and USB-C power plugs, individual cupholders and headset hangers for each occupant.
For the TBM 960, a fifth TBM paint scheme – called Sirocco, based on the creativity of French designer Alexandre Echasseriau – has been added to the aircraft’s style customization possibilities.
The TBM 960 has been certified by EASA (the European Union Aviation Safety Agency); with certification by the U.S. FAA (Federal Aviation Administration) currently underway. Deliveries will begin in the first half of 2022.
With the new aircraft’s launch, Daher’s TBM family is now offered in two versions: the TBM 960 and TBM 910.
I took a Piper Malibu to Cabo San Lucas a few weeks back. This was my second trip flying to Mexico, but the first where I arranged everything. Cabo is a beautiful place and the MMSL airport is a fabulous facility. For those who haven’t been fying to Mexico before, MMSL is the place to go. The folks there are extremely helpful and do most of the paperwork for you. You just have to pass along your information to them.
Flying to Mexico and back out is different than flying in the US. First of all, don’t forget your passport. The authorities on both sides frown upon that. You’ll probably get sent back to the US (or sent back to Mexico if you are on your return trip). Your aircraft also needs, Mexican insurance (talk to your US insurance agent) a radio license, and a customs decal.
Second, you’ll have to file an ICAO specific flight plan for flying to Mexico. This is available on Foreflight now, but I really like Fltplan.com’s way of doing it. I don’t fly internationally enough to remember what everything means, but Fltplan.com does a great job of walking pilots through the the different classifications. It’s almost impossible to get confused.
Third, you have to fill out an eAPIS form. This has to be done at least 24 hours prior to departure from the US, but it can be done as far in advance as you’d like. If your departure time changes or your passengers change, you can edit the eAPIS form to bring it current.
Flying to Mexico IFR is a lot simpler than flying VFR. I have only flown IFR and it is very easy. I’m already on a flight plan, already squawking a discreet code, and already on radar, so there really isn’t any way I can mess up the ADIZ penetration. I really recommend going in and out of Mexico IFR instead of VFR.
Once you land in Mexico, you have to close your IFR flight plan. The tower doesn’t do this for you. After clearing customs, you’ll have to pay a landing fee and sign your flight plan confirming you have arrived and closing it out.
When departing, you have to file another eAPIS 24 hours in advance. Wherever you plan on clearing Customs in the US, you’ll need to call the Customs office no less than 1 hour, but not more than 23 hours before arrival. It’s called an Advanced Notice of Arrival.
You’ll need to fill out a paper flight plan before departing, clear customs again to leave, then away you go.
There are a lot of really fun getaways in Mexico and flying there doesn’t have to be difficult. When you have the right information, flying to Mexico can be a breeze!
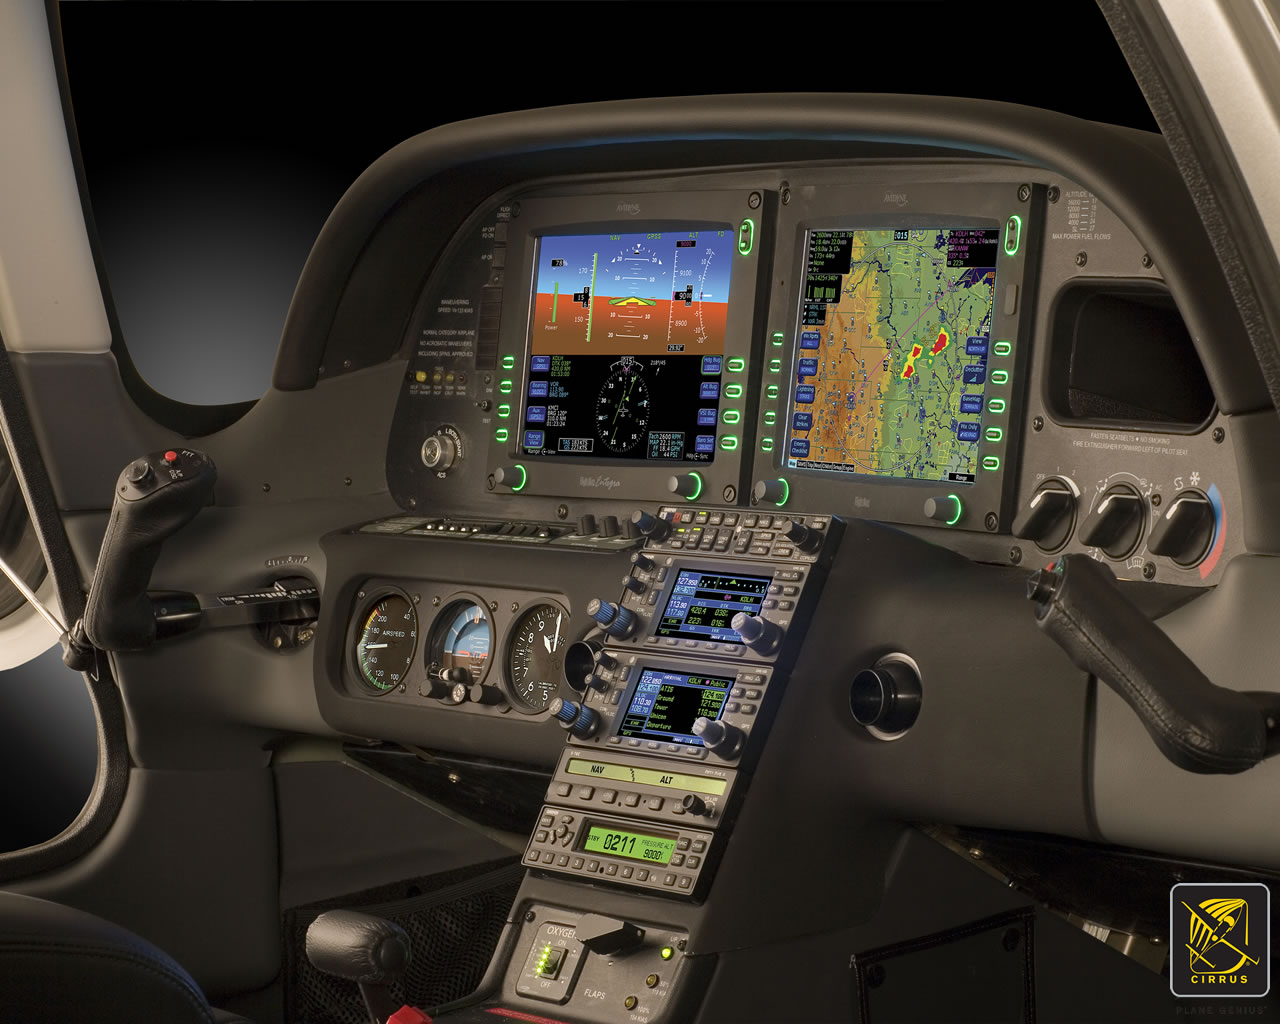
There are a number of airplanes out there equipped with the Avidyne Entegra PFD and MFD system, most notably the Cirrus SR20 and SR22 models from the early 2000s and the Columbia 350 and 400 from the same era. The Entegra is pretty simple and easy to learn, but doesn’t have the capability that it’s Garmin glass panel counterparts do (I have not, however, tried the R9, which could prove much more capable than it’s predecessor). I have found that pilots master the Entegra a lot quicker because of the reduced functionality.
One of the nice features of the Avidyne Entegra is the CMAX Chartview option. With a yearly subscription, you can get all the Jeppesen approach plates and airport diagrams for the entire US on your MFD. Just like your GPS, though, you have to update the charts monthly to keep them legal. After a period of time when you don’t keep up with the updates (I believe it is 90 days), then the charts disappear.
The update process is a little tricky if you don’t have someone to explain it to you. Once you go through it a few times, you’ll have it down pat. Here’s the process for the Avidyne Entegra Chart Updates.
Jeppesen Subscription
The first step in performing your Avidyne Entegra Chart Updates is to create an account with Jeppesen, who handles all the GPS NavData and MFD Chart updates for both Garmin and Avidyne. If you already have a Jeppesen subscription, you can skip down to the next section. To do that, simply go to jeppdirect.jeppesen.com, and then do the following:
Click on Avionics Data on the upper left hand side
Click “Purchase Avionics Subscription”
Then, click on “Create Account” in the new users section
Once you’ve created an account, login, then put in your aircraft information and select 1 update for the Avidyne Entegra EX500 EX 5000
Click Continue at the bottom and you can put in your payment information
Software Needed
There are two different programs depending on if you have a PC or a Mac. If you have a PC, you need the Jeppesen Services Update Manager (JSUM). If you have a Mac, you need the Jeppesen Distribution Manager (JDM). Download whichever one you need, then login, and your updates will show up.
Downloading the Avidyne Entegra Chart Updates
First, we’ll go through the process of performing the Avidyne Entegra Chart Updates process for a Windows computer, using JSUM. You’ll need two 2 GB USB drives formatted to FAT 16. Here’s how to format to FAT 16.
Go to My Computer after inserting the USB drive
Right click on the drive
Click on Format, then select FAT and press OK
Once the USB drive is formatted to FAT16, open up the JSUM program. Login and your updates will be displayed on the screen
You’ll need to set the Avidyne CMAX Key Code
Right click the Avidyne Electronic Charts Service and click Set Avidyne Key
To get the key code, visit MyAvidyne.com and create an account using your JeppView subscription number and your serial number for your Avidyne MFD (found on the AUX page) and your PFD serial number (displayed on startup when the PFD is warming up)
Once you get the Key Code, copy and paste it in the window and click OK
Click on the service and click Start
The program should automatically detect the drive (if it doesn’t, click browse and select the drive)
Click Continue and the charts will start downloading and automatically programmed to the USB drive
If you are updating NavData on the MFD as well, follow the same steps as listed above in order to update the NavData
Next, we’ll go through the Avidyne Entegra Chart Updates process on a Mac, using the JDM program. You’ll need two 2 GB USB flash drives formatted to FAT 16 (the easiest way to format to FAT 16 is on a Windows computer, using the process above).
Open the JDM program and login
Insert the first USB drive
You’ll need to set your Avidyne CMAX Key Code
Click Service Details under the Electronic Charts Service
Click Set Avidyne CMAX Key Code
Program automatically detects the USB drive
Click and drag the Electronic Charts service over to the USB and release
The service is downloaded and copied to the USB drive automatically
Eject the USB drive
Insert the second USB drive (or plug the USB drive in to your MFD, do the update, then reformat the drive) and follow the same steps for the NavData
Updated the MFD with the Avidyne Entegra Chart Updates
Once everything is programmed the your USB drives, the rest of the process is simple. Just go out to your airplane, plug in the first USB drive with the Electronic Charts on it, turn your battery on and the avionics master, and the system will upload the information automatically. Once it’s finished, turn everything off, pull the USB drive out, then insert the second USB drive and do the same thing.
Now, you’re all updated!
If you’d like to see a video on the process, Jeppesen has some very good videos on the updating procedure. The links are below. If you have questions, please contact Texas Top Aviation and an expert will help you through the process.
I have used a few different sun shields in airplanes in my flying career. I have found one that I really like. Bruce’s Custom Covers knocks it out of the park for usability and ease of storage.
Let’s start off with functionality. Like other window sun shields, Bruce’s Custom Covers fit very nicely into the airplane glare shield and side windows. Depending on the type of airplane you have, some of the window covers use the suction cups and others don’t. I recently had 2 customers order from Bruce’s, one that owns a P210 that uses the suction cups for all windows, including the glare shield, and the other owns a Cirrus which doesn’t use the suction cups on anything.
They work great. They do the job of blocking the sun and keeping the cabin much cooler while the airplane is sitting on the ramp.
The thing I like best about Bruce’s Custom Covers is their storage. Other sun shields require you to roll them up and lash a tie around them. Bruce’s, on the other hand, come folded very neatly in a black canvas bag. The folded covers don’t take up nearly as much room as the rolled up covers, plus they are really easy to just fold up and store.
Bruce’s Custom Covers also sells plugs for cowling, pitot tubes, etc., as well as aircraft exterior covers.
Bruce’s Custom Covers gets my recommendation for anyone wanting to get some new sun shields. For those of you in Texas, you know you need them!
2 Comments
Thanks! I was flying some practice approaches and the last approach got lazy and decided to go direct FAF instead of IAF. What a surprise! At first I thought it may have been due to the direct route was 90° From final and might have exceeded some limit. Now I know!






Thanks! I was flying some practice approaches and the last approach got lazy and decided to go direct FAF instead of IAF. What a surprise! At first I thought it may have been due to the direct route was 90° From final and might have exceeded some limit. Now I know!
Thank you. I have fussed over this for 20 years and not understood it.