Garmin GFC 700 Autopilot

The Garmin GFC 700 Autopilot is an amazing machine.  Fully digital and fully integrated with the Garmin G1000 glass panel, it makes a pilot’s workload a lot easier, especially in busy airspace.

I train a lot of pilots in airplanes that have the Garmin GFC 700 autopilot.  The Cirrus SR22, the Columbia 350 & 400, the G36 Bonanza, and the Piper Mirage and M350 to name a few.  The most common problem I see for pilots transitioning into the Garmin GFC 700 equipped aircraft is that it doesn’t act like other autopilots.

STECs and DFC 90 Autopilots function like this:  you push the button for the mode you want on the autopilot controller and that turns the autopilot on.

Not so on the Garmin GFC 700.  If you push the button for the mode on the GFC 700, then the flight director engages, but not the autopilot.  This confuses folks a lot who move up from different autopilots because their autopilot primacy side of their brain is telling them the autopilot is on whenever they push one of the buttons on the GFC 700 controller.

Here’s an example:  A pilot has just departed and is ready to turn on course.  In his old airplane with an STEC 55x autopilot, the pilot pushes the direct to key to go to his first waypoint, then pushes NAV on the autopilot controller and the STEC 55x comes on and starts flying on course.  Then he presses VS and ALT to initiate a climb.

With the same scenario and a Garmin GFC 700 autopilot, the same pilot (who is used to a 55x), pushes the direct to key, then pushes NAV on the autopilot controller and pushes IAS or FLC to initiate the climb.  He lets go of the flight controls thinking the autopilot is engaged.  The airplane starts nosing over and he starts panicking.

Why did this happen?  The pilot in the second scenario never pushed the AP button on the Garmin GFC 700 so the autopilot never engaged.  All he did by pressing the NAV button and IAS button was to turn the flight director on.

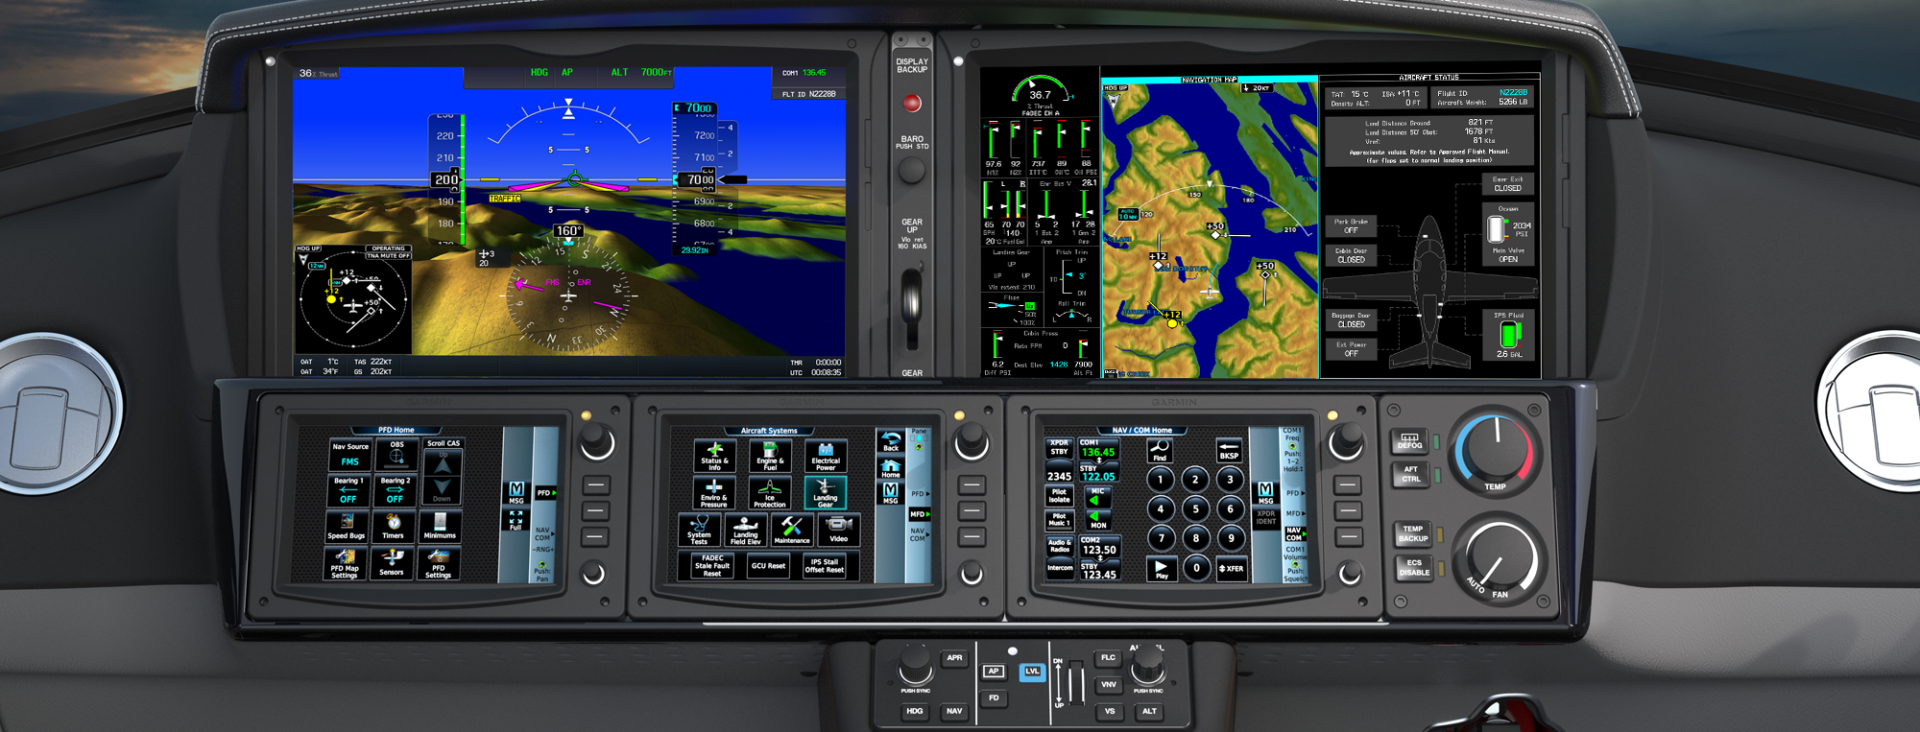
How to remedy this?  Get in the habit of checking your scoreboard.  On the top of the G1000 or Garmin Perspective PFD, there is an autopilot annunciation strip (or scoreboard as I like to call it).  In the very middle of the scoreboard is an area to show if the autopilot or flight director is engaged.  AP means the autopilot is on; FD means the flight director is engaged but the autopilot is not.

I teach pilots to be in the habit of checking your scoreboard each time you get done pressing buttons on the autopilot controller to ensure the Garmin GFC 700 is in the proper mode.  This saves some of those panic moments when it is supposed the AP is engaged, but it’s only the FD.

Similar Posts

  • Cirrus Alternator Failure

    A Cirrus is an electric airplane.  There are no vacuum pumps and therefore no vacuum driven instruments. The Klapmeier brothers did this on purpose, trying to make it a modern airplane.  No vacuum systems means no vacuum pump failures, hence there is a lower likelihood of instrument failures in IMC.

    What Cirrus did instead was put a lot of electricity producing and storing devices in the airplane.  All SR20 and SR22s are equipped with 2 engine driven alternators and 2 backup batteries.  Alternator 1 is a 28 volt alternator (the amperage varies based on whether or not you have an air conditioner) while Alternator 2 is a 28.5 volt alternator.  There are 2 24 volt backup batteries, as well.  Battery 1 is also used for starting.

    In traditional airplanes that have 1 alternator, an alternator failure can affect a lot of things.  Depending on how many electronics are in the airplane, the battery can get depleted quite quickly.

    The Cirrus electrical system is quite ingenious.  It’s a little bit different based on whether you have an Avidyne Cirrus or a Garmin Perspective Cirrus.  I will discuss that further below.

    The main goal of this article is to talk through what happens in the event of a #1 Cirrus Alternator Failure (an Alternator 2 failure actually isn’t a big deal at all, though Alt 2 is required for IFR flight), the procedure for trying to fix it, and a technique I have developed that makes the pilot’s job easier.  First, let’s go through the #1 Cirrus Alternator Failure procedure.

    Alternator 1 Failure

    In either avionics configuration, the Cirrus Alternator Failure procedure is the same.

    • Check and reset the circuit breaker for Alternator 1 (Reset only once)
    • Cycle the Alternator 1 master switch
    • If Alternator 1 doesn’t come back online, leave the Alternator 1 master switch off and shed load on the battery
    Avidyne Entegra

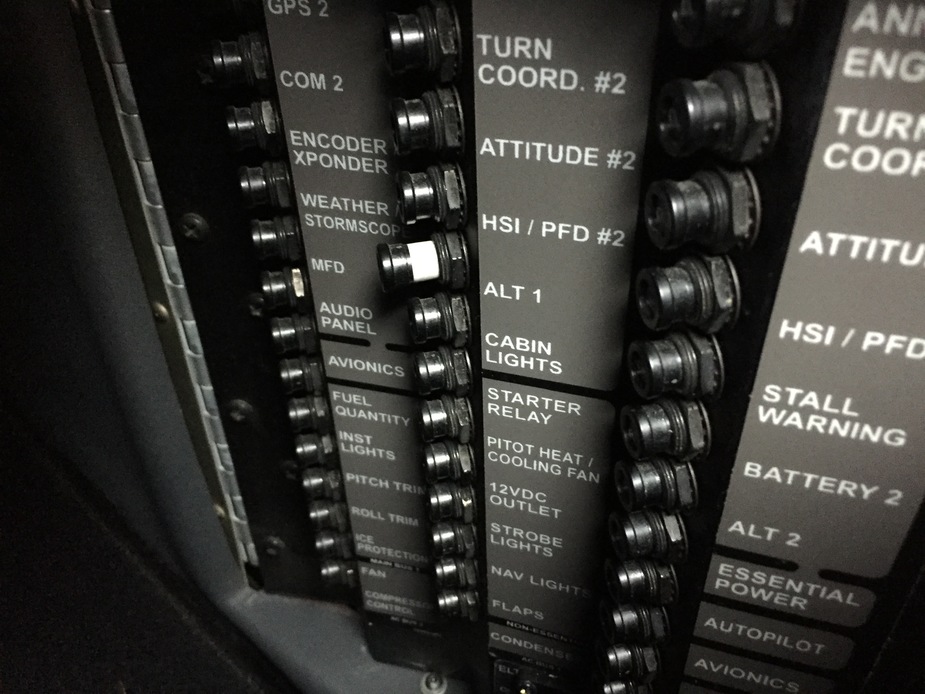
    The Avidyne Entegra has 2 busses, the Main Bus and the Essential Bus.  Alternator 2 isn’t set to come on until the engine RPM reaches 1700.  While on the ground, Alternator 1 runs both the Main and Essential Buses.  In the air, Alternator 1 runs the Main Bus and Alternator 2 runs the Essential Bus.  Since Alt 2 is 28.5 volts, the higher voltage won’t allow the power from Alt 1 to cross over and run the Essential Bus.  There are also 2 one-way directional diodes that prevent the voltage from Alt 2 to cross over and run the Main Bus.

    Having said all that, when Alternator 1 fails, Battery 1 is now running the items on the Main Bus.  There are a significant number of items on the Main Bus which causes the 24 volt battery to quickly lose it’s charge. This precipitates the need for shedding load.  Items like GPS 2, the air conditioner and aircraft lights can all be turned off.

    In the above scenario, Alternator 2 is running the Essential Bus still that has all the Essential items on it.  Those include:

    • The PFD
    • Flight Instruments and associated Avidyne computers
    • Engine Instruments and associated Avidyne computers
    • GPS 1
    • Com 1
    • Nav 1
    • Autopilot
    • Stall Warning
    • Charging Battery 2

    Note 2 important items that are not on the Essential Bus:  the flaps and the landing light (which is very handy at night).  Those two are only on the Main Bus, which Battery 1 is now powering.

    Let’s further enhance our scenario.  You are flying over Nevada (quite remote and not a lot of airports) at night, 30 minutes from the nearest airport when your Alt 1 fails.  When you get to the airport you are planning on landing at, you want to have your flaps and your landing light, but we don’t know how long Battery 1 will last.

    The solution (this is where my technique comes in):  Turn off the Battery 1 master switch.  This is an easy solution to ensuring you have battery power to use your flaps and landing light.  Instead of going through and shedding load, simply turn off the source.  You’ll still have all the above items on the Essential Bus, which is all you need to keep safely flying.  Then, when you get to your landing airport, turn Battery 1 back on to utilize your flaps and landing light.

    Garmin Perspective

    Cirrus wired the Garmin Perspective plane a little bit differently.  There are now 2 Main Buses along with the Essential Bus.  Alternator 1 runs Main Bus 1, while Alternator 2 runs Main Bus 2 and the Essential Bus. Both Alternators are running all the time.  The Alternator 1 Failure procedure remains the same.

    The cool thing that comes along with the second Main Bus in the Perspective is the amount of items you still have available to you in the event of an Alternator 1 failure.  The only items you lose will be:

    • Yaw Damper
    • Landing Light
    • Air Conditioner and associated components
    • EVS Camera
    • 12 Volt power supply in armrest

    Everything else is powered off of Alternator 2.  That’s not much.  The only item you really want on the above list is the landing light if you are going to be landing at night.

    Follow the Alternator 1 Failure procedure, then do my technique again.  Turn off Battery 1 to save the battery power in order to use the landing light when needed.

    Cirrus did a great job creating an all electric airplane with plenty of backups in case something fails.  I focused mainly on the Alternator 1 failure here.  If Alternator 2 fails, the system is wired for Alternator 1 to run everything while still charging Battery 1 and 2.  No big deal.

    In my experience, turning off Battery 1 to conserve battery power is just a simpler solution when shedding load in the event of a Cirrus Alternator Failure.


  • ViBAN IFR Hood

    The first task I give my new instrument students before we start training is to find a view limiting device that they like.  There’s the hood that everyone hates (which has been used since the beginning of instrument training,though it isn’t that uncomfortable) or foggles, which usually end up becoming very uncomfortable very quickly.  The headset ends up pressing the sides of the foggles into the side of your head, leaving lumps and scars that hurt for days.

    Well, there is finally another solution that combines the hood and foggles.  Meet the ViBAN.

    ViBan

    ViBAN brags that it is the most comfortable IFR view limiting device out there.  I have a customer who has one and he loves it.  It’s easy to put reading glasses on underneath while still blocking the view of the exterior of the plane.  It doesn’t leave bruises against the side of your head, either.

    If you’re looking for something different for your IFR training, give ViBAN a try.

  • Selecting the Proper Altitude

    One of the first questions a student pilot asks me when starting the cross country portion of his or her training is, how do I know what altitude is best for my flight?  This is a good question, because without taking certain aspects of the flight into account, it’s really just a crap shoot when selecting an altitude.  Craps and flying don’t mix, so let’s take a look at a few considerations when selecting an altitude.

    Sky Coverage

    Sky coverage has several subcategories when it comes to selecting an altitude.  First is how high are the bases?  Is it IFR (VFR pilots would be grounded), marginal VFR (1,000 AGL to 3,000 AGL ceiling), or good VFR (above 3,000 AGL ceiling)?  If the cloud deck is only 2,500 feet off the ground, then VFR pilots are limited to either 1,000 AGL to 2,000 AGL.  This is an excellent segue into why VFR pilots shouldn’t scud run!

    Scattered Clouds

    Second, what kind of cloud deck is it?  Is it an actual ceiling (broken or overcast), or is it a scattered layer?  Few or scattered layers usually allow VFR pilots to find a hole to get higher to some smoother air, making the flight more pleasant.  VFR pilots, always make sure to check the destination weather as it could be scattered where you are departing from, but it might be broken or overcast where you are arriving.

    Last, how high are the tops of the clouds?  Pilots can only get this information in the planning stage from the area forecast or from pilot reports, so most of the time, it’s not very precise information.  If the tops are at 10,000 feet and the pilot is flying a 172 on a 30 mile trip, it doesn’t make much sense to get on top of the clouds.

    Terrain and Obstacles

    Terrain goes hand in hand with sky coverage.  If there are low clouds and high terrain, that doesn’t bode well for trying to stay VFR and not hitting anything.  Obstacles need to be taken into account too, as there are some pretty tall radio towers that can stretch up into a 1,500-2,000 AGL deck of clouds.

    Winds Aloft

    Winds Aloft

    Once the sky coverage and terrain have been considered, it’s time to look at the winds aloft.  Tailwinds are preferred, but, sometimes, a headwind is the only option.  After taking the clouds and terrain into account, this narrows down your altitude to a handful of options.  The winds aloft will further narrow it down.

    Aircraft Performance

    Once you have two or three altitudes in mind, taking a look at the performance charts for your airplane will help nail down that final altitude.  Pull out the POH, compare fuel burn and cruise speed, and you’ll have your altitude selected.

  • FICON Reports

    Field Condition, or FICON, reports show up in NOTAMs both during the summer time and the winter time. In the southern states, FICON reports are seen more in the summertime during and after hard rains and thunderstorms (with the exception of winter 2021 & 2022, where Texans quickly got familiar with FICON reports after some very unusual winter weather). In cold winter climates, FICON reports are a staple during the winter season, showing up during and after snow & ice storms.

    The question is, what do those codes mean in the FICON report? You could see 5/5/5, 3/3/3, 3/4/4 and any combination thereof. And why are there three numbers?

    Let’s start with the second question first. The three different numbers in the FICON report indicate the 3 different sections of the runway: the touchdown third, midpoint third, and rollout third of the runway.

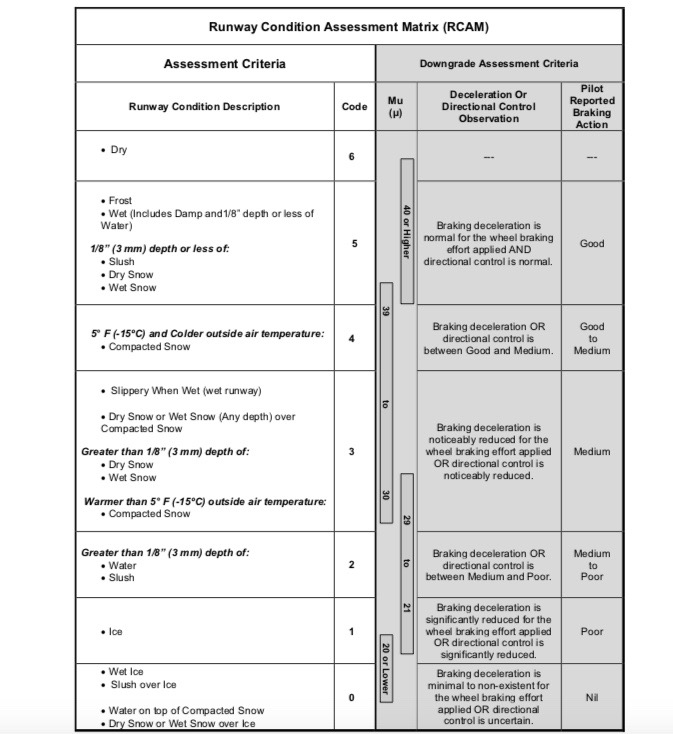
    Now, what are those numbers describing? The three numbers are the indication of how slippery that portion of the runway is. This is referred to as a Runway Condition Code (or RCC). The lower the number, the more slippery the runway is. The higher the number, the dryer the runway. The scale is 0-6, with 6 being completely dry and zero being no traction at all.

    Here is the FAA table for the RCCs.

    Now, in order for those RCC codes to generate, at least 25% of the surface must be wet. If there are just spots of standing water, slush or snow, a FICON report will be issued to report the contaminants, but no codes will be generated.

    The Runway Condition Codes are only part of a FICON report. In addition to the codes, a descriptor in the NOTAM will be published describing what percentage of the portion of the runway is affected and by what.

    For example: RWY 28 FICON 3/3/3 100 PRCNT 2IN DRY SN OVER COMPACTED SN.

    Deciphered, that is saying that all sections of Runway 28 have braking deceleration that is noticeably reduced or direction control is noticeably reduced and 100% of each section has 2 inches of dry snow over compacted snow. Sounds like a runway to avoid!

    Braking action reports are separate from FICON reports, but also issued via NOTAM. Braking action reports are issued by the airport manager whereas the FICON reports are computer generated.

  • Cirrus Vision Jet Receives FAA Certification

    cirrus-vision-jet-interior

    The long anticipated certification of the Cirrus Vision Jet finally happened.  On October 30th, the FAA awarded certification to Cirrus’ single engine jet.  Marketed as the world’s first single engine personal jet, the Cirrus Vision Jet will seat five adults, two children, and cruise around 300 knots.

    The Williams FJ33-5A Turbo Fan engine is operated by a FADEC, single handle throttle, similar to the throttle in the piston powered Cirrus family.  In fact, the SR series was taken into consideration when designing the Cirrus Vision Jet in order to simplify the upgrade for pilots.  Many of the buttons and knobs are in the same places in the Cirrus Vision Jet.

    The Cirrus Vision Jet is equipped with the Cirrus Perspective Touch by Garmin that is very similar to the Cirrus Perspective by Garmin in the piston powered line.  Equipped also with the Flight Into Known Icing system and the Cirrus Airframe Parachute System (CAPS), both of which are standard.

    cirrus-perspective-touch

    Unlike the piston powered Cirrus lines, the CAPS system on the Cirrus Vision Jet is actually mounted in the nose.  Also, unlike the piston lines, the jet CAPS is integrated with the aircraft avionics to slow the airplane to between 67 and 160 knots when the system is activated.  In the jet, the CAPS system was designed to withstand higher weights, higher speeds and higher altitudes.

    Cirrus hopes to start deliveries of the Vision Jet by the end of the year, with many more rolling off the line in 2017.  All Cirrus Vision Jet pilots will need to be type rated in order to fly the aircraft.  Cirrus is doing all the type rating training in house at their new Vision Center in Knoxville, Tennessee.

    To read the full press release, click here.

    cirrus-vision-jet

  • Stephanie Mertz Joins Texas Top Aviation

    Texas Top Aviation has added a new member to our instructing team. Stephanie Mertz was hired in March 2019 and will be specializing in G1000 & Instrument instruction.

    Stephanie graduated from LeTourneau University in Longview, Texas with a degree in Aeronautical Science, earning her commercial single and multi ratings while there. She began her aviation career in Ontario, California flying a Pilatus PC-12 for charter and medical trips. While operating the PC-12, she gained valuable experience flying all over the US and Mexico.

    In 2013, Stephanie moved back to East Texas with her husband where she worked as a contract pilot flying a variety of Citations as well as a Falcon 10. A few years later, she became involved in her local Ninety-Nines chapter and joined their mentorship program.

    After earning her CFI, CFII, and MEI, Stephanie returned to her alma mater to pass on her flying passions to college students through flight instructing. After a year of teaching at LeTourneau, she and her husband, with their first baby in tow, moved to the Austin area. Now she is instructing with Texas Top Aviation while acting as a mentor for other women working on achieving their flying dreams.

Leave a Reply

Your email address will not be published. Required fields are marked *