|

Cirrus Braking Systems: A Hot Topic

You just bought your Cirrus SR22. You do some flying, and soon find yourself with a brake temp sticker that isn’t white anymore. You remember from your transition training that any color other than white is a no go. You now ponder…. I don’t remember getting on the brakes hard, or riding the brakes while taxiing, but sure enough they aren’t white anymore. You now start thinking that all the horrible rumors of Cirrus brakes are true. They overheat so fast!

I would like to share some little-known facts about the Cirrus factory equipped braking system. Following the procedures below can help make the brakes last a little longer. There is also a very popular STC that allows upgraded brakes to be installed on all SR series aircraft. More to come on that.
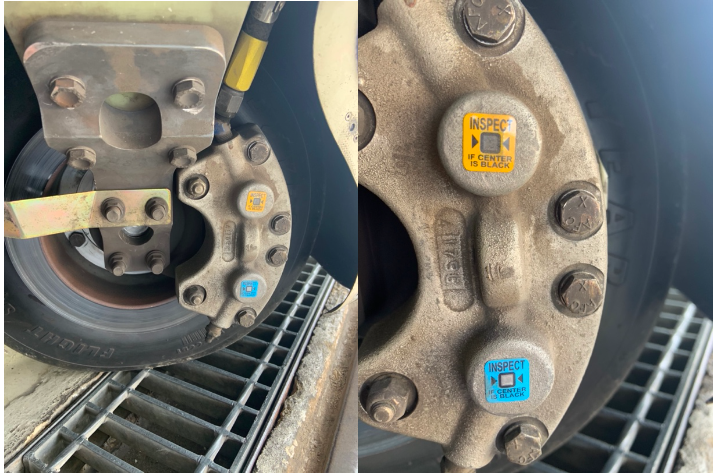
Notice the Top Yellow sticker is far darker than the Bottom. The Yellow temperature indicator turns at 300 Degrees, while the bottom Blue indicator turns at 330 Degrees. This is an indication to the pilot that if the bottom sticker has turned colors, that the braking system has exceeded 330 degrees and is in need of servicing.

Above is a photograph of an SR22 G1 braking system with turned brake temp stickers. The first things you may notice is that there are in fact two brake temperature stickers. We can only see the bottom blue sticker from the inspection port on the wheel pants. The other is higher on the caliper; in order to see it, the wheel pant must be removed. This isn’t common knowledge because there is no mention of this additional indicator in the POH.

Now you may be asking yourself, what can I do to extend the service life of my factory equipped Cirrus brakes? Here are some tips. First, always taxi at 1000 RPM and use the rudder as much as you can while only tapping the brakes. This is not fool proof, since sometimes, depending on the grade, you will have no choice but to utilize brake tapping to keep the aircraft going straight. Taxiing is not typically where the brakes get overheated, though, but this is still a good practice to follow.

What we tend to see is that the Cleveland brakes are generally overheated on landing. We always recommend to make sure your final approach speed is not excessive, land in the first 1/3 of the runway, and let the aircraft rollout to a smooth stop. What tends to happen is that the aircraft is too fast, and the pilot tries to exit at a certain taxi way, or brakes hard and continues to ride the brakes after landing during taxi. If you do your best to avoid these habits, it will serve you well.

This braking system remained unchanged all the way until the 2016 G5 Cirrus SR series. Starting in 2016, the factory equipped G5 and G6 Cirrus SR series all now come standard with a single piston hydraulic braking system from Beringer. The Cirrus Beringer brakes far exceed the braking power and durability of the old system. The new system is more robust, withstands heat better, and is is very well built. There is also an option for an upgraded dual caliper system to increase durability and stopping power. A braking system STC for the older Cirrus G1 through early G5 models was created to upgrade those airplanes to the better stopping power and cooling of the Cirrus Beringer brakes.
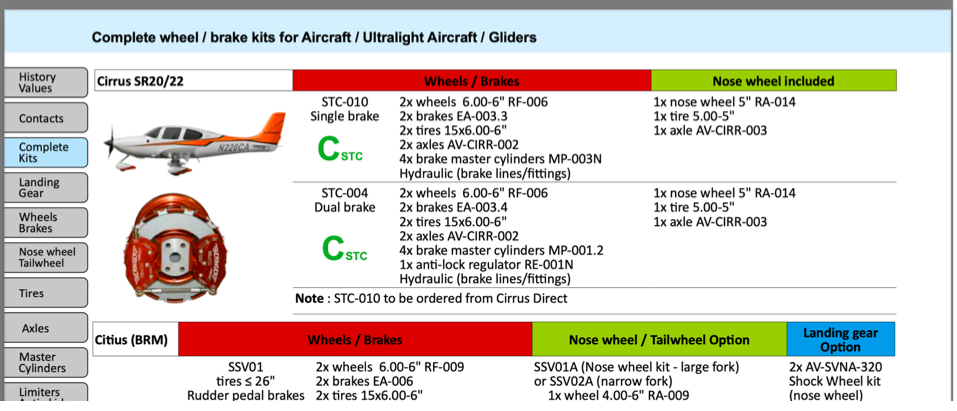
Seen above is a page from a Beringer catalog highlighting the Cirrus SR series STC kits. Your local Cirrus service center will be able to quote prices for the kits. We have over 1000Hrs spent behind Beringer equipped Cirrus aircraft and the difference is quite apparent. The pilot has better control of the aircraft, no spongy pedal, and the confidence to get the plane stopped without possibly overheating the braking system. This, in our opinion, is one of the best upgrades you can do to your Cirrus.
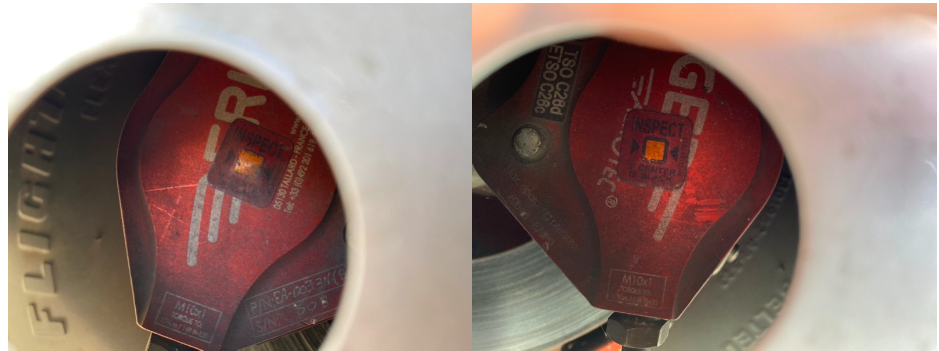
Above is what an STC upgraded braking kit from Beringer looks like, as well as the new temperature indicator for the pre/post flight inspection. Notice the black spot on the left hand picture. These brakes have been overheated.

One other difference for a pilot to note is that once upgraded to the Cirrus Beringer brakes, there is only one temperature indicator and it changes color at a whopping 450 Degrees Fahrenheit! Needless to say, it can handle some heat! The new temperature indicator is now Orange in color and turns grey/black when overheated.
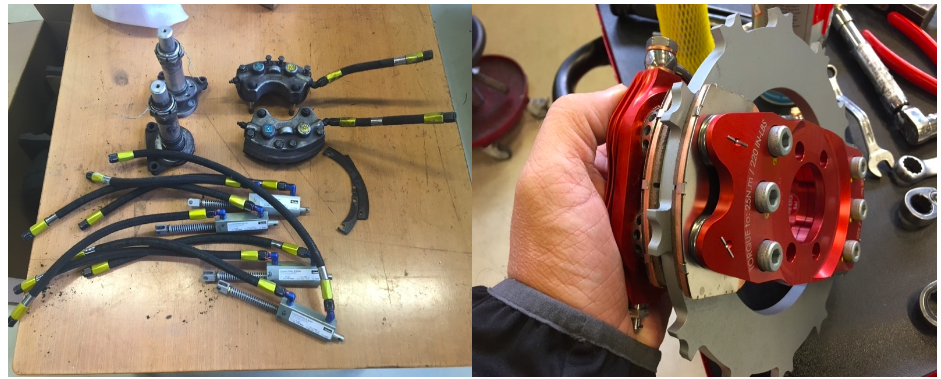
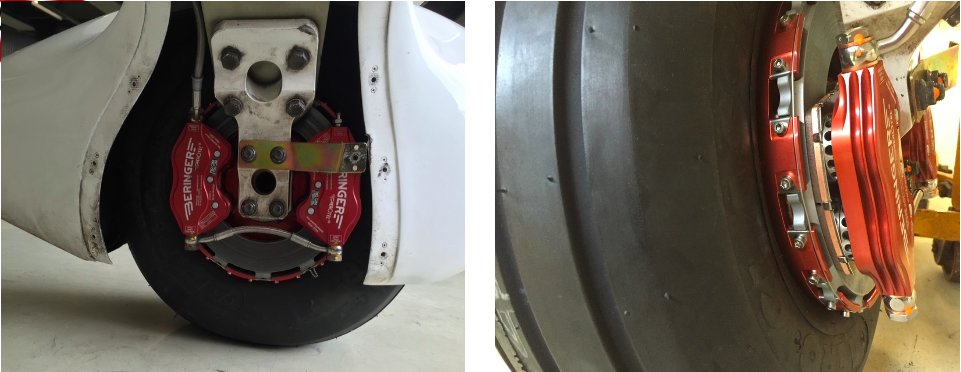
On the left are the original Cirrus factory brakes. On the right is the caliper to the new Beringer brakes for a Cirrus.
Dual Caliper Cirrus Beringer Brakes

The Cirrus Beringer brakes upgrade is quite a step up in the world of slowing down. However, this doesn’t mean that they are completely issue free. There is one little-known problem with Beringer brakes that is not that big of a deal and can be fixed with relative ease.

The rotor on the Beringer braking systems is “free floating,” meaning it is not necessarily “fixed” in position when secured down to the spindle. It is “keyed” into the wheel rim with the male and female side interlocking.

The brakes occasionally will get noisy, causing a “knocking” noise when brakes are applied. This noise is caused by the small metal tabs that tighten up the space between the wheel and the brake rotor. This is so the small tabs wear with use instead of the aluminum rim that they are fixed to. So, if your Beringers are making a knocking noise when brakes applied, this is most likely your culprit.
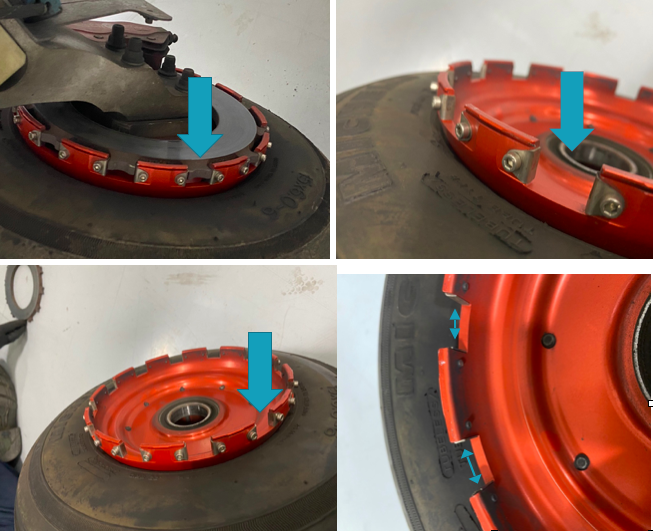
These gaps above are the “keyed” position where the rotor finds home in the rim. Without these tabs that wear with use, we would be replacing the rim more often than the much cheaper replaceable tabs.

It is highly recommended to upgrade your original Cirrus factory brakes to the new Beringer braking system. You will deal with less maintenance, less chance of a brake overheat, and less confusion on whether or not your brakes are airworthy. For more info, you can check out the Cirrus website for the single or dual caliper Beringer brakes.


Zach Anderson is a Cirrus Standardized Instructor Pilot (CSIP) for Texas Top Aviation. Zach comes from a auto mechanic background and is very familiar with the ins and outs of maintenance. He started working for Texas Top Aviation in December 2020.

Similar Posts

  • Piper PA46 Partnership in San Antonio

    A Piper PA46 partnership is being formed in the San Antonio area. Two to three partners are being sought to purchase either a Piper PA46-310P Malibu or a ’90s model Piper PA46-350P Mirage.

    The Piper PA46 Malibu is the original Piper PA46 airframe. It is equipped with a Continental TSIO 520, 310HP engine (though many have been upgraded to the Continental TSIO 550C engine, which is a great upgrade), is complex, and pressurized (the best feature about the airplane!). The six seat airframe travels around 185-190 KTAS at FL200 on 16-17 GPH, giving an incredible range with 120 gallons of fuel.

    The Piper Mirage is what Piper designated the PA46 when it switch to the Lycoming TIO 540 350HP engine in 1989. The airframe remained the same, but the engine eeks out a few more KTAS at 22-25 GPH depending on how high the cruise altitude is.

    Both the Piper Malibu and the ’90s model Mirage are equipped with the KFC 150 autopilot. A lot of the Piper PA46 airframes still have a Garmin 530W/430W or dual 430Ws, but a large number have been upgraded to the Garmin GTN 750/650, while a few have opted for the Avidyne IFD 540/440 GPS units. There are a fair number still with steam gauges, while some have upgraded to Aspen units or the Garmin G500 or G500TXi.

    If you are located in the San Antonio area and interested in a 3-4 way partnership on a Piper PA46, please Contact Us. The purchase price will be between $300,000-$450,000, so only interested parties that can afford a budget of $100,000-$150,000 please.

    The plane will be based at Stinson Field (KSSF) or New Braunfels (KBAZ).

  • Avidyne IFD 440 Receives Certification

    Avidyne’s plug and play replacement for the Garmin 430, the Avidyne IFD 440, finally received certification from the FAA last week.  The touch screen GPS unit is being marketed as a simple swap out for the Garmin 430.  This release follows up Avidyne’s release last year of the IFD 540, also a plug and play replacement, but for the Garmin 530.

    The features and touch screen of the GPS units sound quite nifty, but it will be hard for Avidyne to compete with the GTN 750 and 650 from Garmin.  The unit prices for the IFD 540 and 440 will be less (and installation is simpler), but we will see how the company does.

    Avidyne IFD 440

    The STC allows for installation in 1,000 makes and models of aircraft, according to the company, so there are a lot of possibilities for installs.

    In conjunction, Avidyne also released a new version of it’s software for both GPS units.  According to Avidyne, this will unlock multiple features that enhances the capabilities of both units.

    To read more on the IFD 440 and it’s bigger brother, the IFD 540, check out Avidyne’s website.

  • Piper PA46 De-Ice Boots Care

    It’s winter time, which means it’s time to use those Piper PA46 de-ice boots a little more often. Most of us know the winter flying rules, don’t stay in ice, get rid of frost, etc. However, most of us aren’t as familiar with how to maintain those Piper PA46 de-ice boots. The do need some TLC every couple of months to keep them in tip top shape.

    Below is the recommendation from Goodrich (the maker of the boots) on what to use to clean and polish the boots and how often to do it.

    Steps 1-3 below are your twice a year items to make your Piper PA46 de-ice boots last through the lifetime of the aircraft.

    Step 1-ShineMaster Prep

    ShineMaster Prep strips all the dirt, grime, grease, oil, silicone products and old ShineMaster on the Piper PA46 de-ice boots to prep them for Step 2.

    ShineMaster Prep can be found on Goodrich’s website.

    Step 2-AgeMaster #1

    AgeMaster is your second step the in the Piper PA46 de-ice boot preservation and protectant process. AgeMaster is a rubber preservative that protects against weathering, ozone, and ultraviolet rays.

    Make the first application when your de-ice boots are 6 months old, then re-apply every 150 hours (or twice a year) after that.

    AgeMaster #1 can be purchased on Goodrich’s website.

    Step 3-ShineMaster

    Step 3 in the Piper PA46 de-ice boot care is ShineMaster. As the name implies, ShineMaster shine’s the boots up after getting rid of all the old gunk & grime with ShineMaster Prep and after AgeMaster is applied. 2-3 coats should be sufficient.

    ShineMaster can be purchased on Goodrich’s website.


    During icing season, Goodrich recommends ICEX II. ICEX II is an ice inhibitor that should be applied every 50 hours during ice season. This will help prevent ice from sticking to the Piper PA46 de-ice boots. ICEX II can be found here.

    Finally, for general cleaning of the boots after each flight, utilize Goodrich Aerospace Cleaner to debug, then follow up with Goodrich Aerospace Protectant. Goodrich claims their Protectant will resist dust, soiling, and staining. There may be less bugs to clean each time!


    With just a few hours a couple times a year spent working on the Piper PA46 de-ice boots, owners will never have to worry about the hefty price tag of boot replacement!

  • Iridium Zoleo Allows In Flight Messaging

    Satellite communications company Iridium now has a really nifty little product called the Iridium Zoleo Satellite Communicator. Most pilots who fly newer Cirrus Aircraft will be familiar with the company name Iridium. Iridium manufactures the built in satellite phone that is an option in all Cirrus after 2012. The Iridium Zoleo brings messaging capability to any airplane in a cost effective and simple manner.

    The Iridium Zoleo is a device roughly the size of a walkie-talkie. It links up with the Iridium satellite network to send and receive messages and emails anywhere in the world (or air!). To make things easier, the Iridium Zoleo links with a phone via Bluetooth to a free app that allows the user to write a message directly from the phone and send through the device.

    The Iridium Zoleo is affordable at only $200. A plan has to be purchased in order to send messages, with 3 different levels of subscription offered: 25 messages a month for $20, 250 messages a month for $35, or unlimited messages per month for $50. Each plan offers a $6 upgrade to allow unlimited worldwide breadcrumbs and tracking.

    The Iridium Zoleo has a 200 hour battery life and is designed to be shock, dust, and water resistant. Plus, the device has a built in SOS that can be used anywhere in the world. So, you can take it rafting down the Grand Canyon, hiking in the Andes, flying over the Atlantic, or SOS if you are stranded in the middle of the Indian Ocean.

    Click here to read more about Zoleo and here to read more about the Zoleo plans.

  • The Importance of Slowing Down

    Technology has made our job as pilots simpler, streamlined, and safer.  With all the new GPS & autopilot technology that seems to come out every month, flying an airplane is getting easier every day (and when I say flying, I mean programming!).  I can’t tell you the last time I actually used a VOR for navigation, other than a practice approach.  The AIM even has guidance in it now allowing pilots to use the GPS overlay on a VOR or LOC approach instead of switching to the actual NavAid on the course needle (you have to WAAS in order to legally do this).

    I hear the argument already.  I am young (31) and used to all the different touchscreens because I have grown up with them.  Tech is nothing new to me.  It’s not that easy for everyone, I do understand.  There is also the argument that all the tech causes pilots to not know how to fly the airplane, which is also valid. This is why I put an emphasis on hand flying in any kind of training I do.

    For the sake of argument in this article, yes, I am young and I adapt to technology pretty easily.  I’m not afraid to press buttons to figure out what they do, but I usually do it while sitting on the ground with a GPU hooked up (or I go look in the manual).  And yes, all the autopilot ability has caused a decrease in base pilot skills.  I actually encourage every customer I have to go get a tailwheel rating so that they can actually learn how to fly better.  You don’t use a rudder much in a Cirrus compared to a Super Cub or a Citabria.

    What I want to focus on for a few minutes is how to alleviate the frustration that comes with getting so wrapped up in the technology when it doesn’t do something that you want it to, or the wrong button gets pressed, then you end up somewhere you had no intention of being.

    The biggest thing a pilot can do when it comes to technology is NEVER to get in a hurry.  Good training is first and foremost, but, after that when flying without an instructor or even in recurrent training, SLOW DOWN and think through what you are doing and what you want the system to do.  This will alleviate a ton of frustration.

    It can be very easy in hot, turbulent weather to get tuned in to the GPS programming, trying to do five or six different things in the span of five or six seconds, before looking up and realizing that plane is 500 feet off altitude (without an autopilot) or you blew through the course you were supposed to be intercepting (with an autopilot).

    What I teach is to slow down, whether or not you have an autopilot, and do one thing at a time.  Once that item is done, look up at the instruments or the horizon, check on things, make sure the airplane is still flying properly, then do the next thing.  Don’t try and do a bunch of things all at once or in a hurry.  It will usually get you off course and off altitude, plus it distracts the pilot from his main job:  Flying the airplane.

    So, next time you want to do something on your GPS, pause, take a breath, think through what you want to do, then do one item at a time.  The outcome will be less frustrating and you’ll keep flying where you want to go.

  • Drones: A Brief History

    Drones; these technological wonders have, seemingly, come out of nowhere over the course of a few years. Although they bring with them the promise of convenience and fun, they have also brought problems and uncertainty for the government, general public, and, specifically, the aviation community. But, where did drones come from and are they really something to be worried about? Let’s take a look at Unmanned Aerial Systems (UAS) and hopefully put to bed some of the concerns which seem to be following them around.

    It shouldn’t come as a surprise to anyone when I say that drones have recently become overwhelmingly popular. The military, businesses, and hobbyists are increasingly utilizing them for all kinds of purposes, which range from enemy surveillance to package delivery. Drone pilots are in high demand and several aviation universities are even offering majors designed to produce graduates which specialize in UAVs (Unmanned Aerial Vehicles).

    Drones are relatively new to the landscape of unmanned flying machines. Although model airplanes have been popular since the dawn of aviation, the first “drones” didn’t start becoming commercially available until a few years ago. As electronic technology advanced, so did model aviation. Models became more and more sophisticated and could be flown remotely as long as they remained within sight of the person flying it.

    It wasn’t until about 3 or 4 years ago that the technology became available to develop drones. This is due to the need for very small and light electric motors, batteries, and stabilization systems. Once these started to become popular, it didn’t take long for drones to become bigger, cheaper, and completely automated.

    It is important to note that there is a difference between drones and conventional model airplanes and helicopters. Drones are defined most simply as an unmanned vehicle which can be operated without user input from the ground. Conventional model aircraft can take all shapes and sizes, but must be operated within line of sight from the operator; as they have no ability to fly, takeoff, land, or navigate without input via a radio transmitter. So, if you happen to see a model aircraft flying, don’t assume automatically that it is a drone. Most of the time, model airplanes, helicopters and even drones are being flown safely and legally.

    Generally, a drone is designed with several arms which come off of a central body. Each of the “arms” typically has a motor with a rotor mounted on it to provide lift while the main body is home to the radio equipment, landing skids and camera gear. If you see a model flying that looks like a conventional airplane or helicopter, odds are it isn’t a drone. Most likely it is being flown recreationally by someone nearby.

    Historically, model airplanes and helicopters have been difficult to learn to fly. Before the times of pre-built foam airplanes and ready to fly drones, a modeler had to build their flying machine and find someone to teach them how to fly it. (Otherwise, they would likely only get one short flight). New modelers would be directed toward the local model flying club and would get plugged in with a group of established fliers who could outline the rules for model aircraft as well as get them up in the air safely.


    However, because most everything is purchased online in today’s market, drones are bought and flown by enthusiasts who have not been taught the rules, safety protocols, and procedures necessary to safely operate their new kits. In addition, the drones incredible stability and ability to be flown without any skill means that anyone with great enough funds and an equally great lack of common sense can buy a model and program it to fly over any location they choose. Unfortunately, sometimes that includes places which cause problems.

    Andrew Robinson is a 135 Charter Pilot and flight instructor who lives with his wife and 2 daughters in Pennsylvania.  He flies Pilatus PC-12s and instructs in Beechcraft Bonanzas.

Leave a Reply

Your email address will not be published. Required fields are marked *