Reading Weather Prog Charts

There are a multitude of weather products out there today to assist pilots in preparing for a flight.  Aviationweather.gov is the best source for getting all the information a pilot needs for planning a flight.  Aviationweather.gov is the National Weather Service’s source for all aviation related weather products.  When I teach about weather and weather briefings, I recommend to my students to utilize Aviationweather.gov in the planning stages, but still call the Flight Service Station to get a full fledged weather briefing before takeoff.

When preflight weather planning, one of the best ways to get a picture of what is happening over a broad area is utilizing the Low Level Significant Weather Prog charts.  The Prog chart gives a forecasted 12 and 24 hour picture of what type of weather to expect over the US.  The Prog chart gives the expected flight rules, areas of turbulence, and where the freezing level is located.  If you’re looking at the 4 panel view, the Surface Prog chart shows fronts, pressure areas, and areas of expected precipitation.  That covers just about everything, doesn’t it?

I believe the Prog charts are underutilized in planning.  Foreflight and Garmin Pilot have given easy access to radar pictures, satellite pictures, METARs, TAFs, and several other sources of weather information.  But, a lot of the easy access data you can get from those apps is current data (with the exception of the TAF) while a lot of the forecast data takes some hunting around.  So, products like Prog charts aren’t often utilized.

The other problem arises when pilots know about Prog charts, but don’t know how to read them, then don’t know how to find the legend to decipher the chart, the chart is often set aside and quickly forgotten about just because of a lack of knowledge.  Have no fear, though, as now we will use an example 4 panel Prog chart to decipher the lines and colorations.
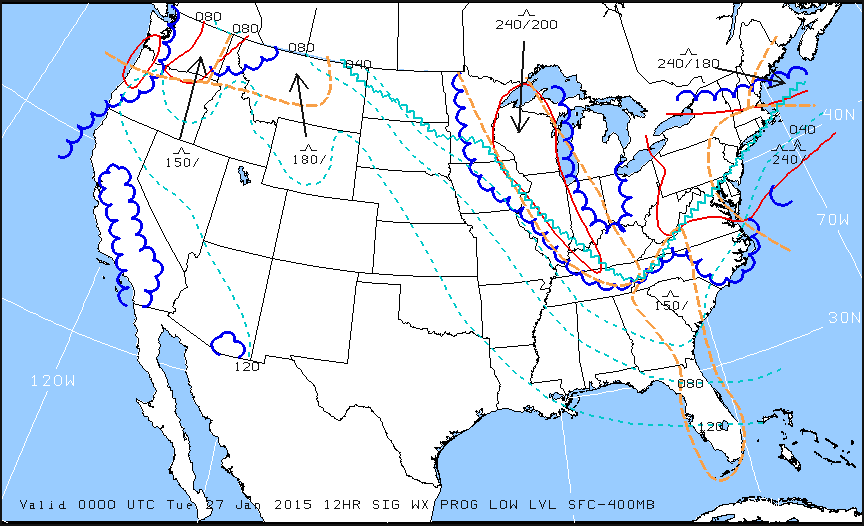
Low Level Sig WX Prog

Just looking at the Low Level Significant Weather Prog Chart above, it can be a little confusing.  That’s why they make a legend!
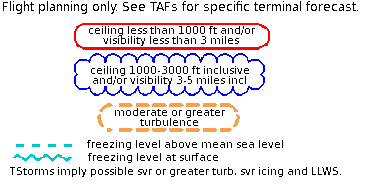
Low Level Legend

Coupling the legend with the chart above, we can determine some things.  First, California, parts of the Pacific Northwest, a small part of southern Arizona, and a good portion of the Midwest and East coast are going to have marginal VFR conditions in the next 12 hours.  Wisconsin, Illinois, a good portion of the Northeast, and a small portion of the Pacific Northwest will suffer IFR from IFR conditions.  There are going to be a good amount of low level turbulence in the northern and eastern parts of the country.  Finally, the freezing level starts at the surface running in a jagged line across the midwest states and curling up into the Northeast.

That’s a good bit of information, isn’t it?  If a pilot is planning a VFR flight into the Northeast tonight, it would probably be best to wait for another day, according to this chart.

Now, to see what is causing the conditions above, we need to look at the Surface Prog Chart.
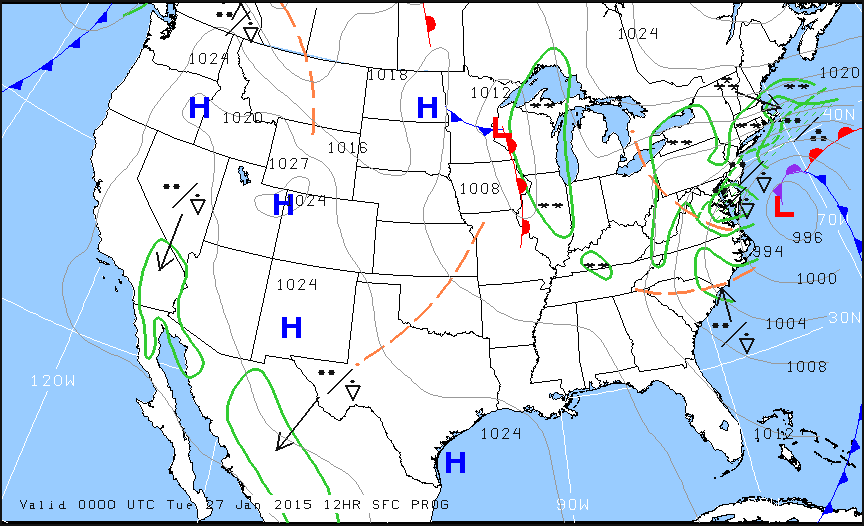
Surface Prog

The green circular areas above show that some form of precipitation is in that area.  The circular dots with the triangle located in Mexico and Baja California are depicting moderate rain showers.  If the triangle was gone, it would just be moderate rain.  In the northeast, all those symbols are showing moderate to heavy snow showers.  Across the plains, we see a lot of high pressure, meaning visibility and nice flying weather.

These charts are invaluable when it comes to flight planning, especially over long distances when the weather could be changing a lot over the period of your flight.  Put them to use the next time you are planning a trip and you’ll learn you have a much better picture of what the weather is doing.


Similar Posts

  • Garmin GTN 750 Tips & Tricks

    The Garmin GTN 750 is an awesome piece of equipment.  Garmin tried to make the user interface with the touch screen as simple as possible (though there still is a bit of a learning curve when moving up from a Garmin 530W).  Garmin also integrated several key features that the 530W did not have that makes flying with a Garmin GTN 750 in IFR all that much better.

    The two features of the Garmin GTN 750 I want to focus on today are the “Load Airway” feature and the “Hold at Waypoint” feature.  If a pilot isn’t looking for these specifically, they can actually be a bit hard to find.  The “Load Airway” feature is especially handy when flying IFR long distances with several airways as part of the clearance.  Here’s how to utilize both.

    Load Airway

    1. On your flight plan page, insert the waypoint that you will be joining the airway, or, if your clearance was radar vectors to join an airway, then insert the waypoint on the airway that begins the leg you will be joining on.
    2. Tap the waypoint you just inserted.
    3. A menu will pop up.  Tap Load Airway.
    4. Select the Airway you want from the next menu that pops up.
    5. Then, a list of waypoints will display to exit the airway.  Select the waypoint where you will be exiting the airway.
      1. Note:  Garmin defaults to listing these waypoints alphabetically.  If you unselect the “Sort Alpha” option, it will sort the waypoints by direction and distance from the entry waypoint.  This is a little more practical, easier to work with, and how I recommend doing it.  This way you can either scroll up or down depending on the direction of travel on the airway and find your exit waypoint.
    6. Tap Load.
    7. The Airway and all the waypoints in between your entry and exit waypoints appear in your flight plan.
    8. If you are getting vectors to join the airway, you’ll need to use the Activate Leg function to activate the leg you will be joining the airway on.
      1. On the Flight Plan page, tap the waypoint that ends the leg you want to activate.
      2. On the menu that pops up, tap Activate Leg.

    Hold At Waypoint

    The Garmin GTN 750 allows pilots to place a holding pattern at any waypoint that is in the Nav Database (or any user created waypoint).  Here’s how to do it.

    1. On the Flight Plan page, tap the Waypoint that you want to hold at.
    2. On the menu that pops up, tap Hold At Waypoint
    3. On the next menu that pops up, input either the inbound or outbound course, right or left turns, leg time or distance, and the EFC time, then tap Load.
    4. You will see the hold now as a Waypoint in your flight plan.


    Once the hold is entered, the GPS will go into Suspend mode, suspending the Flight Plan Waypoint Sequencing.  Once you are ready to depart the hold, you will have to tap Unsuspend before crossing the holding point on the inbound leg, then the GPS will resume normal waypoint sequencing.

    These are 2 of the really cool, gee-wiz features of the Garmin GTN 750.  Following the above steps will make IFR flying much easier for the pilot, as well as much more enjoyable!

  • Angle of Attack (AOA)

    You are hand-flying an in-the-weather descent, power back, heading for the FAF. You start a 30 degree banked turn at your lead point to cross the FAF, when your passenger behind you gasps. Looking over your shoulder, you see he has spilled his drink into his lap…too bad for him! However, when you turn your head back to your panel, your inner ear tumbles and you see 45 degrees of bank, 15 degrees nose low, airspeed increasing.

    Congratulations! You have managed to get distracted and sucked into an unusual attitude recovery. By the book, you should roll wings level, pull to the horizon, and adjust power as necessary to keep the airspeed within limits. In this scenario, if you had not experienced vertigo, you might have been able to roll to less than 30 degrees of bank, recover your turn, pull the nose up to less than the original descent attitude, pulled a bit of power to slow back to your desired penetration speed and then resumed your desired ground track. However, this would only be appropriate if you had full situational awareness as to the deviations caused by the look over your shoulder, plus full confidence that the moderate corrective actions would put you back on your desired flight path.

    As a military aviator, I learned unusual attitude recoveries based upon hard maneuvering at extreme pitch and bank angles. In the hard-maneuvering environment, an unusual attitude could be 90 degrees straight up, airspeed decreasing below 120 kts…or 80 degrees nose low, 135 degrees of bank, airspeed increasing through 500 kts… etc. In these cases, understanding angle of attack, or AOA, is critical to maintaining controlled flight and returning to a normal attitude.

    In an extreme nose-high attitude, a military aviator is trained to roll the aircraft to 90 degrees of bank, ease off the back-stick pressure to reduce AOA, add power as required, and allow the nose to slice back towards level, rolling to wings level as the nose approaches the horizon. If nose low, the recovery procedure is to roll rapidly, within asymmetric g limits, until wings level, then to pull at optimum g loading to recover to level flight. For the nose-low recovery, power was normally reduced until airspeed could be assessed and brought under control. However, when doing the nose-low pullout at 7-9 gs, pulling the power for too long would leave you much to slow to resume combat.

    The AOA gauge on a fighter’s glare shield is a primary reference during hard maneuvering and for landing. The AOA for optimum maneuvering is 13 degrees, displayed as the green circle or “green donut” on the gauge. The red chevron on top represents a slow condition of 15 degrees or more and the yellow lower chevron represents 11 degrees or less.

    For normal landing in the F-16C, the pilot slows to 220 kts and configures abeam the touchdown point while mentally computing the final approach airspeed of 136 kts plus 4 additional knots for each 1000 lbs of fuel. When rolling off the perch and flying the final turn, the pilot would usually only glance once at the airspeed once to ensure final turn airspeed of 180 kts while using the AOA sight gauge as the primary indicator of a best performance turn. As long as the AOA was green donut (13 degrees) or less, you would not stall. If on speed and 13 degrees wasn’t going to get you around the turn to line up with the runway, you knew you were going to overshoot. You never wanted to see the red chevron of 15 degrees or more as that meant you were too slow, pulling too hard, and in danger of building an un-recoverable sink rate!

    Few GA aircraft are currently equipped with AOA indicators, though there are several after market devices available for retrofit. However, knowing the impact of AOA and how to manage it is vital to safe aviating, even without an AOA gauge. The bottom line is, as long as you don’t ask the wing to produce more angle of attack than it can handle, you won’t stall.

    Practicing final turn stalls, to know what the wing feels like as you get too slow or pull too much on the controls, increasing AOA past the critical point, will keep you safe when you encounter that unexpected overshooting wind or you find yourself inadvertently on too tight of a downwind leg. Better to overshoot or take it around to try again, than to pull too hard and exceed critical AOA.


    Mike Hostage is a retired USAF pilot with 37 years of experience, flying a wide variety of aircraft.  An instructor pilot for more than half of his 4800 flight hours, Mike is currently qualified in a Cirrus SR-22T and regularly flies his two homebuilt sailplanes.

  • My 2018 Osh Kosh Experience

    I got the privilege of going to the EAA AirVenture at Osh Kosh this year.  It was my first Osh Kosh experience.  I’ll be the first to tell you, walking in the gate on the first day is mildly overwhelming.  There are people and stuff everywhere.  Airplanes, tents selling everything from airplane parts to mattresses (I wasn’t really sure how mattresses tied to flying), vendors, colleges, and loads of people.

    Photo Courtesy of William Day, copyright 2018, All Rights Reserved

    After I gathered myself from my initial shock, I set out to explore all that I could.  I spent most of the first morning walking around the different manufacturer’s tents, getting a gauge on all the new airplanes I could never afford and only hope to ever fly.

    The short of it is, the Cessna/Textron Denali is going to be stellar once it gets completed.  The Epic E1000 (if it ever gets certified) might take a large market share from TBM, though they will have an uphill climb. The Cirrus Vision Jet is very cool and should be a relatively simple step up for SR22T owners.  The Pilatus Jet is huge.  Finally, the Diamond DA62 would be my below 12,500 airplane and the Piper M350 would be my pressurized plane.  Money being no factor, of course.

    Photo Courtesy of William Day, copyright 2018, All Rights Reserved

    I decided to take in the entire airshow on Day 1, all 4 hours of it.  Upon realizing I would be very stiff necked if I did that each day for the three days I was there, I decided on Day 2 to check out some seminars and learn something.  I took a seaplane ground school course on Day 2, then listened to a NASA presentation on electric airplanes and low boom sonic jet technology (how to make supersonic passenger flight quieter).

    The end of Day 2 at Osh Kosh had to be the highlight.  I got to hang out with Cub Crafters at the 51WI grass strip just north of the OSH Class D airspace.  There was a free BBQ and I got to take a ride in a Carbon Cub.  My landing from the back seat was a bit rusty, but still a very cool experience.  Buzzing the BBQ area in tandem was pretty neat.

    Photo Courtesy of William Day, copyright 2018, All Rights Reserved

    Day 3 brought some cooler temps and some clouds.  We walked out to the vintage airplanes, spending the morning gawking at Cessna 195s and Wacos.  Then I took the plunge to explore all the vendor hangars.  My idea was to walk around and see if I can find some interesting and innovative technology.  Well, after 2 of the 4 hangars, my head was spinning, so I decided to watch the rest of the airshow to let my brain drain out a bit.

    Photo Courtesy of William Day, copyright 2018, All Rights Reserved

    3 Days was a good amount of time to spend.  I don’t think I could have stayed all week, but only a day or two wouldn’t have been worth it.  I flew up with a former student in his TBM 700, which was a very nice way to travel.  We landed and stayed in Green Bay (KGRB), which was super easy and low stress.  Had a great tailwind on the return and made it to Houston non-stop.

    A few closing observations:

    The Stratos 716X Personal Jet

    If Stratos Aircraft is ever able to bring this to market, it sounds awesome.  400 knots, single engine, single pilot, with 6 seats.  Being a single engine jet, similar to the Cirrus Vision Jet, it’s 100 knots faster, plus with the airflow and engine technology, it doesn’t have that big V Tail in the back, thereby reducing drag.  I have a feeling it would find a good market, but the certification process is a bear to get through.  Just ask Epic.

    The Lancair Mako

    This is a legit airplane.  Lots of thought was put in to the design of the Mako by the new Lancair organization in Uvalde, TX (KUVA).  The airplane was extremely comfortable, capable, and pretty cool.  The stick is in the center, with throttles on the side (where the stick would be in a Cirrus or Columbia).  AC, full Garmin integration, and the cool factor of the nose gear retracting, but not having a gear handle. Higher useful load than a Cirrus or Columbia, it would be a great alternative (and cheaper) to one of it’s certified competitors.

    Avionics

    There is a lot of new avionics technology hitting the market.  Dynon, beloved by experimental enthusiasts, is finding a foothold in the certified world with some neat panels.  It will be an uphill battle to take on Garmin, but there is some potential in the retrofit market to offer a cheaper alternative to the Garmin TXi.

    Speaking of the TXi, I played around with the 10.7″ panel at the Garmin booth.  It is extremely intuitive. Garmin did a great job of making it a simple touch screen interface, easy to use, and easy to learn.

    Avidyne is pushing their iPad integration with the IFD 100 iPad app.  It ties via Wifi or Bluetooth to an IFD 550 or 440 navigator, giving an additional screen in the cockpit to work with.  You have the ability to modify flight plans and such on the iPad and it will show up on the GPS units.

    Photo Courtesy of William Day, copyright 2018, All Rights Reserved

    All in all, Osh Kosh was an experience I’m glad to have finally experienced.  I don’t think I would go every year like some folks, but every few years, especially when my sons are older, seems like just enough for me, but not too much.

    All Photos Courtesy of William Day, copyright 2018, All Rights Reserved


  • That Pesky Rudder

    Whenever I get in an airplane with a pilot for recurrent training, I can assure myself that I will mention rudder usage more than once during the flight.  If it is in a tailwheel (or if the pilot is doing tailwheel training), I’m going to mention the rudder a lot.  How do I know this?  Because basic rudder skills are actually one of the most difficult things to master in flying.

    Let’s start simple.  What does the rudder do?  The dictionary definition is it controls the movement about the vertical axis of the airplane.  If you stick a pole down through the CG of the airplane and rotate the airplane around that pole, this is the vertical axis.  Looking at it another way, the rudder moves the airplane’s nose left and right.  Keep this in mind as we move on.

    Rudder

    Every pilot thinks about the rudder during the takeoff roll.  Because of the torque effect, the pilot must add right rudder during the takeoff roll to stay on the runway centerline.  Depending on the airplane’s horsepower, more rudder pressure is needed in higher powered airplanes.  The problem usually shows up once the airplane gets in the air.

    In the worst situation, after takeoff, the pilot will set both feet on the floor and completely disregard the rudder.  Torque effect and now P-factor are continuing to cause the airplane to yaw left, causing the need for right rudder.  With his feet on the floor, though, the pilot is allowing the airplane to yaw.  It’s not terribly noticeable for him in the front seat, but the back seat passengers (especially in a six seat or larger airplane) are certainly feeling it.

    One particular problem spot on the climb is the climbing left turn.  In a climbing left turn, training says to add left rudder since it is a left turn (see below for the reasoning).  But, since the airplane is climbing and therefore experiencing left yawing tendencies due to the aforementioned effects, the pilot needs to continue pressing the right rudder, though the pressure won’t be as much as in a straight climb.  Watch the ball the next time you make a climbing left hand turn and it’ll make a believer out of you.

    I find only a handful of pilots are this egregious.  Most pilots have rudder problems in turns and in turbulence.  We’ll tackle turns first.  As we all learned when we first started flying, due to adverse yaw, a pilot must add rudder in the turn’s direction.  Again, this isn’t usually where the problem shows up.  During the rollout is the problem area.

    Let’s take a turn to the left.  The pilot rolls in, adding left rudder, arrives at his heading, then begins to roll out with the ailerons.  Left adverse yaw is now being experienced and right rudder is needed to smoothly transition back to level flight.  Need some visual assistance?  Watch the nose the next time you make a turn. If you are working the rudder properly, the nose will pivot on one point in the horizon.  If you aren’t using the rudder properly, the nose will draw a U shape on the horizon.  Try making some turns without rudder, see what it looks like, then use the rudder properly.  You’ll notice a big difference.

    Finally, let’s talk turbulence.  As we all know, turbulence in the hot summer afternoon is quite pronounced. When the airplane experiences a bump, it usually doesn’t bounce straight up in the air.  There is usually some kind of rolling motion involved.  As the pilot corrects this rolling motion by moving the ailerons, adverse yaw is experienced (just like rolling into and out of a turn that we talked about above), so rudder is needed.  There isn’t a need to stomp on the rudder or you’ll cause the airplane to severely yaw in the other direction, but rudder pressure is needed.

    Final approach is where this gets most pilots.  By controlling the nose and not allowing it to move around on final by using the rudder, this will make your approaches a little more stabilized leading to a more successful landing.

    Feeling lost when it comes to the rudder?  Ask your instructor the next time you go fly to do some rudder exercises.  Most instructors don’t emphasize these basic stick and rudder skills which leaves pilots lacking as they move on in their aviation lives.  So make it a point to do some basic rudder work the next time you fly with your instructor.

  • Matching the Airplane with Your Mission

    Has it come time to buy your first airplane?  Have the skies been calling your name?  Or are you just tired of standing in the airport security line then getting shoved in a long metal tube with no leg room?  Or, maybe you are a businessman who does business in remote areas that have local airports but are hard to get to commercially.

    Wherever your need is, you have decided it’s time to make a purchase.  If you are familiar with aviation, you may have an airplane in mind that you would like to have, but is that the right airplane for your mission?  If you are new to aviation, you may have no idea what airplane to go for.  Here are some helpful hints in narrowing down the different airplane options out there to fit your specific mission.

    Flying For Enjoyment, but Not Going Far Fast

    Piper Cherokee

    If you’re just a weekend flyer who is tired of dealing with flight school rentals, but you don’t need to carry a lot of people or go very far, your options are pretty numerous.  Anything from a Cessna 152 to a Piper Cherokee, maybe a Beech Sundowner, or a Bellanca Viking, or anything in between.  If you are content with taking a weekend hop for a hamburger at 100-110 knots, you have limitless options for airplanes.  Tailwheels (Cubs, Citabrias, Huskies) are excellent birds for you well.

    Getting Places Fast With Only You and Maybe One Passenger

    Need to go 200-300 miles fast and not worried about weight?  A Cirrus SR22T, a Columbia 400, or Cessna Corvalis might be just what you need.  Cruise speeds on those are all around 180-190 knots at 10,000 feet. All are oxygen equipped if you want more speed higher up, as the service ceilings are 25,000 feet.  Payloads run in the range of 400-500 pounds with full fuel.  All these have air conditioning options, too.

    Hauling More Weight, but Still Need the Speed?

    Cessna 206 Mission

    A little slower (150-170 knots) but a little bit more payload options are A36 & B36 Bonanzas, Piper Saratogas, Cessna 206s, or Cessna 210s might suit your fancy.  All come in turbo models if you are a high elevation dweller.  The Cessna 206 has been used for many years as cargo and people haulers in remote regions like Alaska, South America, and Africa.  I’ve even seen pictures of snowmobiles being carried in a 206.

    Tired of Oxygen Cannulas?

    The next step up from a Cirrus, Corvalis, or Saratoga is the Piper Malibu.  A bigger brother to the Saratoga, the different PA-46 models offer one of the best options for a single engine piston out there.  All except the Matrix (PA-46-350T) are pressurized, all the pistons cruise about 200 knots, and all are configured with club seating with plenty of leg room.  Useful loads range around 1200-1400 pounds (they hold 120 gallons of fuel, so payloads range from 480-680 pounds).  The original Malibu (PA-46-310P) only burns 16.5 GPH so that allows partial fuel to be carried to allow more people and bags.  All have 6 seats.

    Need to Carry Even More Weight?

    It’s time to get into the piston twin market, then.  A Cessna 414, a Cessna 421, a Cessna 340, a Beech Duke or a Beech Baron are all pretty good options here.  The 421 and the 414 have the largest cabins, while the Duke has the highest useful load.  Cruise speeds range from 200-220 knots, but the cabin is roomier and you get a few more pounds useful load than a piston single.  If you do get into a 421, get good training as they are equipped with Continental geared engines, which can be tricky to operate if you don’t know what you are doing.

    Need to Carry a Lot of People and Go Fast?

    Turboprops are the way to go for you.  King Airs have the most utility while  the Pilatus PC-12 is the cream of the single engine turboprop crop as you can put almost anything you want in it.  If you have 4-5 passengers, stay away from a Piper Meridian as you can’t carry a lot of weight.  Those are better for 2-3 passengers at the most (plus a pilot).  The TBM 900 is pricey, but fast (300-325 knots).  The original TBM 700 can be had for under a million bucks, you get 280 knots, and a very usable useful load.  You still can’t fill all 6 seats with full fuel, but you can do more with it then a Meridian.

    Have a Boatload of Money Sitting Around?

    A jet might be for you then.  Fuel, insurance, maintenance, and hangar costs are high, but jets will get you places real fast with room for all your friends and family.

    Gulfstream


  • Cirrus Pilot Proficiency Program (CPPP)-Conroe, KCXO

    The Cirrus Pilot Proficiency Program is coming back to the Lone Star Airport in Conroe, TX (KCXO) on October 23rd-25th.  Wondering what the CPPP program is?

    “CPPP offers a weekend event for Cirrus owners and their partners that focuses on Cirrus-specific knowledge and flying proficiency.  We bring some of the most experienced flight instructors who regularly teach in all kinds of Cirrus airplanes flown for all kinds of missions.  We have prepared an extensive syllabus of ground courses that complement the transition training and delve into areas of greatest need for Cirrus pilots.” (from CirrusPilots.org)

    CPPP

    The weekend starts off with a group dinner on Friday night. The Saturday morning ground session focuses on General Aviation Safety with special focus on the Cirrus accident statistics.  Normal and emergency procedures are also reviewed.

    In the afternoon on Saturday, the attendees are split into two groups.  The first group has a myriad of options for ground sessions covering all topics related to Cirrus aircraft and operations.  The second group flies, then they switch for the second 3 hour session.  Sunday brings the same split, with more courses offered and more flying.

    While the Cirrus pilots are flying and learning more about their airplanes, CPPP offers a Partner in Command course for flying partners on Saturday.  This allows flying partners to be more comfortable in the airplane and teaches them what to do if something were to happen to the pilot.

    All in all, attending a CPPP will improve both Cirrus knowledge and Cirrus flying skills.  It’s highly recommended for all Cirrus pilots.

    To register for the CPPP event in Conroe, check out the CPPP website.

3 Comments

  1. I think you left out an important part of the picture. Maybe it’s there, but I can’t find it. The question is WHEN?
    The footnote tells when it was issued, but not WHEN it applies. Is it a statement of present conditions? Or is it a forecast of conditions at some future time? Somewhere that information is available, but I can’t find it.
    Albert Holt
    AL@holtmarinesystems.com

    1. Hi Albert, at the bottom of the Prog Chart itself, there is an issue time, then directly below it, there is a valid time. That valid time is when it applies. Surface Analysis charts are current, but Prog charts are always forecast. Unless of course, they haven’t been updated, then it’s showing what was supposed to take place in the past.

Leave a Reply

Your email address will not be published. Required fields are marked *