Shock Cooling in a PA46

We’ve all heard it said…”reduce the throttle by no more than 1-inch every minutes to ensure you don’t shock-cool your engine”. Does this advice apply to a PA46 engine? Can a PA46 engine (Lycoming 540 or Continental 520/550) really be shock-cooled? How should the engine temperature be managed?

Metals expand and contract with temperature, and the various metals in an air-cooled aviation engine expand and contract at a different rates. Shock-cooling supposedly occurs when the engine changes temperature quickly and the different metals in the engine cool (and therefore change shape) at different rates. When the change occurs dramatically supposed scoring, rubbing, and marking of the metal can occur, which can cause catastrophic results.

So, let’s back to the original question…can a PA46 engine suffer shock-cooling and should a pilot operate the engine so as to avoid shock cooling? Simply put, I’ve never seen nor heard of any piston PA46 engine suffer shock-cooling. In 5000+ hours flying the piston PA46 and 16 years of flying/managing/training in the Malibu/Mirage/Matrix, it simply has not happened to me nor anyone I know. Does it mean that it cannot happen or has never happened? No. But, it is certainly not a prolific threat to our fleet.

Should the owner/pilot operate the engine with a cautious eye cast toward the potential of shock cooling? Well, sort of…but, let’s flesh this out. My suggestion is that a pilot should operate the engine with conservatism in movement of temperature, but only because this is a good operating practice with any machine, and any flying machine is (by definition) not “overbuilt”. And, there are many ways to change the temperature of the engine…not just by reducing power. Here’s a partial list of ways to cool your PA46 engine:

  • Reduce power: Obvious…yes. When the engine produces less power, less heat is generated. Reducing power in a piston engine will almost always result in less temperature.
  • Lower the nose: By descending (and leaving power in a cruise setting) the airspeed will increase and cool the engine.
  • Enrichen the mixture: Fuel has a cooling effect on the engine, so the richer the mixture the cooler the engine.
  • Lower the landing gear: Yes…you read that right…engine cooling will occur when you lower the landing gear because more air will flow over the cylinders. Notice the landing gear doors on the PA46 have air louvers. Air flows into the engine nacelle on the front, passes down through the cylinders (along with the oil cooler, intercoolers, and other components) and then out the louvers of the closed gear doors. When the landing gear is lowered the “back door is opened” and a LOT more airflows over the cylinders.

My suggestion is that a pilot only perform ONE of these actions at a time when beginning a descent. This suggestion was presented to me by Chad Menne (Owner, Malibu Aerospace) some time ago and I’ve operated engines this way ever since. If you are at a higher altitude and simultaneously reduced the power, lowered the landing gear, started a big descent, and enrichened the mixture in one flail swoop, I think there’s a chance that your engine would suffer some negative effects that could be called “shock cooling”. So, when you do start a descent, pick one “cooling action” to accomplish at a time. I’m sure you’ll not hurt your engine.

Simply put, shock cooling is not a huge factor in the PA46 community, and a PA46 pilot does not need to be overly cautious. The “one inch per minute” rule may apply in some other airframes, but in the PA46 world it is not applicable.

Joe Casey’s aviation story began in 1990 with his first flight near Nacogdoches, TX in a Cessna 172. From lift-off, Joe knew he would have a lifetime passion flying just about anything that will leave the ground…He was completely hooked.

Along with being an FAA Designated Pilot Examiner (DPE), Joe is an ATP/CFI-AHMG and Commercial Rotorcraft/Glider Pilot in the civilian world and also a UH-60/AH-64 Pilot-in-Command/Instructor/Examiner Pilot in the US Army Reserves.  His passion for the last 19 years, however, has been the PA-46 Malibu/Mirage/Matrix/Jetprop/Meridian. Has has amassed over 6,500 hours in various PA-46 airframes and believe it to be one of the finest flying machines available for the serious cross-country pilot with an eye for efficiency.

Now, Joe has flown more than 12,200 hours in just about every imaginable environment. Whether providing initial/recurrent training in the PA-46’s, TBM’s, instructing in NVG’s in a UH-60 Blackhawk, flying the King Air series of airplanes, giving tailwheel endorsements, or taking kids flying for the first time, he simply loves flying machines and the people who fly them.

Similar Posts

  • Stephanie Mertz Joins Texas Top Aviation

    Texas Top Aviation has added a new member to our instructing team. Stephanie Mertz was hired in March 2019 and will be specializing in G1000 & Instrument instruction.

    Stephanie graduated from LeTourneau University in Longview, Texas with a degree in Aeronautical Science, earning her commercial single and multi ratings while there. She began her aviation career in Ontario, California flying a Pilatus PC-12 for charter and medical trips. While operating the PC-12, she gained valuable experience flying all over the US and Mexico.

    In 2013, Stephanie moved back to East Texas with her husband where she worked as a contract pilot flying a variety of Citations as well as a Falcon 10. A few years later, she became involved in her local Ninety-Nines chapter and joined their mentorship program.

    After earning her CFI, CFII, and MEI, Stephanie returned to her alma mater to pass on her flying passions to college students through flight instructing. After a year of teaching at LeTourneau, she and her husband, with their first baby in tow, moved to the Austin area. Now she is instructing with Texas Top Aviation while acting as a mentor for other women working on achieving their flying dreams.

  • MMOPA Operating Practices for the Piper PA46

    I have the privilege of serving on the Malibu & M-Class Owners and Pilot’s Association Safety Committee.  Along with 6 other Piper PA46 instructors, we were tasked with two things last year leading up to the MMOPA Convention in Colorado Springs last October.  The first was to develop a Master Aviator Program (more on that in a later article).  The second was to develop Operating Practices for the Piper PA46 fleet that we as instructors could all get on board with to teach the same thing, allowing everyone in the fleet to fly approaches and patterns the same way.

    When I started instructing in the piston Piper PA46 line (the Malibu, Mirage, and Matrix), I was surprised to find that there were no recommendations anywhere that I could find for approach and pattern power settings and airspeeds.  This led to some experimentation on my part trying to find out what works well for the airplane.  I had originally been given good training in a Malibu, but hadn’t flown one for several years, so my numbers were a bit rusty.

    I have been in the Cirrus world for a very long time.  One thing I greatly appreciated from an instructing point of view about Cirrus was the abundance of guidance the factory gives instructors and pilots on how the airplane is supposed to be flown.  All CSIPs and all Cirrus pilots should (theoretically) be teaching and flying the exact same way.

    I was quite surprised that Piper didn’t put out similar information.  I wasn’t as familiar with MMOPA at the time, but was surprised they didn’t have any information either.

    I apparently wasn’t the only one with a desire to have a little bit more standardization.

    So, without further ado, here are the MMOPA Operating Practices that the Safety Committee put together.  If you are a new Piper PA46 pilot, these numbers are what you will expect to use when you do your Initial training.  If you are a seasoned Piper PA46 pilot, you probably fly these numbers, or pretty close to them already.

    These are tried and true power settings and speeds for the approach phase and landing phase.  They work. That was the goal of the Safety Committee:  put down in writing something repeatable to enhance safety.  I believe we have accomplished that.

  • Winter Ops

    It’s summertime and the weather is hot! Over this dry, sunny season, winter flying is probably the last thing on your mind. However, now is the perfect time to start getting things in place for winter and that includes having a plan for taking care of your airplane.

    Why are preparations for winter ops needed in the first place? Cold weather, especially during the engine start and warm up period, can be very damaging to your engine if precautions aren’t taken to ensure that safe temperatures exist inside the engine before you turn the key. I always thought that the biggest problem associated with cold weather was engine oil. The logic is since cold oil is thicker and less viscous as the temperature drops, it is not able to circulate quickly throughout the engine to provide proper lubrication upon starting.

    While cold oil may be a factor, the introduction of multi­viscocity oils has greatly reduced that issue. The real problem is created by the different ways that various parts of the engine respond to heat. Because aluminum expands more quickly when heated than steel does, the pistons (made of aluminum) expand more quickly than the cylinders (made of steel). This can lead to scuffing on the sides of the cylinder barrel. In the same way, differential heating can reduce clearances which are designed to provide cooling oil to bearings and other vital engine parts, thereby causing damage which greatly reduces the life of the engine.

    So how cold is TOO cold? Unfortunately, that is a difficult question to answer. Because there is so much variation between engines, airplanes, and environments, there really isn’t any one specific answer. An older, more worn out engine may actually be less susceptible to cold weather damage than a newer, tighter engine because its internal clearances are probably not as tight as they were a few thousand hours ago. I have heard of some people who preheat their airplanes anytime the temperature falls below about 40 degrees. For us northerners, this seems excessive. On our E33A Bonanza which has a Continental IO­520, we generally preheat the airplane when it is cold soaked in temperatures below freezing (32° F).

    Here are a few of the best ways to get your machine ready for a cold weather flight:

    • Heated Hangar:­ Nothing beats a heated hangar for warming up an airplane. The warm air is evenly distributed around the engine and in the cockpit (your avionics and gyros will thank you!). The airplane will need to be in the hangar for a while in order to warm up the guts of the engine. Often, the easiest way is to have the airplane pulled in the evening before the planned departure and left overnight. Many FBOs will hangar airplanes overnight for a small fee and it is well worth the price. We almost always have our charter airplanes put into hangars overnight when on a winter trip to ensure that we don’t have any trouble when we depart the next day. This practice has the added benefit of keeping the airframe clear of any ice and snow that may accumulate before you are scheduled to leave.
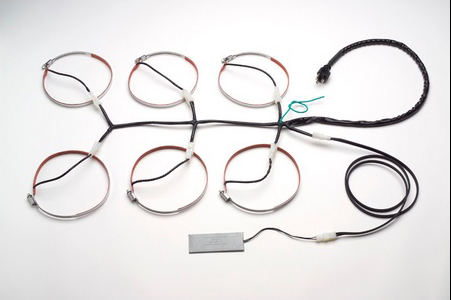
    • Electric Engine Heaters­: Multi­point electronic heaters use heating pads that are placed around the engine in order to heat up the various components such as cylinders, the oil pan and crankcase. Most of these systems are designed to be activated by being plugged into a wall outlet with an extension cord. Preheating for a winter flight is as simple as going to the airport the night before and plugging it in. Two well ­known manufacturers of multi­point engine heaters are Reiff and Tanis. These systems are relatively inexpensive and can be a life saver if you regularly travel in colder climates. If an engine heater is the right choice for you, it is recommended to avoid less ­expensive models that heat only the oil pan.


    Reiff system
    Pictured above is the Reiff system. The heated bands go around the cylinder bases and the pad at the bottom of the picture heats the oil pan. Picture Courtesy of www.reiffpreheat.com


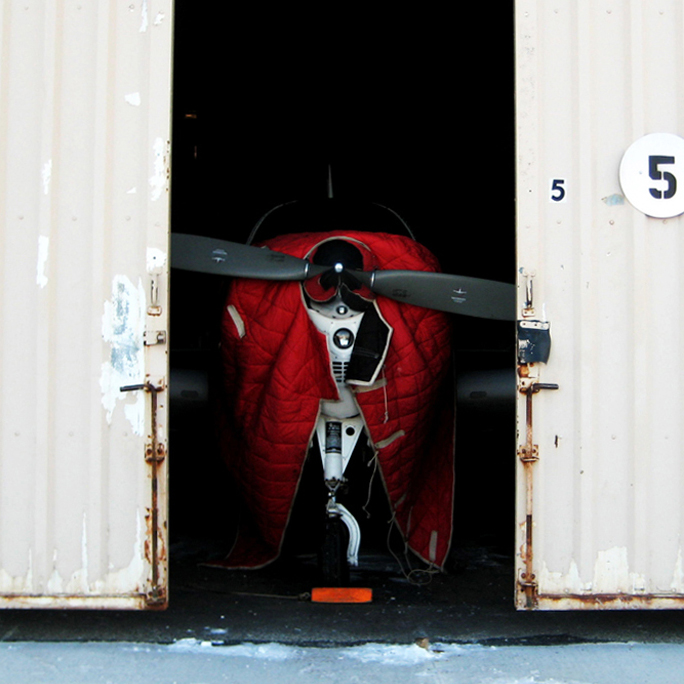
    • Covers and Blankets­: If it is especially cold or you have to preheat outside, having something to insulate the cowling and keep the wind out can be very useful. Regular blankets will work long as you can secure them in place. If you have an ongoing need for additional insulation, there are companies that make custom blankets and propeller covers to fit your airplane. If you are landing and then taking off again relatively quickly, using a few blankets and cowl plugs will work nicely to keep the engine warm while it is sitting outside. In a pinch, placing a couple of powered light bulbs in the cowling overnight with insulation on top can result in sufficient temperatures for starting the engine.


    Bonanza Cover
    Even with the multi­point electric heater, we still use a blanket while preheating to help keep everything toasty.


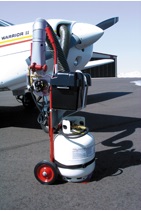
    • Forced Air:­ This method is used widely by FBO’s and flight schools. Hot air is produced in a portable heater and is then pumped into the engine compartment via the openings at the front or bottom of the cowling. This method has the benefit of not requiring any additional equipment to be installed on the aircraft beforehand and can be very effective provided there is adequate time for the engine to heat completely before removal.


    Forced Heat
    Pictured above is a Red Dragon engine preheater. Photo courtesy of Red Dragon’s website: www.flameengineering.com


    • Winter Baffles:­ When the air temperature starts to drop into the teens and lower, you may find it difficult to keep your engine temperatures warm enough in cruise flight. The problem is that the air entering the cowling inlets is so cold that it overcools the engine. The solution is to install additional baffling in the engine inlets to reduce the amount of airflow into the cowling. These additional baffles are usually just sheets of aluminum that are cut to the correct size and are bolted in and removed quickly and easily as needed. Some pilots swear by them while others complain that they can cause uneven cooling. If you have questions about winter baffling, I’d suggest talking to your mechanic about your specific airplane.

    Winter flying can be extremely rewarding. After their hands thaw from pre­flight, a pilot is often rewarded with smooth air, improved performance and outstanding views. Just don’t forget to prepare the airplane for the cold. The preparation is often as simple as plugging in an extension cord or making a phone call to the FBO. So whether you live in the north or the south, take good care of your engine so that it can keep taking good care of you.

  • Maintaining TKS Panels

    Columbia TKS Panels

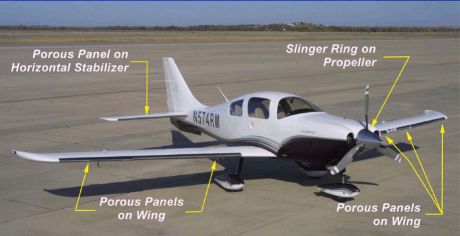
    When cleaning airplanes, the majority of people don’t know how to properly maintain their TKS panels.  TKS panels provide wing leading edge, horizontal stabilizer leading edge, and, in the case of FIKI airplanes, vertical stabilizer leading edge de-icing protection.  For those not familiar with them, they are metal strips that have thousands of holes drilled into them where the TKS fluid seeps out. They have become quite prevalent on Cirrus aircraft, the Cessna TTx, and Mooney aircraft manufactured in the last decade or so.  The system is also known as a weeping wing system.

    Being on the leading edges, these panels pick up bugs very easily.  For the uninitiated, it would make sense to just use normal airplane cleaner to spray the panels and scrub the bugs.  Don’t!

    Using anything that contains Methyl Ethyl Ketone (MEK) as that can harm the TKS bladders behind the panels.  Any aircraft cleaner containing wax could cause the pores to clog, preventing the TKS fluid from properly seeping onto the wing.

    What’s the best thing to do?  Soap and water with a soft cloth is a good start (again, make sure it doesn’t have wax in it.  Dish soap would be suitable).  No hose available?  Just simply turn the TKS system on, let it run till you start to see fluid drip off the wings onto the ground, and use the fluid to clean the panels.

    A soft cloth would work fine, but, if the panels are really buggy, take a green scouring pad to do some scrubbing.  Just make sure the scrubbing motion is up and down with the grain, not side to side.  You can find the green scouring sponges on the dishwashing aisle in the grocery store.  Just leave one in the hangar for when you need it.

  • Flying Through Rain

    For the most part, flying through rain is a non-event. If the NexRad or Radar is showing light green or dark green, usually there aren’t that many bumps and your plane just gets a wash. Sometimes the visibility drops down a little bit making us IFR pilots have to transition to our instruments.

    It get’s a little more exciting when the precipitation on your screen turns to yellow. This means there is a lot more precipitation echoes either in the clouds or coming out of the clouds, meaning harder rain. I usually tend to stay away from yellow unless it’s absolutely necessary to go through it.

    I had a situation a few weeks ago where I deemed it necessary to fly through some yellow NexRad returns. I was flying a G1000 Columbia into Monroe, Louisiana, KMLU. The winds were mostly light, but slightly favoring runway 04, which was the runway in use. As I got closer, a decent size rain shower with mostly yellow returns was sitting over the final approach fix for runway 04 and slowly tracking to the northeast.

    I didn’t particularly want to spend the entire approach getting beat on with rain, so I decided to fly the RNAV 14 approach at MLU and circle to land on runway 04. The rain hadn’t quite reached the airport yet, so I decided that circling to 04 should be no problem.

    I started the RNAV 14 at the FLESH IAF. Since I was approaching from the west, I did not need to do the procedure turn, so I joined the Final Approach Course (FAC) after crossing FLESH.

    In the meantime, that rain shower was inching closer to the FAC for the RNAV 14. I wasn’t concerned about my safety if I flew through some of it and I didn’t have passengers on board who would get nervous, so I elected to continue. I wasn’t seeing any lightning coming out of the clouds, so it appeared to only be moderate rain.

    Just before I got to JIVEY, the FAF, I entered the clouds and the rain. About 20 seconds later, my altimeter and airspeed started bouncing around a lot. Now, based on all I’ve said so far, what would cause that, and what would you do?

    (Jeopardy theme song playing while contestants ponder questions)

    The answers? Due to the moderate precipitation, water had gotten into my static port and caused the unusual readings on my altimeter and airspeed indicators on the G1000.

    I had experienced this before, so I knew what to do. I reached down and turned the static source from primary to alternate, which starts taking static pressure from inside the cabin in the Columbia. Instantly, everything went normal.

    The other time I had experienced this was also in a Columbia, so I’m under the impression that the way the Columbia static ports are designed, they are a little bit more susceptible to water creeping into them than other airplanes.

    Moral of the story? If your pitot/static instruments start jumping around, the first thing you do is turn your alternate static source on.

  • Garmin G1000 Updates

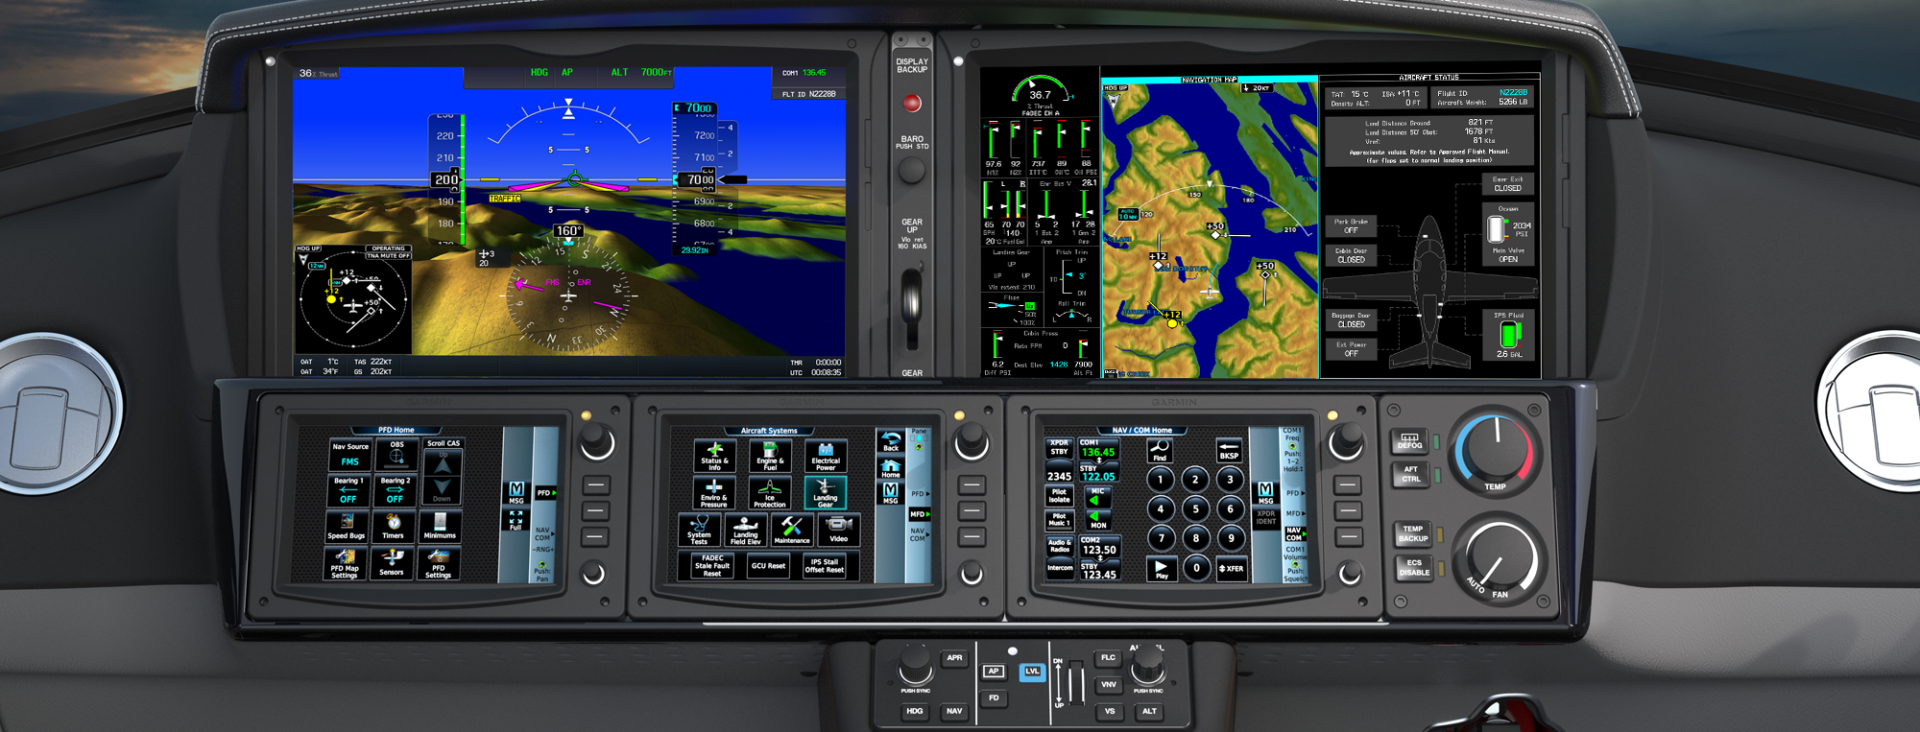
    You have just received the keys of your shiny new (to you) airplane complete with a beautiful Garmin G1000 glass panel flight deck. Synthetic Vision, WAAS, and ADS-B are all installed. You are ready to cruise in high technology.

    You turn on the PFD and MFD and notice one problem. All your databases are expired. No big deal, right? Your Garmin 530W was easy as pie to update with it’s single data card.

    You start looking around and can’t find the data card. Then you notice that there are several SD cards in slots on the panels. SD cards won’t fit in your Blue Jepp Skybound card reader. Confusion sets in which quickly leads to full on panic.

    What have you gotten yourself into?!

    No need to fear, Texas Top Aviation is here to help with your Garmin G1000 database update confusion (and hopefully not panic).

    Database Update Providers

    First, you have to choose who to get your Garmin G1000 updates from. You have two options. One is Garmin (fly.garmin.com; always use either Firefox or Chrome to update, don’t use Safari). The other is Jeppesen.

    Honestly, there is no difference between the data that each provides. If you had a 530 or 430 before, you used Jepp already. Just keep the Jepp account, call them, and have them get you set up for your Garmin G1000 updates.

    If you didn’t have a Jepp account before, I would use Garmin, for a couple of reasons. You get multiple downloads in case you mess something up (Jepp NavData gives 1 download per month, while Safe Taxi, etc. you get 2-3). On Jepp, you have to call in and have them reset the account, which can be a pain if it’s after hours or a Saturday or Sunday.

    The other problem with Jepp is since Boeing bought Jeppesen, I have found it extremely difficult to find online where to set up a new account and purchase databases. Yes, you can always call, but, again, problematic after hours or on a weekend.

    The only problem with Fly Garmin for your Garmin G1000 updates is Garmin is constantly updating their program. You have to update their downloader quite often, which can be a bit frustrating.

    I’m going to use Fly Garmin as my example.

    What to Buy

    Garmin gives you a couple of different bundle options for your Garmin G1000 updates, the OnePak and the PilotPak. The main difference between the two is the PilotPak includes approach charts that display on your PFD and the OnePak doesn’t. Therefore, the OnePak is about $200 cheaper.

    Both include Navigation Data, SafeTaxi, Obstacles, Airport Directory, Terrain, and the BaseMap.

    How to Update

    Once you have followed all the instructions on Garmin’s website (or gotten Jeppesen set up), here is what to put on which SD card.

    NOTE: YOU WILL NEED TO PURCHASE ONE OR TWO BLANK SD CARDS FOR THE NAVIGATION DATABASES. DO NOT PUT THE NAVIGATION DATA ON THE SD CARD THAT IS ALREADY IN THE TOP SLOT ON THE MFD. THAT IS FOR ENGINE DATA LOGGING ONLY. NO NAVIGATION DATA SHOULD EVER BE PUT THAT ON THAT CARD.

    Bottom Card, PFD

    • SafeTaxi
    • Obstacles

    Bottom Card, MFD

    • SafeTaxi
    • Obstacles
    • Airport Directory
    • Flite Charts

    Top Card, PFD & MFD (This is the new blank SD card(s) you bought)

    NOTE: REMOVE THE TOP SD CARD IN THE MFD THAT IS ALREADY IN THE SLOT AND DON’T PUT ANY DATABASE INFORMATION ON IT.

    • Navigation Data

    Garmin G1000 NXi Users (or Cirrus Perspective + Users)

    Ignore everything above and put all databases on the bottom card of the MFD. You have database sync, so you don’t have to mess with multiple cards. When you do an update though, go to the AUX chapter on the MFD and scroll down to the Databases page. Ensure that all dates match what you just put on the SD Card.


    For you Jeppesen users, check out the new Bad Elf Wombat updater that works with the iPad JDM app for updates.

Leave a Reply

Your email address will not be published. Required fields are marked *