New Houston Airspace Procedures

If you are based in Houston, or heading into or out of the Houston airspace under IFR, have you updated your charts?  If not, you may hear a clearance stating: “N67889, cleared to Amarillo via the BORRN 1 Departure, CRGER Transition, Direct.  Climb via the departure, expect 8000 in 10 minutes.  Departure frequency 123.8, Squawk 3365.”  You manage to get the clearance written down, but have completely messed up the spelling of both BORRN and CRGER, so you have no idea where the intersections are.  After stumbling through a readback, you ask ground to spell the fixes for you.

Then, more bad news.  You haven’t updated your GPS cards yet, so the departure isn’t in your 430.  It’s an RNAV only departure, so you can’t fly it based on the NAV Radio.  You were planning on updating your iPad when you got to Amarillo, so you don’t have the departure on there, either.

This has probably already happened to a few people today already.

Houston airspace got a major overhaul today.  There are 20 new DPs and 29 new STARs guiding IFR traffic into and out of Houston airspace (including one named the DOOBI 1 Arrival, named after the Dooby Brothers band).

The FAA’s goal in all these changes, according to AOPA, is to “bring fuel efficiencies, time efficiencies, and reduce carbon emissions” (from Benet J. Wilson’s May 15th article on AOPA.com).  The FAA issued a NOTAM today valid until June 6th describing what routes for pilots to file.  The NOTAM also contains contingency plans for pilots flying without updated charts (like our example above).

Pilots should expect these wide scale procedure additions and changes to start showing up in other Class B airspace across the country.  As always, make sure those charts are updated, GPS databases are current, and you do some studying of your route before you file your flight plan.

Similar Posts

  • Cirrus Embark

    Free training?

    Yes, you heard correctly.  Last fall, Cirrus released a program called Cirrus Embark.  The Cirrus Embark program offers 3 Free Days of Training to new purchasers of used Cirrus aircraft.  The 3 Days is equivalent to the Cirrus VFR Transition Training Course.

    Previously, Cirrus offered free factory training to anyone who purchased a new Cirrus from the Cirrus factory. Now, anyone buying a used Cirrus gets the same offer through Cirrus Embark at their home airport with a local CSIP training provider.

    IFR pilot?  No problem.  The Cirrus IFR Advanced Transition Training Course is 5 days in length, but the Cirrus Embark program covers the first 3, reducing the out of pocket pay to only 2 days.

    Want more information?  Check out the Cirrus Embark website.

    To get more information on both the VFR and IFR Cirrus Transition Training Courses, visit the Texas Top Aviation Cirrus Training Page.

  • Garmin 530/430 Missed Approaches

    Flying a missed approach can be stressful enough.  When you haven’t done one in a while and your GPS isn’t showing you how to get to the missed approach point and you can’t remember which button to press, that adds a lot more stress.  Recipe for disaster?  Quite possibly!

    No need to fear, we are here to help.  The procedure for getting a Garmin 530 or 430 to give you missed approach guidance is actually simple and straightforward, if you know what to do!

    Note: Because of the variety of different autopilot configurations in different airplanes, this article will focus solely on the GPS.

    What the GPS is Thinking

    The way Garmin designed the Garmin 530 and Garmin 430 is to be as helpful to pilots as possible.  Their thinking was, 95% of the time, a pilot will make a landing on an instrument approach.  This is pretty accurate as most of the time, this is what happens.  Most general aviation pilots don’t fly approaches to minimums all that often, thus negating the need for a missed approach.

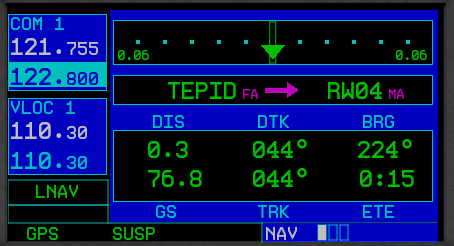
    Garmin Missed ApproachGarmin designed their software with this in mind.  When an airplane crosses the missed approach point, the GPS will go into what’s called suspend mode (a SUSP annunciation appears above the OBS key).  It will keep the missed approach point as the active waypoint because it assumes the pilot is going to land.

    This can be confusing to pilots.  This is what happens when software engineers and pilots come together. Engineers often believe they are smarter than pilots! (See the Airbus fly by wire roll out)

    The Procedure

    In the case of a missed approach, the button pushing on the GPS is actually relatively simple.  There is no SUSP key to take the GPS out of SUSP mode (thanks Garmin!).  Instead, you press the OBS key.  This will take the GPS out of SUSP mode, making the first waypoint on the missed approach procedure the active waypoint.  Your GPS will now give you guidance on the missed approach procedure.

    If you are going missed off an ILS, LOC, or VOR approach, then there is one more key you’ll have to press. Your CDI needle (whether it is digital or analog, an HSI or just a CDI gauge) will be reading off the NAV radio and your CDI indication on the GPS will be VLOC.  After you press the OBS key, press the CDI key on the GPS so you will start getting course guidance from the GPS again.

    That’s it.  Button pressing on the different autopilots will vary, but if you are familiar with yours, you’ll be able to tell it to follow the GPS and climb to the proper altitude.

  • Contact Approaches

    Almost all IFR pilots are familiar with visual approaches and what the requirements are in order to fly a visual approach. As a refresher, the Instrument Procedures Handbook defines a Visual Approach as “an ATC authorization for an aircraft on an IFR flight plan to proceed visually to the airport of intended landing; it is not an [Instrument Approach Procedure]” (page 4-56).

    For ATC to issue a Visual Approach, the pilot must have the airport or the traffic to follow in sight. Once the pilot reports the airport or the traffic in sight, ATC can clear the aircraft for a visual approach.

    A limiting factor for a visual approach is ATC’s Minimum Vectoring Altitude. “This altitude, based on terrain and obstruction clearance, provides controllers with minimum altitudes to vector aircraft in and around a particular location” (Instrument Procedures Handbook page 1-42). ATC has to restrict aircraft to these MVAs, which can sometimes be quite high due to terrain or obstacles in the vicinity of the airport.

    Every pilot has been in a situation with a high MVA that ATC can’t get them below, but it’s solidly MVFR or VFR at the destination airport. The MVA keeps the pilot in the clouds, so a visual approach isn’t possible since the pilot can’t see the airport or the traffic to follow. This can lead to extra time to go out and fly an approach.

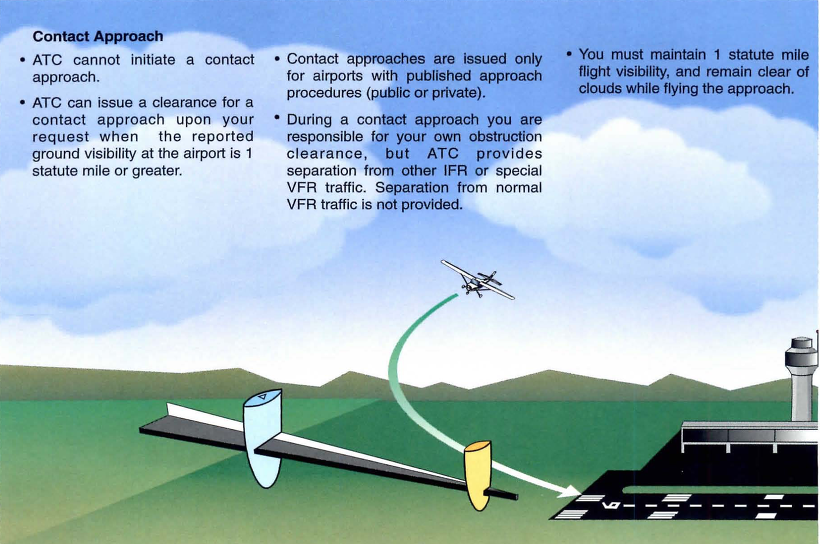
    Enter a Contact Approach. A Contact Approach is different then a Visual Approach. “The main differences between a visual approach and a contact approach are: a pilot must request a contact approach, while a visual approach may be assigned by ATC or requested by the pilot; and a contact approach may be approved with 1sm visibility if the flight can remain clear of clouds, while a visual approach requires the pilot to have the airport in sight, or a preceding aircraft to be followed, and the ceiling must be at least 1,000 feet AGL with at least 3sm visibility” [Instrument Procedures Handbook page 4-57].

    Here’s the simplified explanation: A pilot does not have to have the airport in sight to request a contact approach. All that is required is for the airport to be reporting at least 1sm visibility and for the pilot to remain clear of clouds.

    When would this be helpful for an IFR pilot? Good question. Here’s a scenario.

    Pilot Smalls is about 20 minutes from his destination, which is an uncontrolled airport with only one approach to runway 17. He is approaching from the south and the initial approach fix for the approach to 17 is about 15 miles north of the airport. The airport is under Center control. When he has arrived at this destination in the past, Center usually could only vector him down to 4,000 AGL. He is very familiar with this airport and the surrounding area as he comes to this destination at least 2-3 times a month for business.

    Pilot Smalls listens to the AWOS, which is reporting a 2500 foot scattered layer and 10 miles visibility. He knows it is right traffic for 17 since there is a 2,000 foot antenna on the east side of the field. There is some hilly terrain around, but all the terrain is well below pattern altitude and doesn’t cause a safety issue.

    Looking out at the clouds, Pilot Smalls observes that the cloud layer is scattered to broken, but more scattered on the west side of the airport, with several large openings that he can see the ground through. Center asks for his approach request and Pilot Smalls requests a visual approach. Center gives him a descent to 4,000 AGL, their MVA for the area. They tell him to report the airport in sight for the visual approach.

    At 4,000 AGL, Pilot Smalls is going through the scattered layer of clouds, but can see the ground in between the clouds and deems he has room to maneuver safely between the clouds and stay clear of them. He can’t see the airport, so a visual approach seems unlikely. He can’t cancel IFR because then he would have to keep the VFR cloud clearance and visibility requirements in Class E airspace (1,000 feet above, 500 below and 2sm horizontally), which isn’t possible in this case.

    5 miles from the airport, ATC states, “N12345, I’m going to have to send you out for the approach since you don’t have the airport in sight.” Pilot Smalls then requests a Contact Approach. ATC clears him for the Contact Approach to his destination, so Pilot Smalls descends through a break in the clouds, remaining clear of clouds, until he gets below the base of the ceiling. He maneuvers onto the right downwind, lands and cancels IFR.

    Contact approaches can be useful at controlled and uncontrolled airports. The first time you request one, do so with a higher ceiling and some room to maneuver to keep your safety margins. After you’ve done a few, you can determine what your personal minimums are for a Contact Approach.

    I would not recommend doing a Contact Approach at an airport you are unfamiliar with. It’s vital to know what obstacles are around since on a Contact Approach, the pilot is now responsible for traffic avoidance and terrain avoidance, whereas on a visual approach, ATC resumes that responsibility.

    For more reading on Contact Approaches and another good scenario, check out Bold Method’s article on Contact Approaches.

  • Matching the Airplane with Your Mission

    Has it come time to buy your first airplane?  Have the skies been calling your name?  Or are you just tired of standing in the airport security line then getting shoved in a long metal tube with no leg room?  Or, maybe you are a businessman who does business in remote areas that have local airports but are hard to get to commercially.

    Wherever your need is, you have decided it’s time to make a purchase.  If you are familiar with aviation, you may have an airplane in mind that you would like to have, but is that the right airplane for your mission?  If you are new to aviation, you may have no idea what airplane to go for.  Here are some helpful hints in narrowing down the different airplane options out there to fit your specific mission.

    Flying For Enjoyment, but Not Going Far Fast

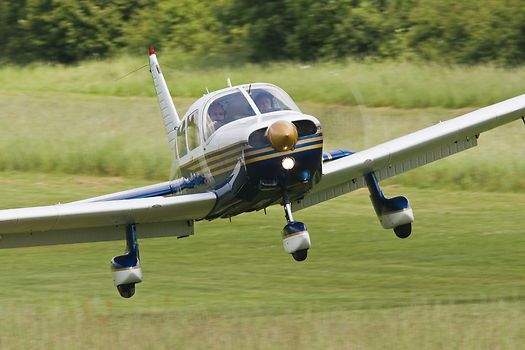
    Piper Cherokee

    If you’re just a weekend flyer who is tired of dealing with flight school rentals, but you don’t need to carry a lot of people or go very far, your options are pretty numerous.  Anything from a Cessna 152 to a Piper Cherokee, maybe a Beech Sundowner, or a Bellanca Viking, or anything in between.  If you are content with taking a weekend hop for a hamburger at 100-110 knots, you have limitless options for airplanes.  Tailwheels (Cubs, Citabrias, Huskies) are excellent birds for you well.

    Getting Places Fast With Only You and Maybe One Passenger

    Need to go 200-300 miles fast and not worried about weight?  A Cirrus SR22T, a Columbia 400, or Cessna Corvalis might be just what you need.  Cruise speeds on those are all around 180-190 knots at 10,000 feet. All are oxygen equipped if you want more speed higher up, as the service ceilings are 25,000 feet.  Payloads run in the range of 400-500 pounds with full fuel.  All these have air conditioning options, too.

    Hauling More Weight, but Still Need the Speed?

    Cessna 206 Mission

    A little slower (150-170 knots) but a little bit more payload options are A36 & B36 Bonanzas, Piper Saratogas, Cessna 206s, or Cessna 210s might suit your fancy.  All come in turbo models if you are a high elevation dweller.  The Cessna 206 has been used for many years as cargo and people haulers in remote regions like Alaska, South America, and Africa.  I’ve even seen pictures of snowmobiles being carried in a 206.

    Tired of Oxygen Cannulas?

    The next step up from a Cirrus, Corvalis, or Saratoga is the Piper Malibu.  A bigger brother to the Saratoga, the different PA-46 models offer one of the best options for a single engine piston out there.  All except the Matrix (PA-46-350T) are pressurized, all the pistons cruise about 200 knots, and all are configured with club seating with plenty of leg room.  Useful loads range around 1200-1400 pounds (they hold 120 gallons of fuel, so payloads range from 480-680 pounds).  The original Malibu (PA-46-310P) only burns 16.5 GPH so that allows partial fuel to be carried to allow more people and bags.  All have 6 seats.

    Need to Carry Even More Weight?

    It’s time to get into the piston twin market, then.  A Cessna 414, a Cessna 421, a Cessna 340, a Beech Duke or a Beech Baron are all pretty good options here.  The 421 and the 414 have the largest cabins, while the Duke has the highest useful load.  Cruise speeds range from 200-220 knots, but the cabin is roomier and you get a few more pounds useful load than a piston single.  If you do get into a 421, get good training as they are equipped with Continental geared engines, which can be tricky to operate if you don’t know what you are doing.

    Need to Carry a Lot of People and Go Fast?

    Turboprops are the way to go for you.  King Airs have the most utility while  the Pilatus PC-12 is the cream of the single engine turboprop crop as you can put almost anything you want in it.  If you have 4-5 passengers, stay away from a Piper Meridian as you can’t carry a lot of weight.  Those are better for 2-3 passengers at the most (plus a pilot).  The TBM 900 is pricey, but fast (300-325 knots).  The original TBM 700 can be had for under a million bucks, you get 280 knots, and a very usable useful load.  You still can’t fill all 6 seats with full fuel, but you can do more with it then a Meridian.

    Have a Boatload of Money Sitting Around?

    A jet might be for you then.  Fuel, insurance, maintenance, and hangar costs are high, but jets will get you places real fast with room for all your friends and family.

    Gulfstream


  • Redbird Skyport Fly-In Rescheduled

    The Bluebonnet Fly-In at Redbird Skyport has been rescheduled due to weather and the recent flooding in San Marcos.  The new date for the Bluebonnet Fly-In will be Saturday, June 6th from 10am-4pm.

    Hank Gibson of Texas Top Aviation will still be presenting on Garmin 430/530 Approaches this Saturday at 2pm in the large conference room at Redbird.

  • Calm Wind Landings

    Some of a pilot’s favorite words are heard on the ATIS:  “Winds, Calm.”  These words set off all sorts of happy bells and hallelujah choruses.  Most pilots spend their lives fighting the winds.  On those rare days when the winds are calm, great happiness ensues.

    Limp Wind Sock

    But, are calm wind landings more complicated then everyone thinks?  Well, they can be if the proper planning doesn’t go into them.

    Let’s think about wind.  We have surface wind and we have winds aloft. Sometimes the surface winds are calm.  When this happens, certain airports have preferred calm wind runways which are supposed to be used in these conditions.  Winds aloft are almost never calm.  95% of the time, there is some kind of wind even 100-200 feet above the surface.

    Here is the question pilot’s face when coming into an airport with calm winds: which runway do I use?  Do I use the calm wind runway?  Do I use the runway that is easiest to enter the pattern for?  Do I use the one with the shortest taxi?

    A lot of technologically advanced aircraft have a wind indicator on the PFD. This tool is often forgotten in calm surface wind conditions.  On the contrary, this is probably the most important tool a pilot can have when figuring out which runway to use when the winds are reported calm.

    Here’s why.  That wind indicator is showing the pilot what the winds aloft are. The winds aloft should determine what runway is going to be used.  If the wind indicator is depicting a south wind, then a south runway should be used.  Even if it is a 5 knot wind at pattern altitude, it’ll still be a headwind coming in on final approach.  If the north facing runway is used, that same 5 knot headwind can blow an airplane halfway down the runway before the ground speed drops off enough for it to land.

    So, the next time you are coming into an airport and the winds are reported calm, take a look at your wind indicator on your PFD when deciding which runway to use.  It’ll probably save a few go arounds!

8 Comments

Leave a Reply

Your email address will not be published. Required fields are marked *