For years, there has been clamoring for airplanes to get rid of lead in piston engine Avgas. In the early 2000s, Thielert created a Jet A burning piston engine for Diamond Aircraft that gained some traction, but Thielert had internal issues and ended up declaring bankruptcy. Several other Jet A piston engines have come down the line since then to some success (Diamond is currently using 2 Austro manufactured Jet A piston engines on it’s DA62 and a Continental manufactured Jet piston on the new DA50).
The problem with a Jet A burning piston engine, though, is that those engines would be very expensive to put on existing airplanes, not to mention the cost of the STC alone.
Insert GAMI (General Aviation Modifications, Inc.), the famed Ada, Oklahoma company that championed turbo normalization, balanced injectors, and lean of peak operations. For those that have been to GAMI’s engine class, you know that these guys are at the very top of their game in engine knowledge.
In 2010, GAMI started the process of creating an Unleaded form of Avgas, terming it G100UL (the irony of traditional Avgas, 100LL, is the LL starts for low lead, but the lead levels in 100LL are actually quite high. UL stands for UnLeaded). Just before Osh Kosh in 2021, GAMI revealed that it’s work has come to fruition, gaining an STC for G100UL for Lycoming powered Cessna 172s.
The amazing thing about GAMI’s product is that it is able to mix with 100LL and not cause any issues. This means fuel trucks, fuel lines, fuel pumps, and aircraft fuel tanks don’t have to have any modifications to them to use G100UL. Plus, pilots will see longer engine life using G100UL because of the simple elimination of the lead. In tests, combustion chambers in cylinders burned cleaner, so theoretically, cylinders and engines will last a lot longer.
According to the company, GAMI has a few more tests to run and, assuming those go well, G100UL will be available for a whole lot more airplanes. An STC will still be required for the use of G100UL in a specific airplane, but the hope is, eventually, 100LL will be completely replaced by G100UL. The only downside is that G100UL is expected to cost about $1/gallon more than 100LL.
GAMI has partnered with Avfuel, so expect to see 100UL showing up at all Avfuel FBOs in the next year or two.
To read more, check out the press release on AOPA’s website.
Are you ready to take part in one of the most exciting Texas aviation events of the year? Registration is now open for the 2025 Texas Top Aviation Fly-In, happening March 26th-28th, 2025, at the stunning Lajitas Golf Resort in Lajitas, Texas.
Whether you’re a pilot looking for a getaway, wanting to make new pilot buddies, or just seeking a one-of-a-kind adventure, the 2025 Texas Top Aviation Fly-In promises an unparalleled blend of community, aviation instruction, and scenic Big Bend recreation. Not to mention, great golf!
Why You Should Register
As one of the top 2025 Texas aviation events, this Fly-In features:
Two rounds of golf at the #1-ranked Black Jack’s Crossing Golf Course
Aviation seminars from industry leaders
Making new friends and seeing old ones at our group dinners
Non-golfing activities, like Jeep rentals, exploring Big Bend, or relaxing at the Resort spa
Spaces are limited, so secure your spot now for our 6th Annual Fly-In!
Event Highlights
Fly-In Golf Tournament
Enjoy two rounds of golf at Black Jack’s Crossing Golf Course:
Round 1: March 26th, 2025, 1:30 PM
Round 2: March 27th, 2025, 1:30 PM
Aviation Seminars
Learn from top experts on Thursday morning, March 27th, 2025:
Paul New: Cirrus and Cessna mechanic
Scott Williams: Aviation attorney
Travis Ulhorn: San Antonio Air Traffic Controller
Community and Connection
Relax and connect at evening group dinners starting at 7:30 PM.
Pricing
$1,475 per person (2 nights + golf) + tax
$1,100 per person (2 nights, no golf) + tax
$475 for non-golfing spouse + tax
Registration includes lodging and golf; food and beverages will be billed directly to the attendee.
Key Details
Golfers: Arrive by noon, March 26th, 2025
Non-Golfers: Arrive by dinner on March 26th
Complimentary shuttles provided from Lajitas International Airport (T89)
Register Today
Don’t miss out on one of the best Texas aviation events of the year. Register now and be part of the 2025 Texas Top Aviation Fly-In. Spaces are limited, so don’t wait!
A common practice when ATC is setting an aircraft up for a visual approach is giving a clearance direct to the Final Approach Fix (FAF) for the approach for that runway. The theory is, the pilot will fly to the FAF, then he’ll pick up the airport and fly visually in. It is a handy way of setting the pilot up for a 5 mile straight in visual approach.
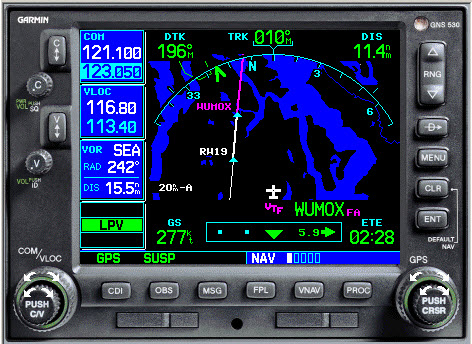
For anyone who flies with a Garmin GPS, whether is be a 430, a G1000, or a GTN 750, you have probably discovered a little nuance with going direct to the FAF. Once an approach is loaded into the flight plan, whether is is loaded via vectors or via an IAF, all the waypoints on the approach go into the flight plan. If the FAF is selected in the flight plan and the direct to command is given, the plane turns to the FAF and flies direct to it.
The fun starts once the plane gets to the FAF. The Garmin doesn’t sequence to the next waypoint. It just keeps the FAF as the active waypoint and the airplane just continues on the course it had to get to the FAF. This has probably caused some stress and frustration as the pilot is expecting the airplane to turn inbound (if the autopilot is engaged), but then it keeps flying, usually away from the runway.
How to fix this? If a Garmin GPS is closely inspected once the direct to the FAF command is selected, the pilot will notice that the GPS goes into Suspend mode. The Garmin programers thought this was a good idea to do.
How to get it to sequence properly? Well, once the FAF is the active waypoint and the airplane is flying direct to it, simply unsuspend the GPS, then the airplane will turn inbound on the final approach course and track inbound and the glide slope will pop up. On the 430 or 530, just press the OBS key. On the G1000, press SUSP. On the GTN 750, tap UNSUSP on the bottom of the unit.
Hopefully, this will lead to reduced frustration on what otherwise should be a simple approach to an airport.
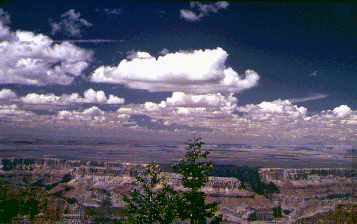
One of the first questions a student pilot asks me when starting the cross country portion of his or her training is, how do I know what altitude is best for my flight? This is a good question, because without taking certain aspects of the flight into account, it’s really just a crap shoot when selecting an altitude. Craps and flying don’t mix, so let’s take a look at a few considerations when selecting an altitude.
Sky Coverage
Sky coverage has several subcategories when it comes to selecting an altitude. First is how high are the bases? Is it IFR (VFR pilots would be grounded), marginal VFR (1,000 AGL to 3,000 AGL ceiling), or good VFR (above 3,000 AGL ceiling)? If the cloud deck is only 2,500 feet off the ground, then VFR pilots are limited to either 1,000 AGL to 2,000 AGL. This is an excellent segue into why VFR pilots shouldn’t scud run!
Second, what kind of cloud deck is it? Is it an actual ceiling (broken or overcast), or is it a scattered layer? Few or scattered layers usually allow VFR pilots to find a hole to get higher to some smoother air, making the flight more pleasant. VFR pilots, always make sure to check the destination weather as it could be scattered where you are departing from, but it might be broken or overcast where you are arriving.
Last, how high are the tops of the clouds? Pilots can only get this information in the planning stage from the area forecast or from pilot reports, so most of the time, it’s not very precise information. If the tops are at 10,000 feet and the pilot is flying a 172 on a 30 mile trip, it doesn’t make much sense to get on top of the clouds.
Terrain and Obstacles
Terrain goes hand in hand with sky coverage. If there are low clouds and high terrain, that doesn’t bode well for trying to stay VFR and not hitting anything. Obstacles need to be taken into account too, as there are some pretty tall radio towers that can stretch up into a 1,500-2,000 AGL deck of clouds.
Winds Aloft
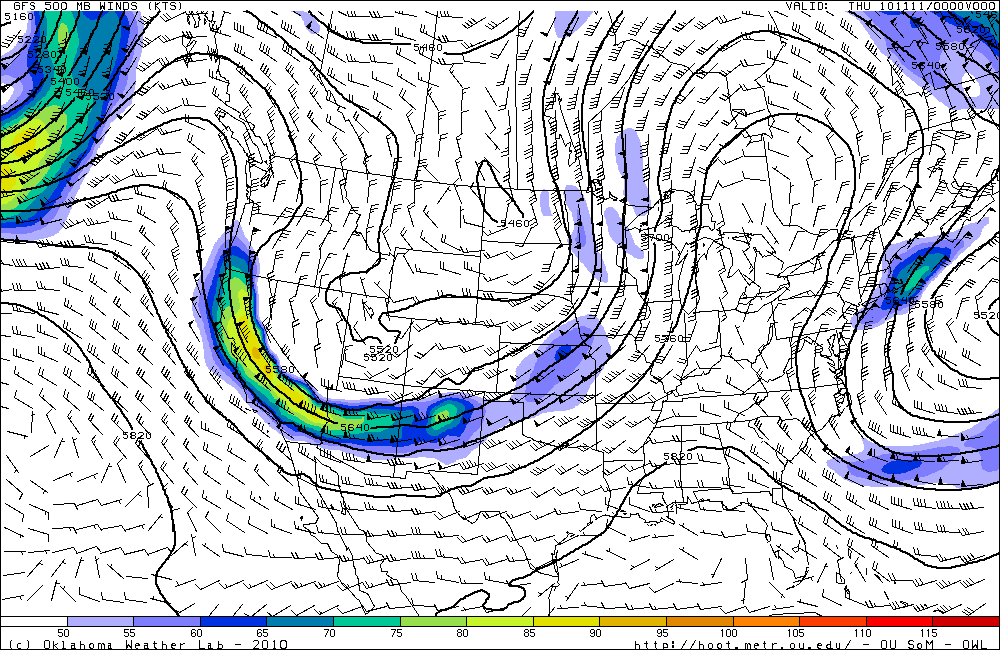
Once the sky coverage and terrain have been considered, it’s time to look at the winds aloft. Tailwinds are preferred, but, sometimes, a headwind is the only option. After taking the clouds and terrain into account, this narrows down your altitude to a handful of options. The winds aloft will further narrow it down.
Aircraft Performance
Once you have two or three altitudes in mind, taking a look at the performance charts for your airplane will help nail down that final altitude. Pull out the POH, compare fuel burn and cruise speed, and you’ll have your altitude selected.
Ever since I moved out to the Philadelphia area, the Hudson River corridor in New York City has become one my favorite places to fly. It’s hard to overstate the beauty of the city from low over the river. Every time I have a family member or friend come to visit, I try and take them over to see the city from the air.
Each time I fly up the river I can’t believe that we are actually allowed to do so, flying below the tops of the buildings and close enough that you feel that you could reach and out touch them. The draw back to the Hudson River Corridor is that it can be busy, intimidating, and confusing. However, with some reading and preparation, the Skyline flight is easy to do and extremely rewarding.
Having the right weather is an important first step. The second step is try to arrive during ideal lighting conditions. If possible, select a smooth, calm day to make it easier to maintain a track down the correct side of the river. I always try and target arrival at the city around sunset. The view is spectacular any time of day, but having the lights from the city while the sun is just setting gives the best viewing. I’ve also flown over and done the whole flight after dark, which is always spectacular.
View of the World Trade Center
The first method of flying the river is to utilize VFR flight following. If the controllers aren’t too busy, they will provide advisories to aircraft that request the Skyline. The nice thing about doing it this way is that the controller will clear you into the NY bravo airspace and keep you above the traffic flying the Skyline in the VFR corridor below. This is the method that I have always preferred as I enjoy the added benefit of the traffic advisories and it’s nice not to worry about position reporting on the radio.
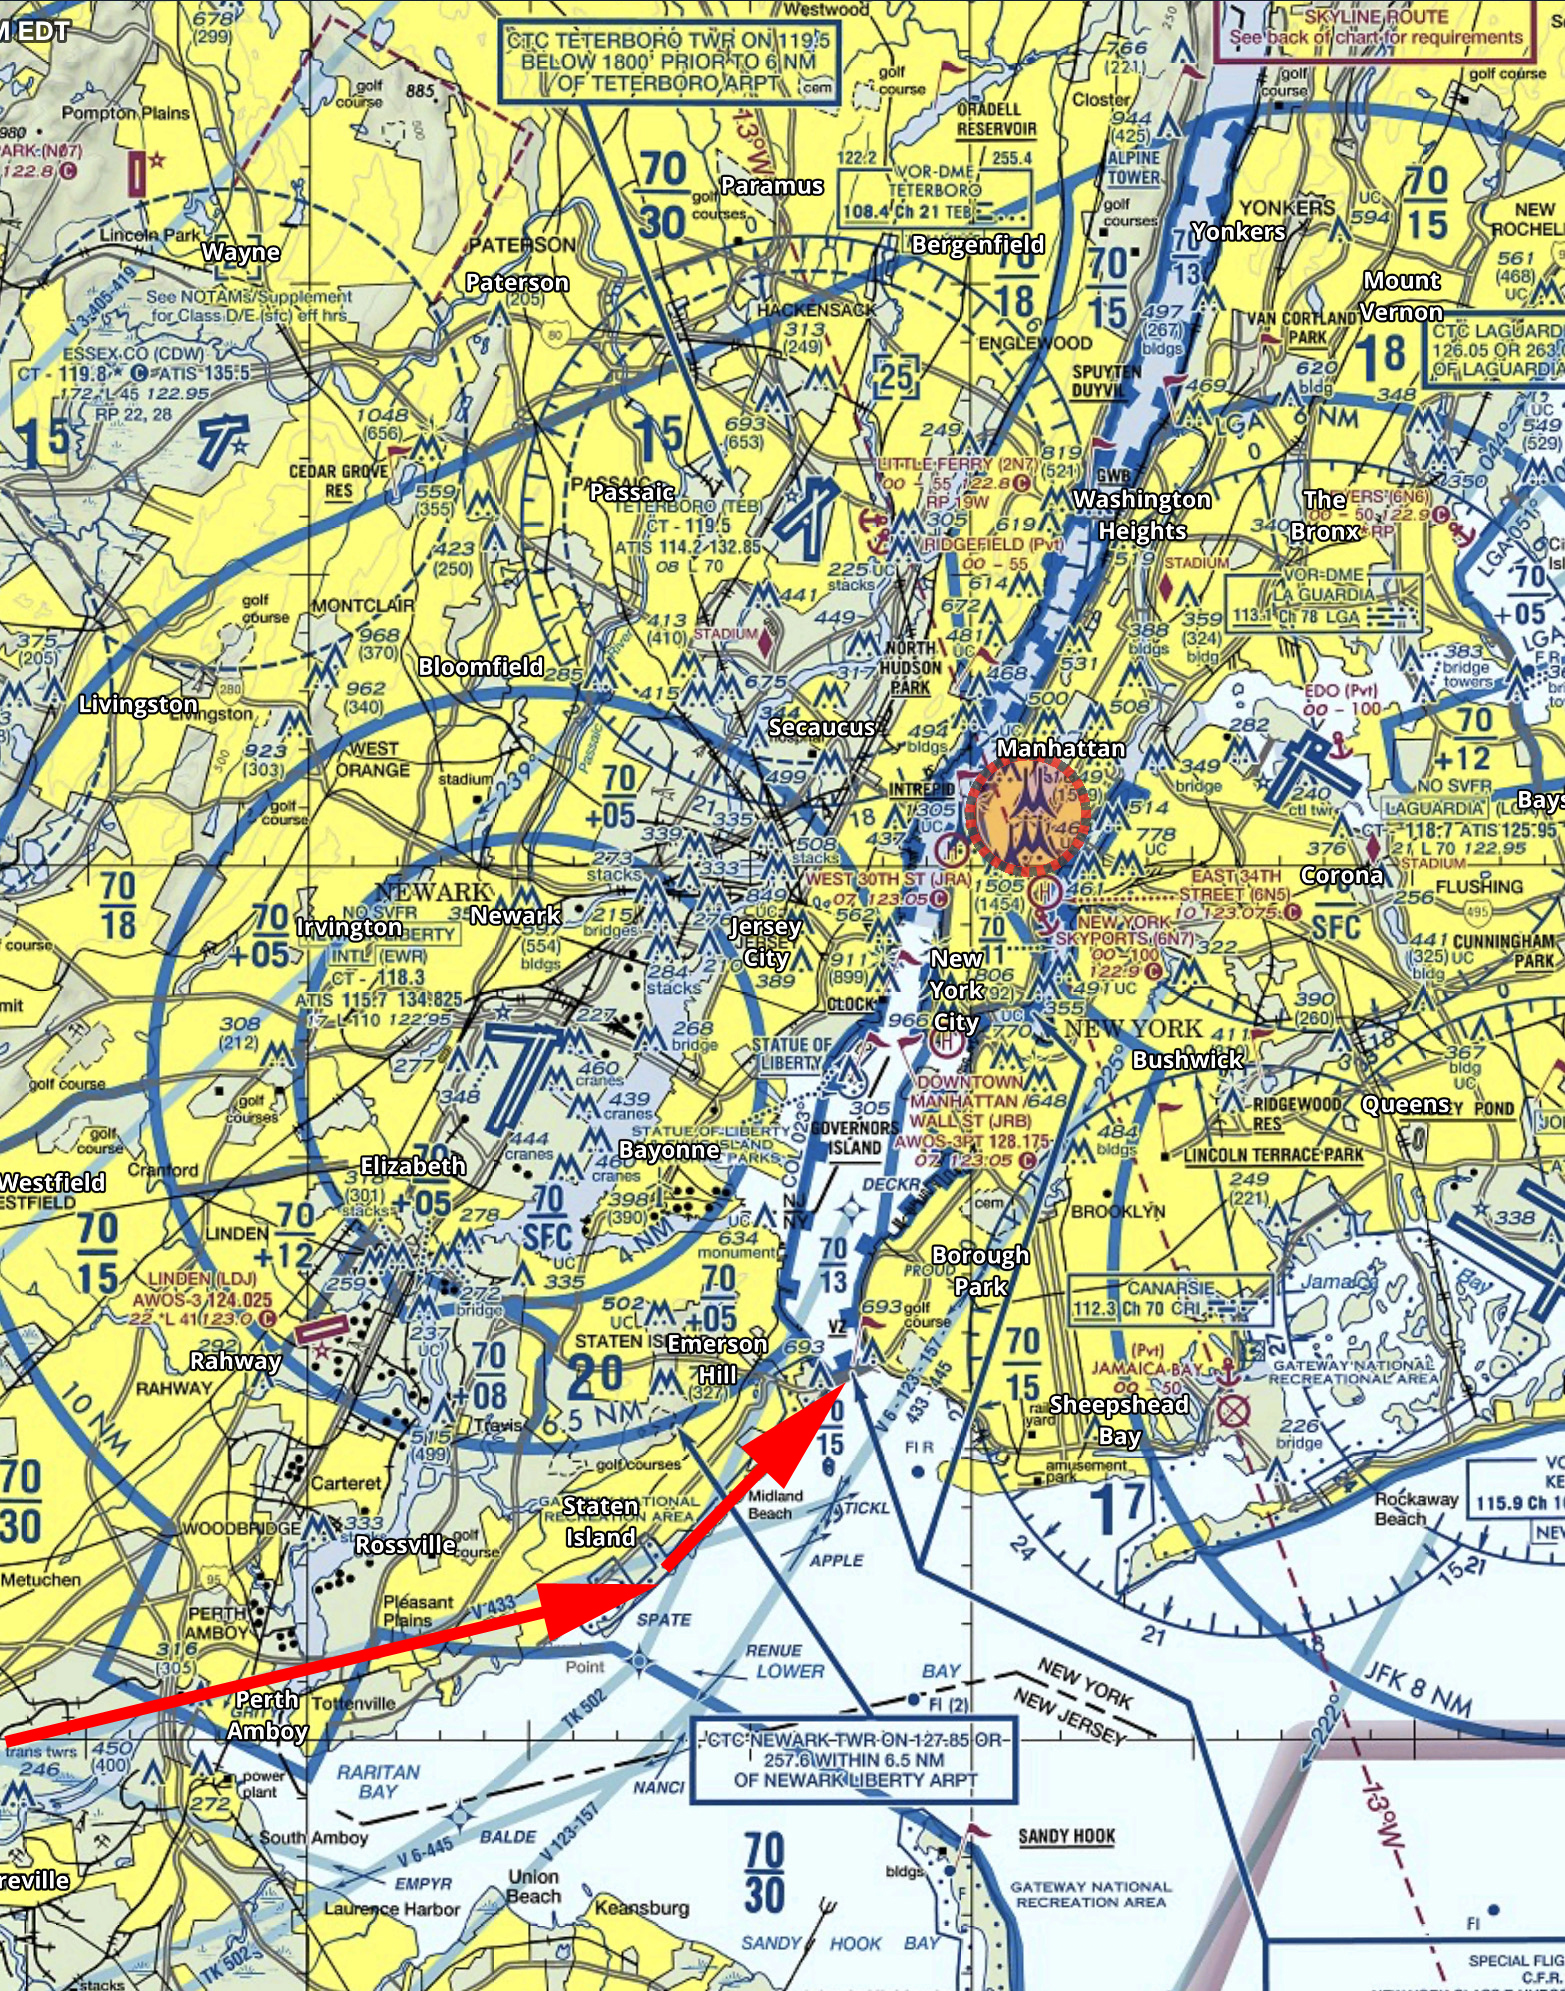
If you want to get flight following, head toward the corridor and request the Skyline route with NY Approach. (Remember to stay clear of the Bravo until you’re cleared in!) Once you’re cleared into the Bravo and approaching the corridor, they will hand you off to Newark/ LaGuardia Tower for traffic advisories over the river. I like to approach from the south and ask for a 180 over the George Washington Bridge. This allows me to fly past the city a second time before exiting the corridor over the VZ (Verrazano Bridge) and heading back toward home.
In red is the path I typically fly. I descend to 1400’ and fly toward the APPLE intersection picking up the shoreline around Staten Island and hugging it until crossing the middle of the VZ. Newark normally clears me into the Bravo at 1400’ or 1500’ to fly up the corridor.
Pros:
Better traffic Awareness
No position reports
Cons:
Flying slightly higher reduces the view
If the controllers are busy, they may deny your request for advisories
Can be intimidating to talk to NY Approach/ Newark/ LaGuardia
The other option is to fly in the VFR corridor. If you want to do it via this method there are just a few things you need to make sure you’re familiar with before you go. When in the VFR corridor you’ll need to make required position reports on a CTAF frequency. Make sure that you have the proper charts and have studied pictures of the landmarks so that you know what you’re looking for. I tend to plan on this as a backup in the event that the controllers won’t give me advisories.
Pros:
Doesn’t require talking to controllers/ class B clearance
More freedom to select altitude and routing as desired
Cons:
Less traffic awareness
Required position reporting
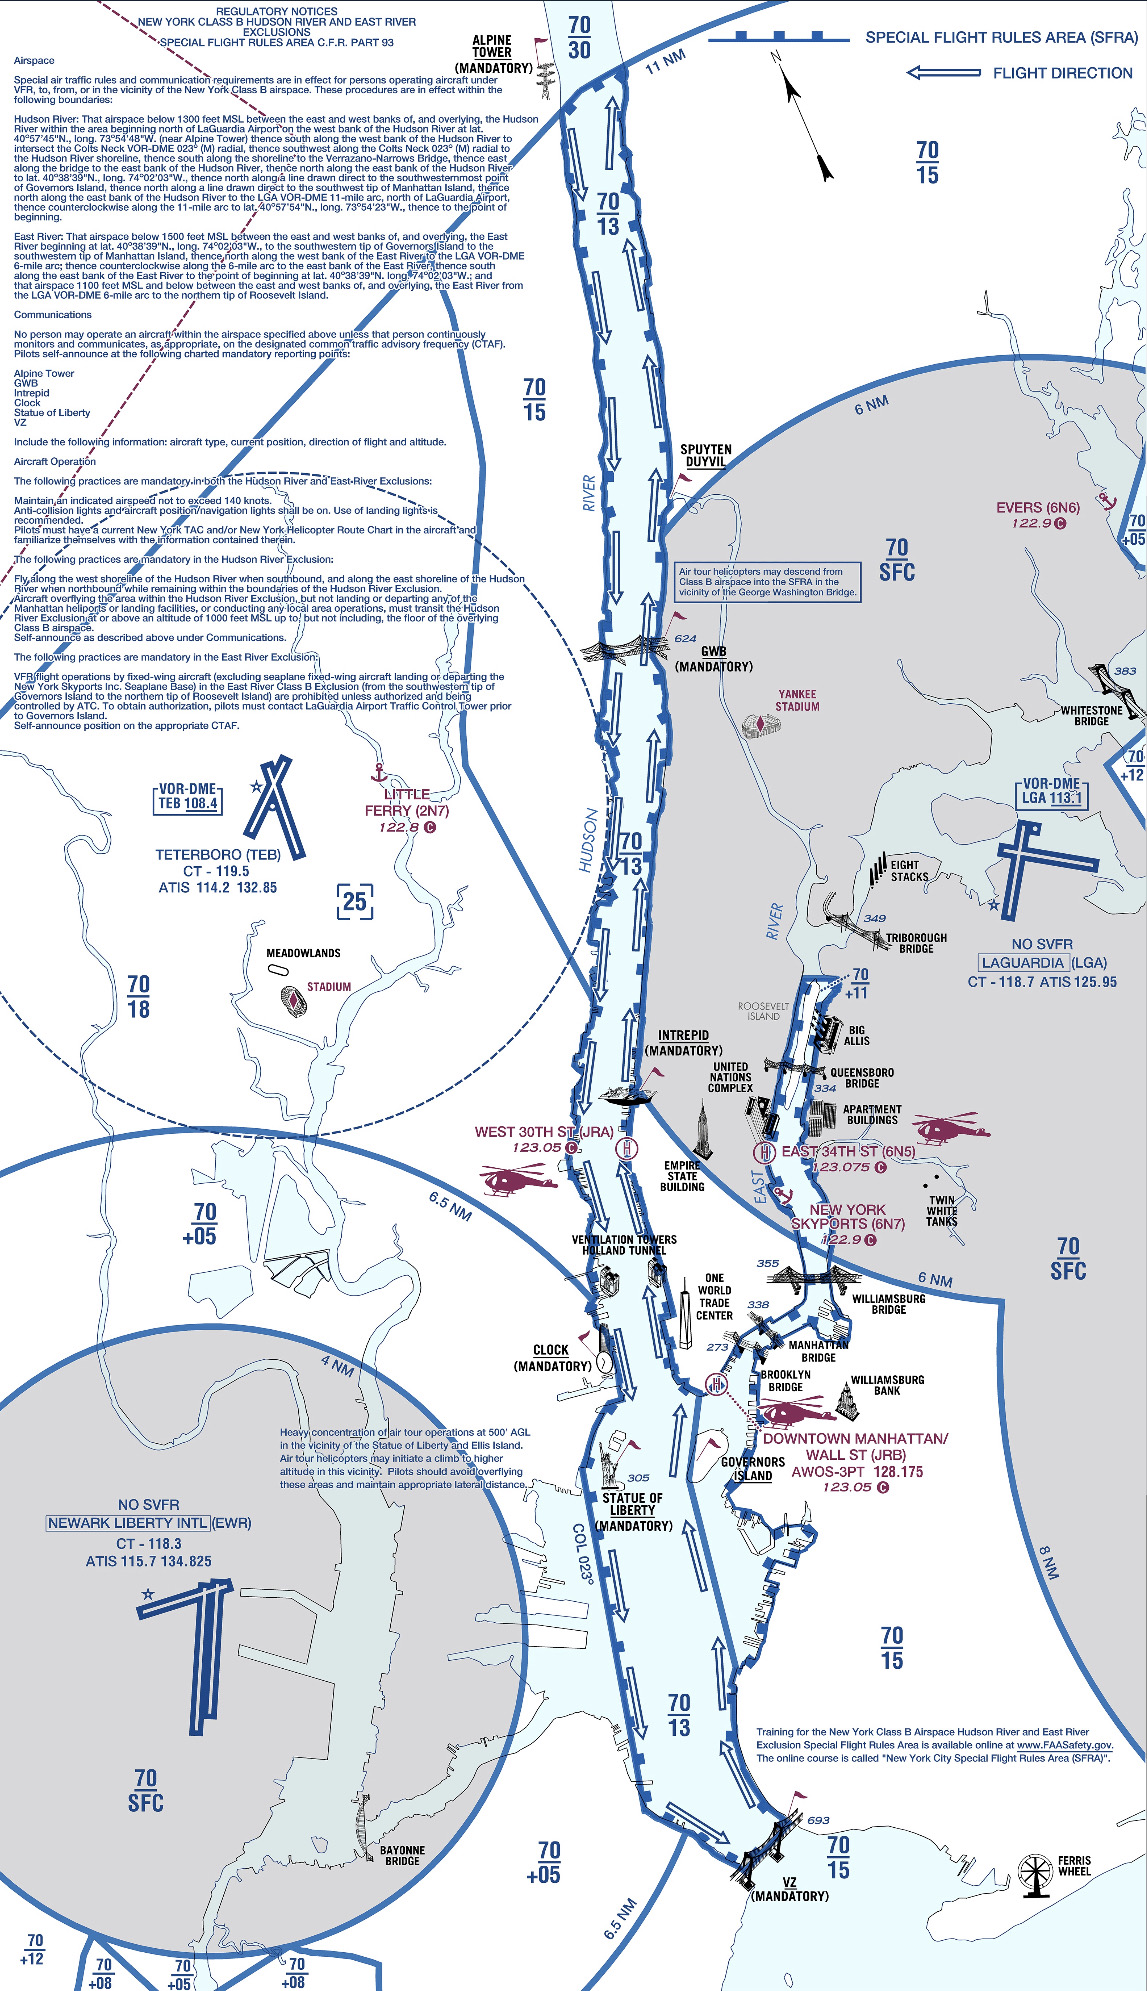
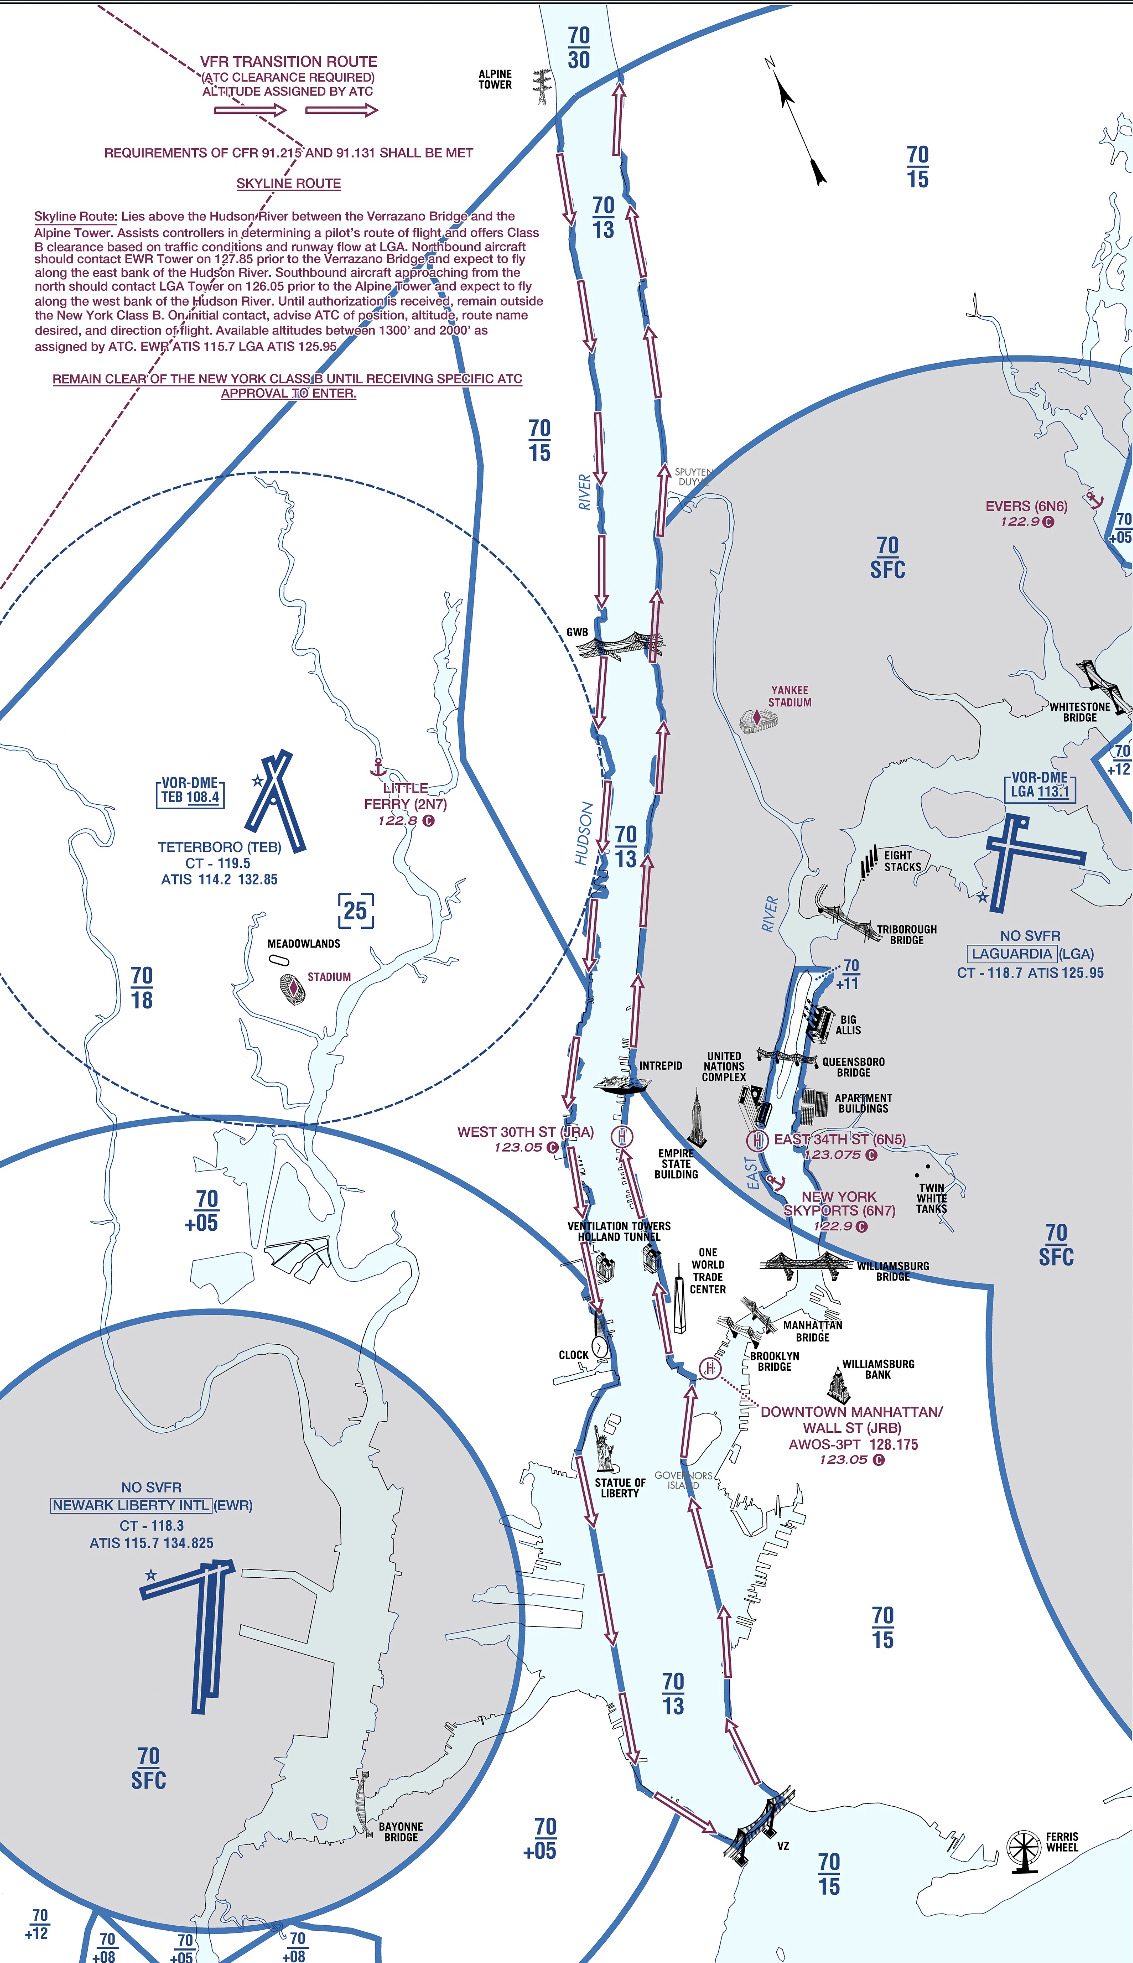
All the requirements and guidelines for flying the corridor can be found on the back of the NYC TAC chart. Any pilot flying the river is required to have one of these or a NYC helicopter route chart on board. If you’re using Foreflight, look in the Documents section under FAA Fly Charts and select the NYC TAC chart in order to read the back of page.
Below you’ll find examples of the diagrams/ instructions printed on the back of the NYC TAC charts.
You can see the traffic flow requires northbound airplanes to hug the east side of the river, while the southbound traffic stays on the west side. The VFR reporting positions (listed from North to South) are: Alpine Tower, George Washington Bridge, Intrepid aircraft carrier, Goldman Sachs (clock), Statue of Liberty, VZ (Verrazano Bridge). Each position report should include aircraft type, position, direction, and altitude.
Other things to be aware of: NYC is always a hotspot for TFR’s. There are often TFR’s for baseball games or presidential movements so make sure to check before you head that way. Additionally, there is a speed restriction in place of 140 kts, though I’m not sure why anyone sightseeing would want to go that fast anyhow.
I realize that all of the procedures and restrictions can be overwhelming, but with the proper preparation, the Hudson Skyline is one of the most incredible places in the world to operate an airplane. There are a lot of things that are easy to get excited about that don’t live up to expectation, but this isn’t one of them. I’ve never taken anyone to the river that wasn’t impressed by what they saw and that’s why I plan to keep going back.
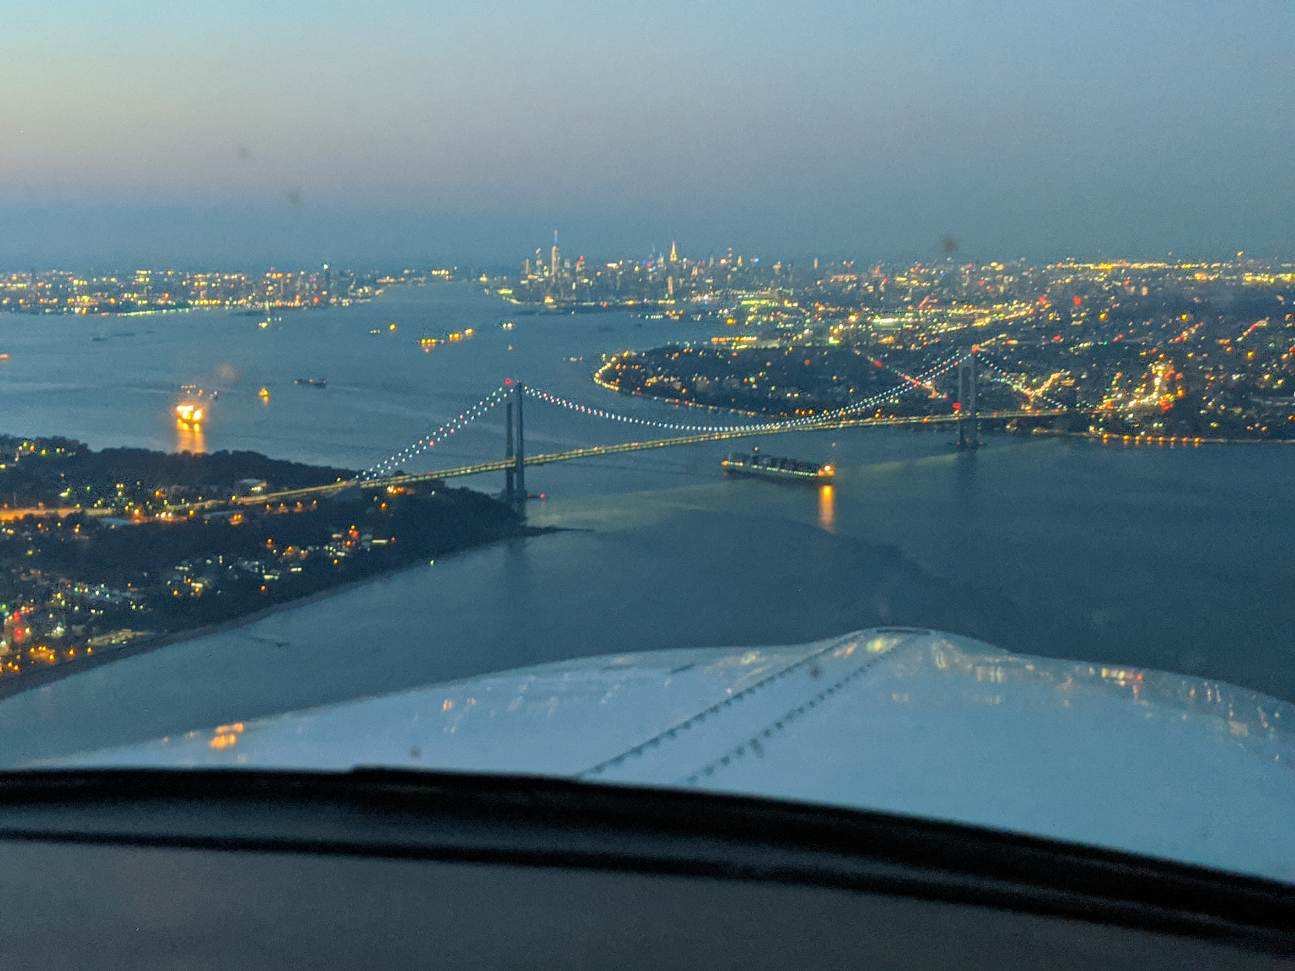
About to cross the VZ looking north toward the city
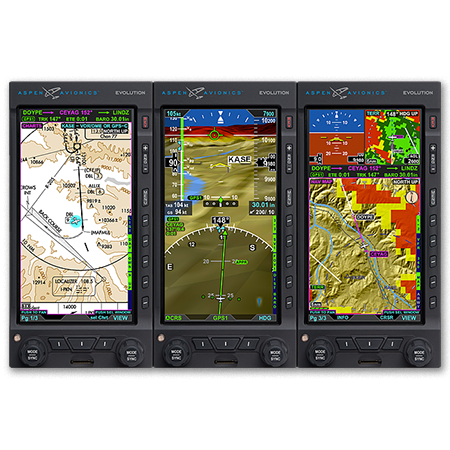
Have you looked longingly at the Aspen PFD or Garmin G500, imagining those beautiful glass panels set in your airplane? Think it’s too advanced for your flying skills? Well, think again! Hank Gibson of Texas Top Aviation will be hosting a seminar at the Redbird Skyport FBO at the San Marcos Airport (KHYI) on Thursday, September 25th at 7pm to enlighten everyone on all the different glass panel and modern GPS options out there.
No panel is too complex! No GPS is too complicated! Come hear about how you can upgrade your steam gauge airplane to a modern, glass panel cockpit that will be the envy of all your pilot buddies.
The seminar begins at 7pm in the large conference room at the Redbird Skyport. Come see this beautiful facility which hosted the AOPA Fly In this past April. There will be two drawings for free flight training in your airplane, so make sure you get your entry in once you arrive. WINGS credit will also be given.
Redbird welcomes pilots flying in for the event. If you are flying in, please show your support for Redbird by purchasing fuel!
Signup is required for the event. To sign up, please click here.
When it comes to turboprop engines, a hot start is a really bad thing. For you piston drivers out there thinking, “What’s the big deal, you are just starting a hot engine,” then here’s a little education for you.
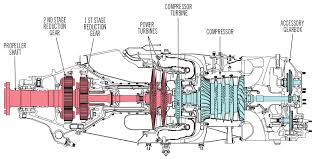
In a PT6 turboprop engine, there is a very important temperature gauge that a pilot monitors very closely during each and every start. It is called the Inter-Turbine Temperature gauge, or ITT. This temperature is a measurement of the exhaust gases between the compressor turbine and the power turbine (s). In the picture below, the probe is located where the blue and red colors meet.
In a turboprop engine, specifically the Pratt & Whitney PT-6 in all it’s different sizes and variations, there will always be a specific temperature that the pilot will want to keep the ITT below. This article will deal specifically with a Piper Meridian.
A Piper Meridian starts hotter than almost any other PT6 engine because of the way it’s air intake is designed. Unlike other turboprops, the Meridian has a permanently open inertial separator. This means that not all the intake air makes it to the engine during start because some of it goes out the inertial separator opening. So, coming to a Meridian from operating other turboprop engines can lead to a little bit of a surprise on the ITT temperature being higher than what a pilot is used to when starting.
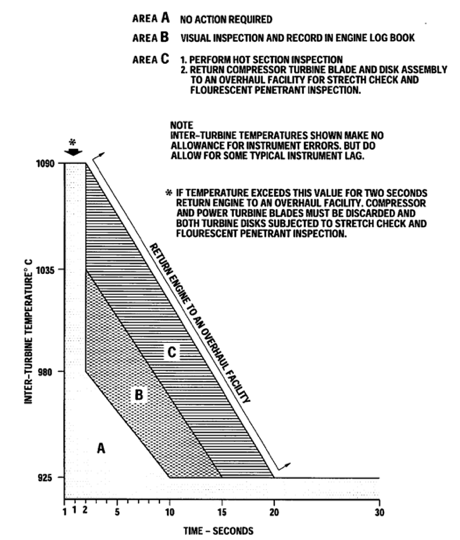
As a rule of thumb, when starting a Meridian, never let a start continue when the ITT hits 875 degrees. Based on the chart below, you are still in the safe zone at 875 and have about a 50 degree buffer before you have to start getting worried.
On cold starts with a good battery or a GPU, 875 is typically not an issue. Most starts when cold are going to be in the high 700s or low 800s. On a cold start, if you are seeing starts in the mid to upper 800s, try starting with a GPU and see if that lowers the start temperature. If it does, then that means your battery is weak and needs to be replaced. Another tell-tale sign of a weak batter is the Ng doesn’t spool up properly (meaning it settles around 12-13%) or takes a really long time to spool up. Also, never start on the battery with less than 24 volts.
When there are multiple flights in one day, the pilot has to take into consideration the warm engine prior to starting. If the ITT, prior to the start sequence, is above 150 degrees, it is time to do some motoring of the engine.
What is motoring? It is simply using the starter to turn the engine, which leads to air being sucked into the engine allowing the engine to cool off prior to start. The theory is, the cooler your engine prior to start, the cooler the ITT peaks at during start.
Here’s the steps on how to dry motor a Piper Meridian:
Battery on
Strobes on
Fuel Pumps and Ignition off
Throttle idle
Condition Lever feather/cutoff
Push the start button
Monitor the ITT temperature
Reaching 150 degrees, if less than 30 seconds have elapsed:
Fuel Pumps on
Ignition On
Condition Lever run
Reaching 150 degrees, if 30 seconds have elapsed:
Push Manual/Stop button to stop the start
Let starter rest for 30 seconds
The starter has a 30 second limit on the Meridian, followed by a 30 second rest period. You can do the sequence twice, then, after the 3rd start, there is a 30 minute rest period. Typically, if the ITT won’t cool down to 150 after the 3rd time, there is probably something wrong.
The most important thing a pilot can remember is never, ever push the condition lever forward if the ITT is above 150 degrees. You’ll be well on your way to avoiding hot starts that way.